Download
Содержание:
- Bootstrap Versions
- Как это работает
- Try it Yourself Examples
- Z-index
- Important globals
- Customizing the grid
- Alignment
- Important globals
- Печать
- Глобально важно
- Добавляем котиков
- Auto-layout columns
- Block buttons
- Sass
- Сообщество
- Vertical alignment
- Bootstrap 5 vs. Bootstrap 3 & 4
- Заводские Android браузеры
- Sass mixins
- Что такое Bootstrap
- Пропуск навигации
- Button plugin
- Community
- Quick start
- Responsive classes
- Important globals
- Anatomy
- Two Basic Bootstrap Pages
- Какую версию Bootstrap выбрать
- Процентное округления в Safari
Bootstrap Versions
This tutorial follows Bootstrap 3, which was released in 2013. However, we also cover newer versions; Bootstrap 4 (released 2018) and Bootstrap 5 (released 2021).
Bootstrap 5 is the newest version of Bootstrap;
with new components, faster stylesheets, more responsiveness etc. It supports the latest, stable releases of all major browsers and
platforms. However, Internet Explorer 11 and down is not supported.
The main differences between Bootstrap 5 and Bootstrap 3 & 4, is that
Bootstrap 5 has switched to JavaScript instead of jQuery.
Note: Bootstrap 3 and Bootstrap 4 is still supported by the team for critical bugfixes and documentation changes,
and it is perfectly safe to continue to use them. However, new features will NOT be added to
them.
Как это работает
На высоком уровне, блочная система работает так:
- Существует три основных компонента—контейнера, строки и столбцы.
- Контейнеры— для фиксированной ширины или на полную ширину—центрирует содержание вашего сайта и помогает выровнять содержание блока.
- «Rows» — горизонтальные группы столбцов, которые обеспечивают чтобы столбцы выстроились правильно.
- Контент должен быть помещен в столбцах, и только колонки могут быть непосредственными потомками строк.
- Классы столбце указано количество столбцов, которые вы хотите использовать из 12 возможных в ряду. Так что если вы хотите три равные ширины столбцов, нужно использовать .
- Столбец устанавливаются в процентах, так они всегда изменчивый и размерами по отношению к родительскому элементу.
- Столбцы имеют горизонтальную для создания промежутка между отдельными столбцами.
- Есть пять грид уровней, по одному для каждой : сверхмалые, малые, средние, большие, и очень большие.
- Грид уровни основываются на минимальной ширине, то есть они применяются к ярусу и всем, кто выше его (например, применим для малых, средних, больших, и очень больших устройств).
- Вы можете использовать предопределенные грид классов или Sass примеси для более семантической разметки.
Звучит хорошо? Отлично, давайте перейдем посмотрев все это на примерах.
Try it Yourself Examples
This Bootstrap tutorial contains hundreds of Bootstrap examples.
With our online editor, you can edit the code, and click on a button to view the result.
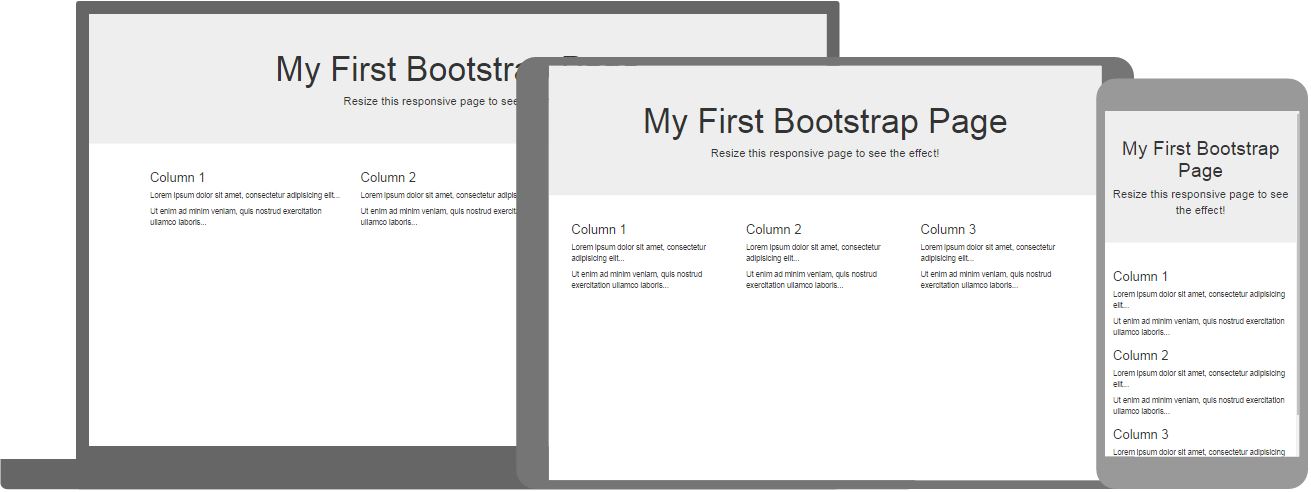
Bootstrap Example
<div class=»jumbotron text-center»> <h1>My First Bootstrap Page</h1> <p>Resize this responsive page to see the effect!</p> </div><div class=»container»> <div class=»row»>
<div class=»col-sm-4″> <h3>Column 1</h3> <p>Lorem ipsum
dolor..</p> </div> <div class=»col-sm-4″> <h3>Column 2</h3> <p>Lorem ipsum
dolor..</p> </div> <div class=»col-sm-4″> <h3>Column 3</h3> <p>Lorem ipsum
dolor..</p> </div> </div></div>
Click on the «Try it Yourself» button to see how it works.
Z-index
Several Bootstrap components utilize , the CSS property that helps control layout by providing a third axis to arrange content. We utilize a default z-index scale in Bootstrap that’s been designed to properly layer navigation, tooltips and popovers, modals, and more.
These higher values start at an arbitrary number, high and specific enough to ideally avoid conflicts. We need a standard set of these across our layered components—tooltips, popovers, navbars, dropdowns, modals—so we can be reasonably consistent in the behaviors. There’s no reason we couldn’t have used + or +.
We don’t encourage customization of these individual values; should you change one, you likely need to change them all.
To handle overlapping borders within components (e.g., buttons and inputs in input groups), we use low single digit values of , , and for default, hover, and active states. On hover/focus/active, we bring a particular element to the forefront with a higher value to show their border over the sibling elements.
Important globals
Bootstrap employs a handful of important global styles and settings that you’ll need to be aware of when using it, all of which are almost exclusively geared towards the normalization of cross browser styles. Let’s dive in.
HTML5 doctype
Bootstrap requires the use of the HTML5 doctype. Without it, you’ll see some funky incomplete styling, but including it shouldn’t cause any considerable hiccups.
Responsive meta tag
Bootstrap is developed mobile first, a strategy in which we optimize code for mobile devices first and then scale up components as necessary using CSS media queries. To ensure proper rendering and touch zooming for all devices, add the responsive viewport meta tag to your .
You can see an example of this in action in the .
Box-sizing
For more straightforward sizing in CSS, we switch the global value from to . This ensures does not affect the final computed width of an element, but it can cause problems with some third-party software like Google Maps and Google Custom Search Engine.
On the rare occasion you need to override it, use something like the following:
With the above snippet, nested elements—including generated content via and —will all inherit the specified for that .
Learn more about box model and sizing at CSS Tricks.
Reboot
For improved cross-browser rendering, we use Reboot to correct inconsistencies across browsers and devices while providing slightly more opinionated resets to common HTML elements.
Customizing the grid
Using our built-in grid Sass variables and maps, it’s possible to completely customize the predefined grid classes. Change the number of tiers, the media query dimensions, and the container widths—then recompile.
Columns and gutters
The number of grid columns can be modified via Sass variables. is used to generate the widths (in percent) of each individual column while sets the width for the column gutters.
Grid tiers
Moving beyond the columns themselves, you may also customize the number of grid tiers. If you wanted just four grid tiers, you’d update the and to something like this:
When making any changes to the Sass variables or maps, you’ll need to save your changes and recompile. Doing so will output a brand new set of predefined grid classes for column widths, offsets, and ordering. Responsive visibility utilities will also be updated to use the custom breakpoints. Make sure to set grid values in (not , , or ).
Alignment
Use flexbox alignment utilities to vertically and horizontally align columns.
Vertical alignment
One of three columns
One of three columns
One of three columns
One of three columns
One of three columns
One of three columns
One of three columns
One of three columns
One of three columns
One of three columns
One of three columns
One of three columns
Horizontal alignment
One of two columns
One of two columns
One of two columns
One of two columns
One of two columns
One of two columns
One of two columns
One of two columns
One of two columns
One of two columns
No gutters
The gutters between columns in our predefined grid classes can be removed with . This removes the negative s from and the horizontal from all immediate children columns.
Here’s the source code for creating these styles. Note that column overrides are scoped to only the first children columns and are targeted via attribute selector. While this generates a more specific selector, column padding can still be further customized with spacing utilities.
Need an edge-to-edge design? Drop the parent or .
In practice, here’s how it looks. Note you can continue to use this with all other predefined grid classes (including column widths, responsive tiers, reorders, and more).
.col-12 .col-sm-6 .col-md-8
.col-6 .col-md-4
Column wrapping
If more than 12 columns are placed within a single row, each group of extra columns will, as one unit, wrap onto a new line.
.col-9
.col-4Since 9 + 4 = 13 > 12, this 4-column-wide div gets wrapped onto a new line as one contiguous unit.
.col-6Subsequent columns continue along the new line.
Column breaks
Breaking columns to a new line in flexbox requires a small hack: add an element with wherever you want to wrap your columns to a new line. Normally this is accomplished with multiple s, but not every implementation method can account for this.
.col-6 .col-sm-3
.col-6 .col-sm-3
.col-6 .col-sm-3
.col-6 .col-sm-3
You may also apply this break at specific breakpoints with our responsive display utilities.
.col-6 .col-sm-4
.col-6 .col-sm-4
.col-6 .col-sm-4
.col-6 .col-sm-4
Important globals
Bootstrap employs a handful of important global styles and settings that you’ll need to be aware of when using it, all of which are almost exclusively geared towards the normalization of cross browser styles. Let’s dive in.
HTML5 doctype
Bootstrap requires the use of the HTML5 doctype. Without it, you’ll see some funky incomplete styling, but including it shouldn’t cause any considerable hiccups.
Responsive meta tag
Bootstrap is developed mobile first, a strategy in which we optimize code for mobile devices first and then scale up components as necessary using CSS media queries. To ensure proper rendering and touch zooming for all devices, add the responsive viewport meta tag to your .
You can see an example of this in action in the .
Box-sizing
For more straightforward sizing in CSS, we switch the global value from to . This ensures does not affect the final computed width of an element, but it can cause problems with some third party software like Google Maps and Google Custom Search Engine.
On the rare occasion you need to override it, use something like the following:
With the above snippet, nested elements—including generated content via and —will all inherit the specified for that .
Learn more about box model and sizing at CSS Tricks.
Reboot
For improved cross-browser rendering, we use Reboot to correct inconsistencies across browsers and devices while providing slightly more opinionated resets to common HTML elements.
Печать
Даже в некоторых современных браузерах, для обеспечения печати приходится изловчиться.
В частности, в Chrome версии 32 независимо от параметров отступов и размеров полей, Chrome при печати использует значительно более узкую область просмотра, чем физический размер бумаги при отображении медиа запросов. Это может привести к тому, при печати Bootstrap неожиданно активирует очень мелкую сетку. и Ошибке Chrome #273306. Рекомендуемые обходные пути:
- Примените extra-small разметку и убедитесь, что ваша страница выглядит приемлемо.
- Настройка значения Less переменных, чтобы ваш бумага для принтера рассматривалась больше, чем extra-small.
- Добавить Пользовательское медиа запросы изменение грид Размер точки останова для печати медиа только.
Также, как Сафари и v8.0, фиксированной ширины может вызвать Сафари использовать необычайно маленький размер шрифта при печати. См. #14868 и В WebKit ошибка #138192 Для более подробной информации. Одним из возможных обойти это, добавив следующие CSS:
Глобально важно
Bootstrap использует несколько важных глобальных стилей и настроек, о которых Вам нужно знать при его использовании. Все они почти исключительно направлены на нормализацию кроссбраузерных стилей. Давайте погрузимся.
Тип текущего документа
Bootstrap требует использования doctype HTML5. Без него Вы увидите несколько забавных неполных стилей, но его включение не должно вызывать каких-либо серьезных сбоев.
Адаптивный метатег
Bootstrap разработан mobile first (сначала мобильный), стратегия, в которой мы сначала оптимизируем код для мобильных устройств, а затем масштабируем компоненты по мере необходимости с помощью медиа-запросов CSS. Чтобы обеспечить правильный рендеринг и сенсорное масштабирование для всех устройств, добавьте метатег адаптивного окна просмотра (viewport) к Вашему .
Вы можете увидеть пример этого в действии в .
Свойство Box-sizing
Для более простого изменения размеров в CSS мы переключаем глобальное значение с на . Это гарантирует, что не влияет на окончательную вычисленную ширину элемента, но может вызвать проблемы с некоторым сторонним программным обеспечением, таким как Google Maps и Google Custom Search Engine.
В редких случаях Вам нужно переопределить его, используйте что-то вроде следующего:
В приведенном выше фрагменте все вложенные элементы, включая сгенерированный контент с помощью и будут наследовать указанный для этого .
Узнайте больше о коробочной модели и размерах на сайте CSS Tricks.
Перезагрузка
Для улучшения кроссбраузерности рендеринга мы используем Reboot, чтобы исправить несоответствия между браузерами и устройствами, обеспечивая при этом несколько более самоуверенный сброс общих элементов HTML.
Добавляем котиков
Мы добавим в статью изображения котиков и посмотрим, как движок сам будет ими управлять в зависимости от размера экрана.
Сначала код, который мы поместим тоже в новый контейнер:
Если мы вставим это в наш шаблон страницы, вместе с первой частью кода, то увидим, что картинки расползлись и занимают слишком много места. Дело в том, что для браузера размер картинок сейчас важнее, чем размеры сетки Бутстрапа — котики как бы разрывают нашу страницу. Нужно это исправить:
Чтобы котики уважали ширину ячеек, в которые их засовывают, пропишем в CSS-стилях специальную команду для тега <img>. Команда должна сказать, чтобы ширина картинки была не больше, чем максимальный размер блока, который под неё выделили:
Этот код нужно вставить в начало страницы между тегами и .
Теперь всё нормально: картинка занимает максимальную ширину, которую ей даёт занять сетка Бутстрапа. Давайте посмотрим, что произойдёт при изменении размеров браузера:
Auto-layout columns
Utilize breakpoint-specific column classes for easy column sizing without an explicit numbered class like .
Equal-width
For example, here are two grid layouts that apply to every device and viewport, from to . Add any number of unit-less classes for each breakpoint you need and every column will be the same width.
1 of 2
2 of 2
1 of 3
2 of 3
3 of 3
Setting one column width
Auto-layout for flexbox grid columns also means you can set the width of one column and have the sibling columns automatically resize around it. You may use predefined grid classes (as shown below), grid mixins, or inline widths. Note that the other columns will resize no matter the width of the center column.
1 of 3
2 of 3 (wider)
3 of 3
1 of 3
2 of 3 (wider)
3 of 3
Variable width content
Use classes to size columns based on the natural width of their content.
1 of 3
Variable width content
3 of 3
1 of 3
Variable width content
3 of 3
Create responsive stacks of full-width, “block buttons” like those in Bootstrap 4 with a mix of our display and gap utilities. By using utilities instead of button specific classes, we have much greater control over spacing, alignment, and responsive behaviors.
Button
Button
Here we create a responsive variation, starting with vertically stacked buttons until the breakpoint, where replaces the class, thus nullifying the utility. Resize your browser to see them change.
Button
Button
You can adjust the width of your block buttons with grid column width classes. For example, for a half-width “block button”, use . Center it horizontally with , too.
Button
Button
Additional utilities can be used to adjust the alignment of buttons when horizontal. Here we’ve taken our previous responsive example and added some flex utilities and a margin utility on the button to right align the buttons when they’re no longer stacked.
Button
Button
Sass
Одним из ограничений CSS Grid является то, что наши классы по умолчанию по-прежнему генерируются двумя переменными Sass: и . Это фактически предопределяет количество классов, сгенерированных в нашем скомпилированном CSS. У вас есть два варианта:
- Измените эти переменные Sass по умолчанию и перекомпилируйте свой CSS.
- Используйте встроенные или настраиваемые стили для расширения предоставленных классов.
Например, вы можете увеличить количество столбцов и изменить размер зазора, а затем изменить размер «столбцов» с помощью сочетания встроенных стилей и предопределенных классов столбцов таблицы CSS (например, ).
14 колонок
.g-col-4
Сообщество
Будьте в курсе развития Bootstrap и обращайтесь к сообществу с помощью этих полезных ресурсов.
- Обсуждайте в чате Telegram @getbootstrap_ru.
- Читайте и подписывайтесь на Официальный блог Bootstrap.
- Присоединиться к официальной комнате Slack.
- Общайтесь с другими Bootstrappers в IRC. На сервере , в канале .
- Справку по реализации можно найти на сайте Stack Overflow (с тегом ).
- Разработчикам следует использовать ключевое слово в пакетах, которые изменяют или расширяют функциональность Bootstrap при распространении через npm или аналогичные механизмы доставки для максимальной узнаваемости.
Вы также можете следить за @getbootstrap в Твиттере, чтобы следить за последними слухами и потрясающими музыкальными клипами.
Vertical alignment
Table cells of are always vertical aligned to the bottom. Table cells in inherit their alignment from and are aligned to the the top by default. Use the vertical align classes to re-align where needed.
| Heading 1 | Heading 2 | Heading 3 | Heading 4 |
|---|---|---|---|
| This cell inherits from the table | This cell inherits from the table | This cell inherits from the table | This here is some placeholder text, intended to take up quite a bit of vertical space, to demonstrate how the vertical alignment works in the preceding cells. |
| This cell inherits from the table | This cell inherits from the table | This cell is aligned to the top. | This here is some placeholder text, intended to take up quite a bit of vertical space, to demonstrate how the vertical alignment works in the preceding cells. |
Bootstrap 5 vs. Bootstrap 3 & 4
This tutorial follows Bootstrap 3, which was released in 2013. However, we also cover newer versions; Bootstrap 4 (released 2018) and Bootstrap 5 (released 2021).
Bootstrap 5 is the newest version of Bootstrap;
with new components, faster stylesheets, more responsiveness etc. It supports the latest, stable releases of all major browsers and
platforms. However, Internet Explorer 11 and down is not supported.
The main differences between Bootstrap 5 and Bootstrap 3 & 4, is that
Bootstrap 5 has switched to JavaScript instead of jQuery.
Note: Bootstrap 3 and Bootstrap 4 is still supported by the team for critical bugfixes and documentation changes,
and it is perfectly safe to continue to use them. However, new features will NOT be added to
them.
Заводские Android браузеры
Из коробки, Android 4.1 (и даже некоторые новые версии) ставят приложение Браузера в качестве веб-браузера по умолчанию(в отличие от Chrome). К сожалению, стандартные браузеры имеют множество ошибок и несоответствий с CSS в целом.
Меню выбора
На элементе, в Android браузере не будет отображаться элементы управления если есть и/или . (Смотри этот вопросы на StackOverflow более детально.) Используйте фрагмент кода ниже, чтобы удалить этот CSS и сделать элемент без стиля на Android браузере. Избегать недовольство юзера помогает использование браузеров: Chrome, Safari и Mozilla.
Хотите увидеть пример? Проверьте это JS Bin demo.
Sass mixins
When using Bootstrap’s source Sass files, you have the option of using Sass variables and mixins to create custom, semantic, and responsive page layouts. Our predefined grid classes use these same variables and mixins to provide a whole suite of ready-to-use classes for fast responsive layouts.
Variables
Variables and maps determine the number of columns, the gutter width, and the media query point at which to begin floating columns. We use these to generate the predefined grid classes documented above, as well as for the custom mixins listed below.
Example usage
You can modify the variables to your own custom values, or just use the mixins with their default values. Here’s an example of using the default settings to create a two-column layout with a gap between.
Main content
Secondary content
Что такое Bootstrap
Бутстрап — это фреймворк для создания сайтов. У него много полезных возможностей: показывать всплывающие окна, выводить кнопки и ошибки, рисовать выпадающие меню и многое другое. В обычной жизни на программирование всей этой красоты могли бы уйти часы, в Бутстрапе это уже реализовано.
Самое полезное для нас сейчас — адаптивная многоколоночная вёрстка Бутстрапа. Что она нам даёт:
- Можно красиво сверстать сайт, чтобы слева было меню, по центру основная колонка, справа ещё поле для рекламы. Или сделать сайт из трёх, четырёх, шести колонок — как Pinterest.
- Можно научить колонки сайта скрываться или менять размер в зависимости от размера экрана. Например, на большом экране выводить боковые колонки, а на маленьком — нет.
- Можно не особо думать о шрифтах, размерах и отступах: даже стандартная настройка Бутстрапа уже работает довольно неплохо.
- Не нужно думать, как всё это будет вести себя на мобильных устройствах, — всё адаптируется само.
Пропуск навигации
Благодаря давнему недостатки/ошибки в Chrome (см. вопрос 262171 в хром багтрекер) и Internet Explorer (см. эту статью на ссылки и фокус того), Вы должны убедиться, что цель вашей ссылке пропустить хотя бы программно фокусируемый, добавив .
Кроме того, может потребоваться явно подавляет видимый фокусировки на мишени (в частности, хром в настоящее время также устанавливает фокус на элементах с при щелчке мышкой) с .
Обратите внимание, что эта ошибка также влияет на другие ссылки вашего сайта могут использовать, делая их бесполезными для пользователей клавиатуры. Вы можете рассмотреть вопрос о включении аналогичного затычка исправить все другие именованные анкеры / идентификаторы фрагментов, которые выступают в качестве цели ссылки
Button plugin
The button plugin allows you to create simple on/off toggle buttons.
Visually, these toggle buttons are identical to the . However, they are conveyed differently by assistive technologies: the checkbox toggles will be announced by screen readers as “checked”/“not checked” (since, despite their appearance, they are fundamentally still checkboxes), whereas these toggle buttons will be announced as “button”/“button pressed”. The choice between these two approaches will depend on the type of toggle you are creating, and whether or not the toggle will make sense to users when announced as a checkbox or as an actual button.
Toggle states
Add to toggle a button’s state. If you’re pre-toggling a button, you must manually add the class and to ensure that it is conveyed appropriately to assistive technologies.
Toggle button
Active toggle button
Disabled toggle button
Disabled toggle link
Methods
You can create a button instance with the button constructor, for example:
| Method | Description |
|---|---|
| Toggles push state. Gives the button the appearance that it has been activated. | |
| Destroys an element’s button. (Removes stored data on the DOM element) | |
| Static method which allows you to get the button instance associated to a DOM element, you can use it like this: | |
|
Static method which returns a button instance associated to a DOM element or create a new one in case it wasn’t initialized. You can use it like this: |
For example, to toggle all buttons
Community
Stay up to date on the development of Bootstrap and reach out to the community with these helpful resources.
- Read and subscribe to The Official Bootstrap Blog.
- Join the official Slack room.
- Chat with fellow Bootstrappers in IRC. On the server, in the channel.
- Implementation help may be found at Stack Overflow (tagged ).
- Developers should use the keyword on packages that modify or add to the functionality of Bootstrap when distributing through npm or similar delivery mechanisms for maximum discoverability.
You can also follow @getbootstrap on Twitter for the latest gossip and awesome music videos.
Quick start
Looking to quickly add Bootstrap to your project? Use jsDelivr, a free open source CDN. Using a package manager or need to download the source files? Head to the downloads page.
JS
Many of our components require the use of JavaScript to function. Specifically, they require our own JavaScript plugins and Popper. Place one of the following s near the end of your pages, right before the closing tag, to enable them.
Bundle
Include every Bootstrap JavaScript plugin and dependency with one of our two bundles. Both and include Popper for our tooltips and popovers. For more information about what’s included in Bootstrap, please see our section.
Separate
If you decide to go with the separate scripts solution, Popper must come first (if you’re using tooltips or popovers), and then our JavaScript plugins.
Components
Curious which components explicitly require our JavaScript and Popper? Click the show components link below. If you’re at all unsure about the general page structure, keep reading for an example page template.
Show components requiring JavaScript
- Alerts for dismissing
- Buttons for toggling states and checkbox/radio functionality
- Carousel for all slide behaviors, controls, and indicators
- Collapse for toggling visibility of content
- Dropdowns for displaying and positioning (also requires Popper)
- Modals for displaying, positioning, and scroll behavior
- Navbar for extending our Collapse plugin to implement responsive behavior
- Toasts for displaying and dismissing
- Tooltips and popovers for displaying and positioning (also requires Popper)
- Scrollspy for scroll behavior and navigation updates
Responsive classes
Bootstrap’s grid includes six tiers of predefined classes for building complex responsive layouts. Customize the size of your columns on extra small, small, medium, large, or extra large devices however you see fit.
All breakpoints
For grids that are the same from the smallest of devices to the largest, use the and classes. Specify a numbered class when you need a particularly sized column; otherwise, feel free to stick to .
col
col
col
col
col-8
col-4
Stacked to horizontal
Using a single set of classes, you can create a basic grid system that starts out stacked and becomes horizontal at the small breakpoint ().
col-sm-8
col-sm-4
Mix and match
Don’t want your columns to simply stack in some grid tiers? Use a combination of different classes for each tier as needed. See the example below for a better idea of how it all works.
.col-md-8
.col-6 .col-md-4
.col-6 .col-md-4
.col-6 .col-md-4
.col-6 .col-md-4
.col-6
.col-6
Row columns
Use the responsive classes to quickly set the number of columns that best render your content and layout. Whereas normal classes apply to the individual columns (e.g., ), the row columns classes are set on the parent as a default for contained columns. With you can give the columns their natural width.
Use these row columns classes to quickly create basic grid layouts or to control your card layouts and override when needed at the column level.
Column
Column
Column
Column
Column
Column
Column
Column
Column
Column
Column
Column
Column
Column
Column
Column
Column
Column
Column
Column
Column
Column
Column
Column
Column
Column
Column
Column
Column
Column
Column
Column
Column
Column
Column
Column
You can also use the accompanying Sass mixin, :
Important globals
Bootstrap employs a handful of important global styles and settings that you’ll need to be aware of when using it, all of which are almost exclusively geared towards the normalization of cross browser styles. Let’s dive in.
HTML5 doctype
Bootstrap requires the use of the HTML5 doctype. Without it, you’ll see some funky incomplete styling, but including it shouldn’t cause any considerable hiccups.
Responsive meta tag
Bootstrap is developed mobile first, a strategy in which we optimize code for mobile devices first and then scale up components as necessary using CSS media queries. To ensure proper rendering and touch zooming for all devices, add the responsive viewport meta tag to your .
You can see an example of this in action in the .
Box-sizing
For more straightforward sizing in CSS, we switch the global value from to . This ensures does not affect the final computed width of an element, but it can cause problems with some third-party software like Google Maps and Google Custom Search Engine.
On the rare occasion you need to override it, use something like the following:
With the above snippet, nested elements—including generated content via and —will all inherit the specified for that .
Learn more about box model and sizing at CSS Tricks.
Reboot
For improved cross-browser rendering, we use Reboot to correct inconsistencies across browsers and devices while providing slightly more opinionated resets to common HTML elements.
Anatomy
Table head
Similar to tables and dark tables, use the modifier classes or to make s appear light or dark gray.
| # | First | Last | Handle |
|---|---|---|---|
| 1 | Mark | Otto | @mdo |
| 2 | Jacob | Thornton | @fat |
| 3 | Larry | the Bird |
| # | First | Last | Handle |
|---|---|---|---|
| 1 | Mark | Otto | @mdo |
| 2 | Jacob | Thornton | @fat |
| 3 | Larry | the Bird |
Captions
A functions like a heading for a table. It helps users with screen readers to find a table and understand what it’s about and decide if they want to read it.
| # | First | Last | Handle |
|---|---|---|---|
| 1 | Mark | Otto | @mdo |
| 2 | Jacob | Thornton | @fat |
| 3 | Larry the Bird |
You can also put the on the top of the table with .
| # | First | Last | Handle |
|---|---|---|---|
| 1 | Mark | Otto | @mdo |
| 2 | Jacob | Thornton | @fat |
| 3 | Larry | the Bird |
Two Basic Bootstrap Pages
The following example shows the code for a basic Bootstrap page (with a responsive fixed width container):
Example
<!DOCTYPE html><html lang=»en»><head> <title>Bootstrap Example</title> <meta charset=»utf-8″> <meta name=»viewport» content=»width=device-width, initial-scale=1″> <link rel=»stylesheet» href=»https://maxcdn.bootstrapcdn.com/bootstrap/3.4.1/css/bootstrap.min.css»>
<script src=»https://ajax.googleapis.com/ajax/libs/jquery/3.5.1/jquery.min.js»></script>
<script src=»https://maxcdn.bootstrapcdn.com/bootstrap/3.4.1/js/bootstrap.min.js»></script>
</head><body><div class=»container»> <h1>My First Bootstrap Page</h1> <p>This is some text.</p> </div></body></html>
The following example shows the code for a basic Bootstrap page (with a full width container):
Example
<!DOCTYPE html><html lang=»en»><head> <title>Bootstrap Example</title> <meta charset=»utf-8″> <meta name=»viewport» content=»width=device-width, initial-scale=1″> <link rel=»stylesheet» href=»https://maxcdn.bootstrapcdn.com/bootstrap/3.4.1/css/bootstrap.min.css»>
<script src=»https://ajax.googleapis.com/ajax/libs/jquery/3.5.1/jquery.min.js»></script>
<script src=»https://maxcdn.bootstrapcdn.com/bootstrap/3.4.1/js/bootstrap.min.js»></script></head><body><div class=»container-fluid»> <h1>My First Bootstrap Page</h1> <p>This is some text.</p> </div></body></html>
❮ Previous
Next ❯
Какую версию Bootstrap выбрать
Для разработки большинства веб-проектов лучше использовать последнюю версию Bootstrap в выбранной ветке.
На текущий момент:
- в v5 — это 5.1.3 (скачать);
- в v4 — это 4.6.1 (скачать);
- в v3 — это 3.4.1 (скачать).
Bootstrap 5 рекомендуется для проектов, которые будут использоваться только в современных браузерах (поддержка IE и других браузеров не нужна). В других случаях — Bootstrap 4.
Что нового в Bootstrap 5:
- нет зависимости от библиотеки jQuery, все плагины переписаны на чистом JavaScript;
- библиотека Popper обновлена до v2.x с v1.x;
- не поддерживаются Internet Explorer 10 и 11, Microsoft Edge <16, Firefox <60, Safari <10, iOS Safari <10, Chrome <60 и Android <6;
- добавлен новый брекпойнт в сетку ( для 1400px и выше);
- новые классы , и для указания горизонтальных и вертикальных отступов между ячейками;
- добавлен новый компонент offcanvas;
- удален компонент Media, его реализацию предлагают выполнять с помощью утилитных классов Bootstrap;
- улучшен раздел по формам в документации, и добавлена возможность создания в плавающего .
Третью версию в основном имеет смысл использовать, если нужна поддержка «старых» браузеров (IE8 и IE9).
Основные отличия Bootstrap 4 от Bootstrap 3:
- не поддерживает IE8, IE9 и iOS6 (v4 теперь только IE10+ и iOS7+);
- сетка и другие компоненты построены на флексах, а не на float;
- исходный код стилей написан на Sass, а не на Less;
- размеры, указываются в rem и em, а не в px;
- размер шрифта увеличен с 14px до 16px;
- увеличено количество брекпойнтов в сетки (в v4 — 5, в v3 — 4);
- удалены компоненты Panels, Thumbnails и Wells, вместо них добавлен Cards;
- удалены иконочный шрифт Glyphicons и jQuery плагин Affix;
- обновлены почти все компоненты;
- работа всплывающих подсказок (Tooltips) и блоков с контентов (Popovers) построена на библиотеке Popper JS.
Компоненты Bootstrap 3 в IE8 и некоторых других версиях отображаются без градиентов, теней и закруглённых углов. Это связано с тем, что в них нет поддержки используемых для этих целей CSS3 свойств.
Процентное округления в Safari
Движок для отображения версий Safari до версии v7.1 для OS X и Safari для iOS В8.0 были некоторые проблемы с количеством десятичных знаков, используемых в нашем грид классов. Так что если у вас 12 индивидуальный грид столбцы, Вы заметите, что они придумали короткие по сравнению с другими рядами колонн. Помимо обновления сафари на iOS, у вас есть несколько вариантов решений:
- Добавить в вашей последней колонки в разметке, чтобы получить жесткое выравнивание по правому краю.
- Изменить проценты вручную, чтобы получить идеальное округления для Safari (более сложно, чем в первом варианте)