Grep(1) — linux man page
Содержание:
- Difference between grep, egrep fgrep, pgrep, zgrep
- Команды Linux, для работы с файлами
- Checking for the given string in multiple files.
- 1.2 Общие параметры и примеры команды find
- 4.2.1. What is grep?
- Как использовать grep рекурсивно
- File and directory selection
- Основные команды grep
- grep -E
- Basic Usage
- Matching control options
- con GREP найдем любой текст в любом файле
- Basic vs. extended regular expressions
- Команды Linux для работы с пользователями
- Регулярное выражение Grep
- Conclusion
- Искать полные слова
- Technical description
- Почему мы используем grep?
- Catch space or tab
- Примеры использования find
- Grep IP-адреса
Difference between grep, egrep fgrep, pgrep, zgrep
Various grep switches were historically included in different binaries. On modern Linux systems, you will find these switches available in the base grep command, but it’s common to see distributions support the other commands as well.
From the man page for grep:

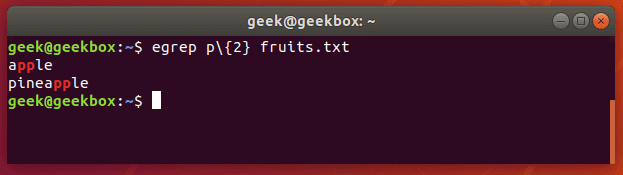
egrep is the equivalent of grep -E
This switch will interpret a pattern as an . There’s a ton of different things you can do with this, but here’s an example of what it looks like to use a regular expression with grep.
Let’s search a text document for strings that contain two consecutive ‘p’ letters:
$ egrep p\{2} fruits.txt
or
$ grep -E p\{2} fruits.txt
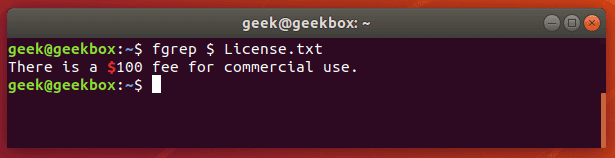
fgrep is the equivalent of grep -F
This switch will interpret a pattern as a list of fixed strings, and try to match any of them. It’s useful when you need to search for regular expression characters. This means you don’t have to escape special characters like you would with regular grep.

pgrep is a command to search for the name of a running process on your system and return its respective process IDs. For example, you could use it to find the process ID of the SSH daemon:
$ pgrep sshd
This is similar in function to just piping the output of the ‘ps’ command to grep.
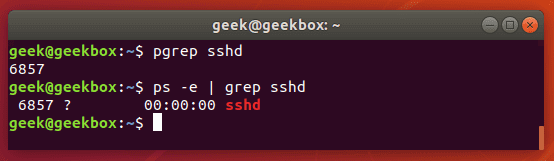
You could use this information to kill a running process or troubleshoot issues with the services running on your system.
You can use zgrep to search compressed files for a pattern. It allows you to search the files inside of a compressed archive without having to first decompress that archive, basically saving you an extra step or two.
$ zgrep apple fruits.txt.gz
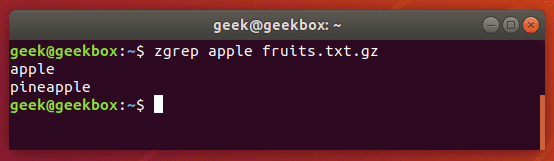
zgrep also works on tar files, but only seems to go as far as telling you whether or not it was able to find a match.
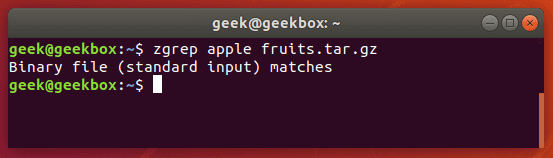
We mention this because files compressed with gzip are very commonly tar archives.
Команды Linux, для работы с файлами
Эти команды используются для обработки файлов и каталогов.
33. ls
Очень простая, но мощная команда, используемая для отображения файлов и каталогов. По умолчанию команда ls отобразит содержимое текущего каталога.
34. pwd
Linux pwd — это команда для показывает имя текущего рабочего каталога. Когда мы теряемся в каталогах, мы всегда можем показать, где мы находимся.
Пример ример ниже:
35. mkdir
В Linux мы можем использовать команду mkdir для создания каталога.
По умолчанию, запустив mkdir без какой-либо опции, он создаст каталог в текущем каталоге.
36. cat
Мы используем команду cat в основном для просмотра содержимого, объединения и перенаправления выходных файлов. Самый простой способ использовать cat— это просто ввести » имя_файла cat’.
В следующих примерах команды cat отобразится имя дистрибутива Linux и версия, которая в настоящее время установлена на сервере.
37. rm
Когда файл больше не нужен, мы можем удалить его, чтобы сэкономить место. В системе Linux мы можем использовать для этого команду rm.
38. cp
Команда Cp используется в Linux для создания копий файлов и каталогов.
Следующая команда скопирует файл ‘myfile.txt» из текущего каталога в «/home/linkedin/office«.
39. mv
Когда вы хотите переместить файлы из одного места в другое и не хотите их дублировать, требуется использовать команду mv. Подробнее можно прочитать ЗДЕСЬ.
40.cd
Команда Cd используется для изменения текущего рабочего каталога пользователя в Linux и других Unix-подобных операционных системах.
41. Ln
Символическая ссылка или программная ссылка — это особый тип файла, который содержит ссылку, указывающую на другой файл или каталог. Команда ln используется для создания символических ссылок.
Команда Ln использует следующий синтаксис:
42. touch
Команда Touch используется в Linux для изменения времени доступа к файлам и их модификации. Мы можем использовать команду touch для создания пустого файла.
44. head
Команда head используется для печати первых нескольких строк текстового файла. По умолчанию команда head выводит первые 10 строк каждого файла.
45. tail
Как вы, возможно, знаете, команда cat используется для отображения всего содержимого файла с помощью стандартного ввода. Но в некоторых случаях нам приходится отображать часть файла. По умолчанию команда tail отображает последние десять строк.
46. gpg
GPG — это инструмент, используемый в Linux для безопасной связи. Он использует комбинацию двух ключей (криптография с симметричным ключом и открытым ключом) для шифрования файлов.
50. uniq
Uniq — это инструмент командной строки, используемый для создания отчетов и фильтрации повторяющихся строк из файла.
53. tee
Команда Linux tee используется для связывания и перенаправления задач, вы можете перенаправить вывод и/или ошибки в файл, и он не будет отображаться в терминале.
54. tr
Команда tr (translate) используется в Linux в основном для перевода и удаления символов. Его можно использовать для преобразования прописных букв в строчные, сжатия повторяющихся символов и удаления символов.
Checking for the given string in multiple files.
Syntax:
grep "string" FILE_PATTERN
This is also a basic usage of grep command. For this example, let us copy the demo_file to demo_file1. The grep output will also include the file name in front of the line that matched the specific pattern as shown below. When the Linux shell sees the meta character, it does the expansion and gives all the files as input to grep.
$ cp demo_file demo_file1

$ grep "this" demo_*
demo_file:this line is the 1st lower case line in this file.
demo_file:Two lines above this line is empty.
demo_file:And this is the last line.
demo_file1:this line is the 1st lower case line in this file.
demo_file1:Two lines above this line is empty.
demo_file1:And this is the last line.
1.2 Общие параметры и примеры команды find
-perm: Найти файлы в соответствии с правами доступа.
-prune: Используйте эту опцию, чтобы команда поиска не выполняла поиск в указанном каталоге. Если вы также используете опцию -depth, то команда -prune будет игнорироваться командой поиска.
-user: Найти файл в соответствии с владельцем файла.
-group: Найти файлы в соответствии с группой, к которой они принадлежат.
-mtime -n +n: Найти файл в соответствии со временем изменения файла, -n означает, что время изменения файла находится в течение n дней, + n означает, что время изменения файла составляет n дней назад.
-nogroupНайти файл без допустимой группы, то есть группа, к которой принадлежит файл, не существует в / etc / groups.
-nouser: Найти файл без действительного владельца, то есть владелец файла не существует в / etc / passwd.
- -newer file1 ! file2: Найти файлы, время изменения которых новее, чем file1, но старше, чем file2.
- -typeНайдите файл определенного типа, например:
-size n: Найдите файл, длина файла которого составляет n блоков, с c означает, что длина файла в байтах.
-depth: При поиске файла сначала найдите файл в текущем каталоге, а затем выполните поиск в его подкаталогах.
-mount: Не пересекать точки монтирования файловой системы при поиске файлов.
-follow: если команда find встречает файл символьной ссылки, она будет следовать за файлом, на который указывает ссылка.
4.2.1. What is grep?
grep searches the input files for lines containing a match to a given pattern list. When it finds a match in a line, it copies the line to standard output (by default), or whatever other sort of output you have requested with options.
Though grep expects to do the matching on text, it has no limits on input line length other than available memory, and it can match arbitrary characters within a line. If the final byte of an input file is not a newline, grep silently supplies one. Since newline is also a separator for the list of patterns, there is no way to match newline characters in a text.
Some examples:
cathy ~> grep root /etc/passwd root:x:0:0:root:/root:/bin/bash operator:x:11:0:operator:/root:/sbin/nologin cathy ~> grep -n root /etc/passwd 1:root:x:0:0:root:/root:/bin/bash 12:operator:x:11:0:operator:/root:/sbin/nologin cathy ~> grep -v bash /etc/passwd | grep -v nologin sync:x:5:0:sync:/sbin:/bin/sync shutdown:x:6:0:shutdown:/sbin:/sbin/shutdown halt:x:7:0:halt:/sbin:/sbin/halt news:x:9:13:news:/var/spool/news: mailnull:x:47:47::/var/spool/mqueue:/dev/null xfs:x:43:43:X Font Server:/etc/X11/fs:/bin/false rpc:x:32:32:Portmapper RPC user:/:/bin/false nscd:x:28:28:NSCD Daemon:/:/bin/false named:x:25:25:Named:/var/named:/bin/false squid:x:23:23::/var/spool/squid:/dev/null ldap:x:55:55:LDAP User:/var/lib/ldap:/bin/false apache:x:48:48:Apache:/var/www:/bin/false cathy ~> grep -c false /etc/passwd 7 cathy ~> grep -i ps ~/.bash* | grep -v history /home/cathy/.bashrc:PS1="\$USER is in \w\ " |
With the first command, user cathy displays the lines from /etc/passwd containing the string root.
Then she displays the line numbers containing this search string.
With the third command she checks which users are not using bash, but accounts with the nologin shell are not displayed.
Then she counts the number of accounts that have /bin/false as the shell.
The last command displays the lines from all the files in her home directory starting with ~/.bash, excluding matches containing the string history, so as to exclude matches from ~/.bash_history which might contain the same string, in upper or lower cases. Note that the search is for the string «ps», and not for the command ps.
Как использовать grep рекурсивно
Вы можете выполнять поиск рекурсивно, т.е. читать все файлы в каждом каталоге по строке “192.168.1.5”
ИЛИ
Примеры выходных данных:
/etc/ppp/options:# ms-wins 192.168.1.50
/etc/ppp/options:# ms-wins 192.168.1.51
/etc/NetworkManager/system-connections/Wired connection 1:addresses1=192.168.1.5;24;192.168.1.2;
Вы увидите результат для 192.168.1.5 в отдельной строке, перед которой будет указано имя файла (например /etc/ppp/options) в котором он был найден. Включение имен файлов в выходные данные можно подавить, используя -h следующее:
ИЛИ
Примеры выходных данных:
# ms-wins 192.168.1.50
# ms-wins 192.168.1.51
addresses1=192.168.1.5;24;192.168.1.2;
File and directory selection
| -a, —text | Process a binary file as if it were text; this is equivalent to the —binary-files=text option. |
| —binary-files=TYPE | If the first few bytes of a file indicate that the file contains binary data, assume that the file is of type TYPE. By default, TYPE is binary, and grep normally outputs either a one-line message saying that a binary file matches, or no message if there is no match. If TYPE is without-match, grep assumes that a binary file does not match; this is equivalent to the -I option. If TYPE is text, grep processes a binary file as if it were text; this is equivalent to the -a option. Warning: grep —binary-files=text might output binary garbage, which can have nasty side effects if the output is a terminal and if the terminal driver interprets some of it as commands. |
| -D ACTION,—devices=ACTION | If an input file is a device, FIFO or socket, use ACTION to process it. By default, ACTION is read, which means that devices are read as if they were ordinary files. If ACTION is skip, devices are silently skipped. |
| -d ACTION,—directories=ACTION | If an input file is a directory, use ACTION to process it. By default, ACTION is read, i.e., read directories as if they were ordinary files. If ACTION is skip, silently skip directories. If ACTION is recurse, read all files under each directory, recursively, following symbolic links only if they are on the command line. This is equivalent to the -r option. |
| —exclude=GLOB | Skip files whose base name matches GLOB (using wildcard matching). A file-name glob can use *, ?, and as wildcards, and \ to quote a wildcard or backslash character literally. |
| —exclude-from=FILE | Skip files whose base name matches any of the file-name globs read from FILE (using wildcard matching as described under —exclude). |
| —exclude-dir=DIR | Exclude directories matching the pattern DIR from recursive searches. |
| -I | Process a binary file as if it did not contain matching data; this is equivalent to the —binary-files=without-match option. |
| —include=GLOB | Search only files whose base name matches GLOB (using wildcard matching as described under —exclude). |
| -r, —recursive | Read all files under each directory, recursively, following symbolic links only if they are on the command line. This is equivalent to the -d recurse option. |
| -R,—dereference-recursive | Read all files under each directory, recursively. Follow all symbolic links, unlike -r. |
Основные команды grep
Вывести все упоминания слова
Предположим вы запустили
CentOS Linux
и хотите посмотреть все установленные пакеты в названии которых есть слово
kernel
yum list installed | grep kernel
abrt-addon-kerneloops.x86_64 2.1.11-60.el7.centos @base
kernel.x86_64 3.10.0-1160.el7 @anaconda
kernel.x86_64 3.10.0-1160.2.2.el7 @updates
kernel.x86_64 3.10.0-1160.6.1.el7 @updates
kernel-devel.x86_64 3.10.0-1160.2.2.el7 @updates
kernel-devel.x86_64 3.10.0-1160.6.1.el7 @updates
kernel-headers.x86_64 3.10.0-1160.6.1.el7 @updates
kernel-tools.x86_64 3.10.0-1160.6.1.el7 @updates
kernel-tools-libs.x86_64 3.10.0-1160.6.1.el7 @updates
И наоборот, можно посмотреть все строки где нет слова kernel
: нужно добавить опцию -v
yum list installed | grep -v kernel
Если вам нужно найти что-то в файле, можно вместо | воспользоваться выражением
grep ‘\bkernel\b’ huge_file
Где huge_file это имя файла в текущей директории в котором мы ищем отдельные слова kernel.
То есть слова akernel или kernelz найдены не будут
Вывести всё, что начинается со слова
Если нам теперь не нужны пакеты, в которых слово
kernel
в середине, а только те, которые начинаются с
kernel добавим перед словом знак ^
yum list installed | grep ^kernel
kernel.x86_64 3.10.0-1160.el7 @anaconda
kernel.x86_64 3.10.0-1160.2.2.el7 @updates
kernel.x86_64 3.10.0-1160.6.1.el7 @updates
kernel-devel.x86_64 3.10.0-1160.2.2.el7 @updates
kernel-devel.x86_64 3.10.0-1160.6.1.el7 @updates
kernel-headers.x86_64 3.10.0-1160.6.1.el7 @updates
kernel-tools.x86_64 3.10.0-1160.6.1.el7 @updates
kernel-tools-libs.x86_64 3.10.0-1160.6.1.el7 @updates
grep -E ‘ion$’ huge_file
compensation
generation
Допустим вы знаете только начало и конец слова
grep -E ‘^to..le$’ huge_file
topbicycle
Несколько символов подряд
Найти слова с пятью гласными подряд
grep -E ‘{5}’ /usr/share/dict/words
cadiueio
Chaouia
cooeeing
euouae
Guauaenok
miaoued
miaouing
Pauiie
queueing
grep -E
С некоторыми задачами обычный grep не справляется, поэтому нужен расширеный режим.
Найти в файле file
все foobar или foo bar с ровно одним пробелом
grep -E ‘foo\s?bar’ file
Найти в файле file
все foobar или foo bar с ровно двумя пробелами
grep -E ‘foo\s{2}bar’ file
Более сложный пример. Сотрудникам
TopBicycle
нужно понять у каких велосипедов в списке отсутствует или неправильно записан порядковый номер.
Номер должен быть в формате 111-11-1111 то есть три цифры дефис две цифры дефис четыре цифры
cat bikes.txt
Stels,Pilot,111-22-3333
Merida,BigNine,,
Stark,Cobra,xxx-xx-xxx
Forward,Tracer,1234-0
Author,Grand,444-55-6666
Stels,Pilot21,111-22-3344
Giant,Lannister,555-66-7777
Helkama,Jopo,,
grep -vE ‘\b{3}-{2}-{4}\b’ bikes.txt
Merida,BigNine,,
Stark,Cobra,xxx-xx-xxx
Forward,Tracer,1234-0
Helkama,Jopo,,
Правильные записи
grep -E ‘\b{3}-{2}-{4}\b’ bikes.txt
Stels,Pilot,111-22-3333
Author,Grand,444-55-6666
Stels,Pilot21,111-22-3344
Giant,Lannister,555-66-7777
Basic Usage
In this tutorial, you’ll use to search the GNU General Public License version 3 for various words and phrases.
If you’re on an Ubuntu system, you can find the file in the folder. Copy it to your home directory:
If you’re on another system, use the command to download a copy:
You’ll also use the BSD license file in this tutorial. On Linux, you can copy that to your home directory with the following command:
If you’re on another system, create the file with the following command:
Now that you have the files, you can start working with .
In the most basic form, you use to match literal patterns within a text file. This means that if you pass a word to search for, it will print out every line in the file containing that word.
Execute the following command to use to search for every line that contains the word :
The first argument, , is the pattern you’re searching for, while the second argument, , is the input file you wish to search.
The resulting output will be every line containing the pattern text:
On some systems, the pattern you searched for will be highlighted in the output.
Common Options
By default, will search for the exact specified pattern within the input file and return the lines it finds. You can make this behavior more useful though by adding some optional flags to .
If you want to ignore the “case” of your search parameter and search for both upper- and lower-case variations, you can specify the or option.
Search for each instance of the word (with upper, lower, or mixed cases) in the same file as before with the following command:
The results contain: , , and :
If there was an instance with , that would have been returned as well.
If you want to find all lines that do not contain a specified pattern, you can use the or option.
Search for every line that does not contain the word in the BSD license with the following command:
You’ll receive this output:
Since you did not specify the “ignore case” option, the last two items were returned as not having the word .
It is often useful to know the line number that the matches occur on. You can do this by using the or option. Re-run the previous example with this flag added:
This will return the following text:
Now you can reference the line number if you want to make changes to every line that does not contain . This is especially handy when working with source code.
Matching control options
| -e PATTERN,—regexp=PATTERN | Use PATTERN as the pattern to match. This can specify multiple search patterns, or to protect a pattern beginning with a dash (—). |
| -f FILE, —file=FILE | Obtain patterns from FILE, one per line. |
| -i, —ignore-case | Ignore case distinctions in both the PATTERN and the input files. |
| -v, —invert-match | Invert the sense of matching, to select non-matching lines. |
| -w, —word-regexp | Select only those lines containing matches that form whole words. The test is that the matching substring must either be at the beginning of the line, or preceded by a non-word constituent character. Or, it must be either at the end of the line or followed by a non-word constituent character. Word-constituent characters are letters, digits, and underscores. |
| -x, —line-regexp | Select only matches that exactly match the whole line. |
| -y | The same as -i. |
con GREP найдем любой текст в любом файле
Прежде всего мы объясним доступные варианты:
- –i: не будет различать верхний и нижний регистр.
- –w: заставить его находить только определенные слова.
- –v: выбирает строки, которые не совпадают.
- –n: показывает номер строки с запрошенными словами.
- –h: удаляет префикс из имени файла Unix в выводе.
- –r: рекурсивный поиск в каталогах.
- –R: как -r, но следуйте всем символическим ссылкам.
- –l: показывает только имена файлов с выделенными строками.
- –c- Показывает только одно количество выбранных строк для каждого файла.
- -Цвет: Отображает совпадающие шаблоны в цветах.
На изображении, которое вы указали в заголовке этой статьи, я искал слово «Изображения» в файле «830.desktop», который находится по этому пути. Как видите, я написал:
grep Imágenes /home/pablinux/Documentos/830.desktop
Имейте в виду, что в этой статье мы напишем примеры, которые необходимо изменить в соответствии с нашими поисковыми предпочтениями. Когда мы говорим «Файл», «Слово» и т. Д., Мы будем ссылаться на файл с его путем.. Если бы я просто написал «grep Images 830.desktop», я бы получил сообщение о том, что файл не существует. Или так было бы, если бы файл не находился в корневом каталоге.
Другие примеры:
- grep -i images /home/pablinux/Documentos/830.desktop, где «изображения» — это слово, которое мы хотим найти, а остальное — файл с его путем. В этом примере выполняется поиск «изображений» в файле «830.desktop» без учета регистра.
- grep -R изображения: он будет искать во всех строках каталога и всех его подкаталогах, где найдено слово «изображения».
- grep -c пример test.txt: это будет искать нас и показывать общее количество раз, когда «example» появляется в файле с именем «test.txt».
Basic vs. extended regular expressions
In basic regular expressions the metacharacters ?, +, {, |, (, and ) lose their special meaning; instead use the backslashed versions \?, \+, \{, \|, \(, and \).
Traditional versions of egrep did not support the { metacharacter, and some egrep implementations support \{ instead, so portable scripts should avoid { in grep -E patterns and should use to match a literal {.
GNU grep -E attempts to support traditional usage by assuming that { is not special if it would be the start of an invalid interval specification. For example, the command grep -E ‘{1’ searches for the two-character string {1 instead of reporting a syntax error in the regular expression. POSIX allows this behavior as an extension, but portable scripts should avoid it.
Команды Linux для работы с пользователями
Эти команды используются для управления пользователями Linux.
25. id
Команда ID используется в Linux для отображения реального и эффективного идентификатора пользователя (UID) и идентификатора группы (GID). UID — это единый идентификатор пользователя. В то время как идентификатор группы (GID) может состоять из нескольких идентификаторов UID.
27. who
Команда who — это инструмент для отображения информации о пользователях, которые в данный момент вошли в систему. who может видеть только реального пользователя, вошедшего в систему. Он не увидит пользователя, выполняющего команду su.
Команда Groupadd используется для создания группы в Linux.
Следующая команда добавит в систему группу «setiwiki«.
29. useradd
В операционных системах Linux и Unix — подобных наиболее распространенной командой для создания пользователей является «useradd» или «adduser«.
Давайте посмотрим, как создать нового пользователя «setiwik» и установить пароль. Команда добавляет запись в файлы /etc/passwd, /etc/shadow, /etc/group и /etc/gshadow.
30. userdel
Userdel — это низкоуровневая утилита для удаления пользователей. Команда Userdel будет искать файлы системных учетных записей, такие как «/etc/password » и «/etc/group«, а затем удалит оттуда все записи, связанные с именем пользователя.
31. usermod
Команда Linux usermod используется для изменения атрибутов существующего пользователя. Атрибутами пользователя являются домашний каталог, оболочка, дата истечения срока действия пароля, группы, UID и т.д.
32. passwd
Passwd — это команда, используемая в Linux (Redhat, Centos, Ubuntu, Debian, Fedora) и UNIX-подобных операционных системах для смены паролей.
Регулярное выражение Grep
Регулярное выражение или регулярное выражение — это шаблон, который соответствует набору строк. Шаблон состоит из операторов, конструирует буквальные символы и метасимволы, которые имеют особое значение. GNU поддерживает три синтаксиса регулярных выражений: базовый, расширенный и Perl-совместимый.
В своей простейшей форме, когда тип регулярного выражения не указан, интерпретирует шаблоны поиска как базовые регулярные выражения. Чтобы интерпретировать шаблон как расширенное регулярное выражение, используйте параметр (или ).
В реализации GNU нет функциональной разницы между базовым и расширенным синтаксисами регулярных выражений. Единственная разница в том, что в базовых регулярных выражениях метасимволы , , , , , и интерпретируются как буквальные символы. Чтобы сохранить особое значение метасимволов при использовании основных регулярных выражений, символы должны быть экранированы обратной косой чертой ( ). Мы объясним значение этих и других мета-символов позже.
Как правило, вы всегда должны заключать регулярное выражение в одинарные кавычки, чтобы избежать интерпретации и расширения метасимволов оболочкой.
Conclusion
is useful in finding patterns within files or within the file system hierarchy, so it’s worth spending time getting comfortable with its options and syntax.
Regular expressions are even more versatile, and can be used with many popular programs. For instance, many text editors implement regular expressions for searching and replacing text.
Furthermore, most modern programming languages use regular expressions to perform procedures on specific pieces of data. Once you understand regular expressions, you’ll be able to transfer that knowledge to many common computer-related tasks, from performing advanced searches in your text editor to validating user input.
Искать полные слова
При поиске строки отобразит все строки, в которых строка встроена в строки большего размера.
Например, если вы ищете «gnu», все строки, в которых «gnu» встроено в слова большего размера, такие как «cygnus» или «magnum», будут найдены:
Чтобы вернуть только те строки, в которых указанная строка представляет собой целое слово (заключенное в символы, отличные от слов), используйте параметр (или ).
Символы слова включают буквенно-цифровые символы ( , и ) и символы подчеркивания ( ). Все остальные символы считаются несловесными символами.
Если вы запустите ту же команду, что и выше, включая параметр , команда вернет только те строки, где включен как отдельное слово.
Technical description
grep searches the named input FILEs (or standard input if no files are named, or if a single dash («—«) is given as the file name) for lines containing a match to the given PATTERN. By default, grep prints the matching lines.
Also, three variant programs egrep, fgrep and rgrep are available:
- egrep is the same as running grep -E. In this mode, grep evaluates your PATTERN string as an extended regular expression (ERE). Nowadays, ERE does not «extend» very far beyond basic regular expressions, but they can still be very useful. For more information about extended regular expressions, see: , below.
- fgrep is the same as running grep -F. In this mode, grep evaluates your PATTERN string as a «fixed string» — every character in your string is treated literally. For example, if your string contains an asterisk («*«), grep will try to match it with an actual asterisk rather than interpreting this as a wildcard. If your string contains multiple lines (if it contains newlines), each line will be considered a fixed string, and any of them can trigger a match.
- rgrep is the same as running grep -r. In this mode, grep performs its search recursively. If it encounters a directory, it traverses into that directory and continue searching. (Symbolic links are ignored; if you want to search directories that are symbolically linked, use the -R option instead).
In older operating systems, egrep, fgrep and rgrep were distinct programs with their own executables. In modern systems, these special command names are shortcuts to grep with the appropriate flags enabled. They are functionally equivalent.
Почему мы используем grep?
Grep — это инструмент командной строки, который пользователи Linux используют для поиска текстовых строк. Вы можете использовать его для поиска файла по определенному слову или комбинации слов, или вы можете направить вывод других команд Linux в grep, так что grep может показать вам только тот вывод, который вам нужен.
Давайте посмотрим на некоторые действительно распространенные примеры. Скажем, вам нужно проверить содержимое каталога, чтобы увидеть, существует ли там определенный файл. Это то, для чего вы бы использовали команду «ls».
Но чтобы ускорить весь процесс проверки содержимого каталога, вы можете направить вывод команды ls в команду grep. Давайте посмотрим в нашем домашнем каталоге папку с названием Documents.
$ ls

Desktop        Drafts                   Ваше_имя        'My files'      Samples

Documents      examples.desktop         Linux            Pictures       Templates

Downloads      Favorites                Music            Public         Videos
А теперь давайте попробуем проверить каталог снова, но на этот раз, используя grep, специально для проверки папки «Документы».
$ ls | grep Documents

Documents
Как вы можете видеть на скриншоте выше, использование команды grep сэкономило нам время, быстро изолировав искомое слово от остальной части ненужного вывода, созданного командой ls.
Если папка Documents не существует, grep не вернет ничего. Поэтому, если ничего не возвращает grep, это означает, что он не может найти слово, которое вы ищете.
Catch space or tab
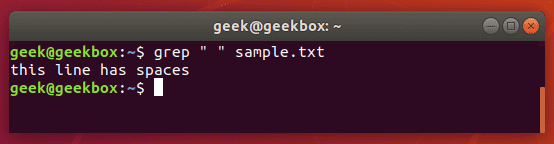
As we mentioned earlier in our explanation of how to search for a string, you can wrap text inside quotes if it contains spaces. The same method will work for tabs, but we’ll explain how to put a tab in your grep command in a moment.
Put a space or multiple spaces inside quotes to have grep search for that character.
$ grep " " sample.txt
There are a few different ways you can search for a tab with grep, but most of the methods are experimental or can be inconsistent across different distributions.
The easiest way is to just search for the tab character itself, which you can produce by hitting ctrl+v on your keyboard, followed by tab.
Normally, pressing tab in a terminal window tells the terminal that you want to auto-complete a command, but pressing the ctrl+v combination beforehand will cause the tab character to be written out as you’d normally expect it to in a text editor.
$ grep " " sample.txt
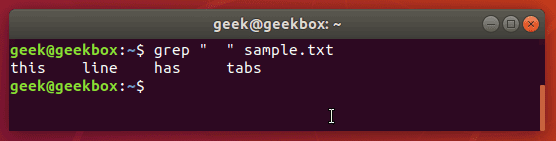
Knowing this little trick is especially useful when greping through configuration files in Linux since tabs are frequently used to separate commands from their values.
Примеры использования find
Поиск файла по имени
1. Простой поиск по имени:
find / -name «file.txt»
* в данном примере будет выполнен поиск файла с именем file.txt по всей файловой системе, начинающейся с корня .
2. Поиск файла по части имени:
find / -name «*.tmp»
* данной командой будет выполнен поиск всех папок или файлов в корневой директории /, заканчивающихся на .tmp
3. Несколько условий.
а) Логическое И. Например, файлы, которые начинаются на sess_ и заканчиваются на cd:
find . -name «sess_*» -a -name «*cd»
б) Логическое ИЛИ. Например, файлы, которые начинаются на sess_ или заканчиваются на cd:
find . -name «sess_*» -o -name «*cd»
в) Более компактный вид имеют регулярные выражения, например:
find . -regex ‘.*/\(sess_.*cd\)’
find . -regex ‘.*/\(sess_.*\|.*cd\)’
* где в первом поиске применяется выражение, аналогичное примеру а), а во втором — б).
4. Найти все файлы, кроме .log:
find . ! -name «*.log»
* в данном примере мы воспользовались логическим оператором !.
Поиск по дате
1. Поиск файлов, которые менялись определенное количество дней назад:
find . -type f -mtime +60
* данная команда найдет файлы, которые менялись более 60 дней назад.
2. Поиск файлов с помощью newer. Данная опция доступна с версии 4.3.3 (посмотреть можно командой find —version).
а) дате изменения:
find . -type f -newermt «2019-11-02 00:00»
* покажет все файлы, которые менялись, начиная с 02.11.2019 00:00.
find . -type f -newermt 2019-10-31 ! -newermt 2019-11-02
* найдет все файлы, которые менялись в промежутке между 31.10.2019 и 01.11.2019 (включительно).
б) дате обращения:
find . -type f -newerat 2019-10-08
* все файлы, к которым обращались с 08.10.2019.
find . -type f -newerat 2019-10-01 ! -newerat 2019-11-01
* все файлы, к которым обращались в октябре.
в) дате создания:
find . -type f -newerct 2019-09-07
* все файлы, созданные с 07 сентября 2019 года.
find . -type f -newerct 2019-09-07 ! -newerct «2019-09-09 07:50:00»
* файлы, созданные с 07.09.2019 00:00:00 по 09.09.2019 07:50
Искать в текущей директории и всех ее подпапках только файлы:
find . -type f
* f — искать только файлы.
Поиск по правам доступа
1. Ищем все справами на чтение и запись:
find / -perm 0666
2. Находим файлы, доступ к которым имеет только владелец:
find / -perm 0600
Поиск файла по содержимому
find / -type f -exec grep -i -H «content» {} \;
* в данном примере выполнен рекурсивный поиск всех файлов в директории и выведен список тех, в которых содержится строка content.
С сортировкой по дате модификации
find /data -type f -printf ‘%TY-%Tm-%Td %TT %p\n’ | sort -r
* команда найдет все файлы в каталоге /data, добавит к имени дату модификации и отсортирует данные по имени. В итоге получаем, что файлы будут идти в порядке их изменения.
Лимит на количество выводимых результатов
Самый распространенный пример — вывести один файл, который последний раз был модифицирован. Берем пример с сортировкой и добавляем следующее:
find /data -type f -printf ‘%TY-%Tm-%Td %TT %p\n’ | sort -r | head -n 1
Поиск с действием (exec)
1. Найти только файлы, которые начинаются на sess_ и удалить их:
find . -name «sess_*» -type f -print -exec rm {} \;
* -print использовать не обязательно, но он покажет все, что будет удаляться, поэтому данную опцию удобно использовать, когда команда выполняется вручную.
2. Переименовать найденные файлы:
find . -name «sess_*» -type f -exec mv {} new_name \;
или:
find . -name «sess_*» -type f | xargs -I ‘{}’ mv {} new_name
3. Вывести на экран количество найденных файлов и папок, которые заканчиваются на .tmp:
find . -name «*.tmp» | wc -l
4. Изменить права:
find /home/user/* -type d -exec chmod 2700 {} \;
* в данном примере мы ищем все каталоги (type d) в директории /home/user и ставим для них права 2700.
5. Передать найденные файлы конвееру (pipe):
find /etc -name ‘*.conf’ -follow -type f -exec cat {} \; | grep ‘test’
* в данном примере мы использовали find для поиска строки test в файлах, которые находятся в каталоге /etc, и название которых заканчивается на .conf. Для этого мы передали список найденных файлов команде grep, которая уже и выполнила поиск по содержимому данных файлов.
6. Произвести замену в файлах с помощью команды sed:
find /opt/project -type f -exec sed -i -e «s/test/production/g» {} \;
* находим все файлы в каталоге /opt/project и меняем их содержимое с test на production.
Grep IP-адреса
Greping для IP-адресов может быть немного сложным, потому что мы не можем просто сказать, что grep ищет 4 числа, разделенных точками — ну, мы могли бы, но эта команда также может вернуть недопустимые IP-адреса.
Следующая команда найдет и изолирует только действительные адреса IPv4 :
$ grep -E -o "(25|2|??)\.(25|2|??)\.(25|2|??)\.(25|2|??)" /var/log/auth.log
Мы использовали это на нашем сервере Ubuntu только для того, чтобы увидеть, откуда были сделаны последние попытки SSH.
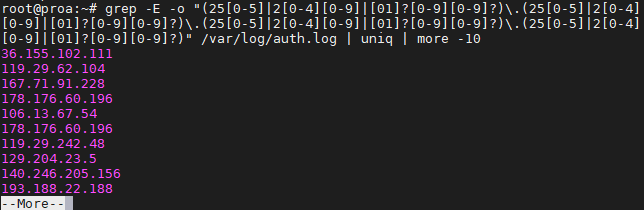
Чтобы избежать повторной информации и захламления вашего экрана, вы можете направить ваши команды grep в «uniq» и «more», как мы делали на скриншоте выше.