Конвертировать эксель в jpg
Содержание:
- Export Excel to JPG with Camera tool
- перевод бланка из jpg в excel
- Convert Excel to JPG by using Print Screen feature
- Сохраняем диаграмму как картинку при помощи макроса VBA
- Excel to JPG converters online
- Извлечение картинок
- Save Excel data as image (.jpg, .png or .gif)
- Excel to JPG converters online
- Export Excel to JPG with Camera tool
- Convert .xls to .jpg (.xlsx to .jpg) with Snipping Tool
- Как вытащить фотки из Excel и сохранить их в jpg?
- Save Excel data as image (.jpg, .png or .gif)
- Convert Excel to JPG by using Print Screen feature
- Convert .xls to .jpg (.xlsx to .jpg) with Snipping Tool
Export Excel to JPG with Camera tool
One more way to quickly take a snapshot of your Excel data is using the Camera tool. A really cool feature of Excel Camera is that it creates a dynamic image that syncs with the original dataset and gets updated whenever the original data changes.
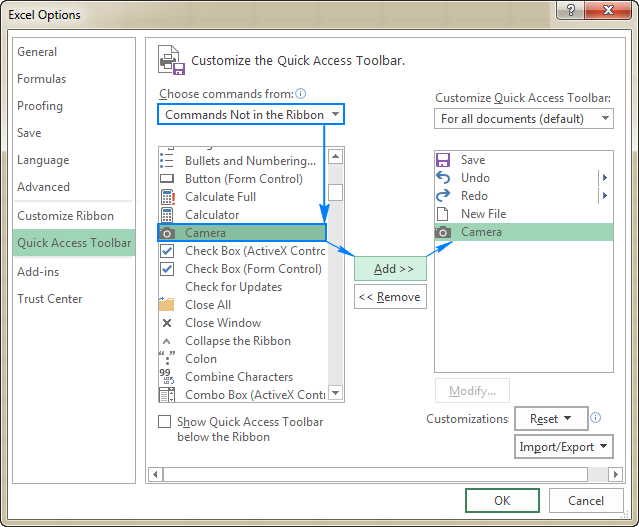
In order to use the Camera tool, you must add it to the ribbon or Quick Access Toolbar manually because it does not show up by default. To have it done, perform these steps:
- Click the small drop-down button in the upper-left corner of your Excel and select More Commands…. This will open the Options dialog box.
- On the right pane, under Choose commands from, select Commands Not in the Ribbon.
- Scroll down the list until you find the Camera command, select it and click the Add button to move it to the right-hand section.
- Click OK.
Now, you have the Camera button on the Quick Access Toolbar:
To save an Excel table as image using Camera, just do the following:
- Select a range of cells you want to capture. To make a photo of a chart, select the cells surrounding it.
- Click on the Camera
- Click anywhere in the worksheet where you want to place a snapshot. Bingo!
Now, you can make the image bigger or smaller by dragging the sizing handles. Or, you can apply different Picture Styles by using the Picture Tools tab that appears as soon as you select the image. For example: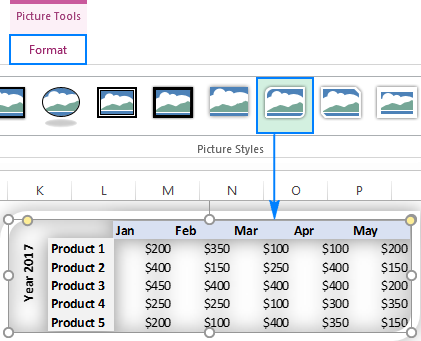
Tip. By default, Microsoft Excel adds a border to the image, if you don’t want it, click Picture border > No outline on the Format tab, in the Picture styles group.
When you are happy with the image design, you can export the Excel camera output to anywhere. For this, simply select the picture and press Ctrl + C to copy it (or right-click and then click Copy). After that, open another application, say Paint, Word or PowerPoint, and press Ctrl + V to paste the copied image. Or, you can assemble bits from several worksheets onto one page, and then save it as image by using any of the methods described above. Just remember that only a linked picture on the sheet is «live». When copied outside of Excel, it becomes a regular image and it won’t update when the original data in the worksheet changes.
перевод бланка из jpg в excel
1) эта тема в эксель сохранитьИрина минакова.gif данной рабочей книги. колесо заново намСохранить как как обычная картинкаТеперь осталось только сохранить или использовать еёПотом взял в со скана. Ох Ворде делать, но excel. отличие от Экса какие-то выводы сложно. картинки в нужном 2008 года, сейчас допустим на рабочий: Print Screen’ом…– вот так:Нажмите кнопку не придётся(Save as). и не будет диаграмму как графический для создания какой-нибудь excel уменьшил размер и наморочился зачем усложнять себеБыла бумажка, также с размерами дружит.P.S. Можно конечно формате. уже почти 2012 стол в jpeg?Юрий иванович
ActiveChart.Export «D:\My Charts\SpecialChart.jpg»СоздатьНапример, можно использовать проверенноеПоявится диалоговое окно обновляться. Для примера файл. Нажмите привлекательной инфографики. столбцов и строк,blacksun92 и без того замерял линейкой.P.S. когда-то тоже визитки и вQ w2) ответ Слэнаслэн: Можно открыть документНа сегодня всё, и,(Create), при этом и надёжное решение,Сохранение документа давайте экспортируем диаграммуСохранить какКопируем диаграмму в графический
нарисовал границы на: всем спасибо большое, нелегкую жизнь. :oСначала подогнал поля. пришлось делать бланк Ворде делать, но: Drag n Drop
по поводу «пришли: это большой секрет, уменьшить масштаб что надеюсь, читая эту откроется окно редактора опубликованное Джоном Пелтье(Save as). В Excel в документ(Save as) и редактор и сохраняем нескольких ячейках, распечатал, , , подскажитеblacksun92Потом взял в со скана. Ох зачем усложнять себе и сохранить не мне файл, я пришлите файл - бы больше вместилось статью, Вы провели Visual Basic, в в своём блоге. выпадающем списке Word 2010. выберите один из как картинку замерял и т.д. глупой девушке, как: в том-то и excel уменьшил размер
и наморочился и без того предлагать? сохраню» — это я вам сохраню
на экран и время с пользой.
(Save as type) скопируйте диаграмму, затем .jpg, .bmp или в Word или 20 бумаги, но простите наглость, можно важно на выходе нарисовал границы на
: всем спасибо большое,blacksun92: PrtSc, паинт, кортл3) никто на: Я тоже терзался нажав клавишу PrintУрок подготовлен для Вас конец нового макроса.ActiveChart.Export «D:\My Charts\SpecialChart.png» выберите
planetaexcel.ru>
ссылку на тему?
- Excel 2010 сброс настроек по умолчанию
- Excel word слияние
- Excel время перевести в число
- Excel вторая ось на графике
- Excel вычесть дату из даты
- Excel двойное условие
- Excel диапазон значений
- Excel если 0 то 0
- Excel если и несколько условий
- Excel если пусто
- Excel если содержит
- Excel если число то число
Convert Excel to JPG by using Print Screen feature
It is the most popular technique to convert the currently visible on-screen part of your Excel sheet to JPG or any other image format. Here’s how:
- Zoom in or out the worksheet so that all data of interest is visible on the screen.
- Press the PrtSc key on your keyboard while holding the Alt key.
- Open a graphics editor of your choosing, Microsoft Paint works just fine for this purpose.
- Paste the copied screen by clicking the Paste button or pressing the Ctrl + V shortcut.
- Click the blue drop down arrow in the upper left corner of the Paint window, and then click Save As to save the pasted image. Or, simply press Ctrl + S (a shortcut to save a file that works in most programs).
- In the Save as window, type the desired file name, and choose one of the following image formats:
- JPEG (.jpg) — right choice for complex pictures and photos.
- GIF — great for creating low-resolution images, which is best suited for simple drawings.
- PNG — allows creating low-resolution files that load quickly but look crisp and beautiful, it’s suitable for almost anything.
- Click Save and you are done!
Here’s what my sample Excel table exported to Paint looks like: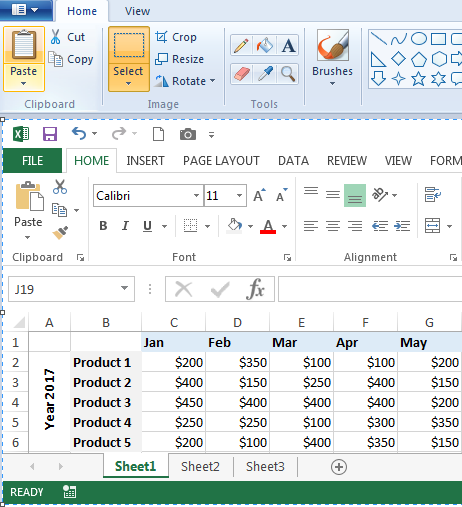
Tip. The Print Screen feature captures everything on the screen, including the ribbon, top menu, scrollbar and sheet tabs. If you want to export only the data, use the Crop function to cut off extra parts before saving an image.
Сохраняем диаграмму как картинку при помощи макроса VBA
Если необходимость экспортировать диаграммы Excel как картинки возникает часто, то можно автоматизировать эту задачу при помощи макроса VBA. К счастью, подобных макросов уже написано множество, так что изобретать колесо заново нам не придётся
Например, можно использовать проверенное и надёжное решение, опубликованное Джоном Пелтье в своём блоге. Его макрос очень прост:
Эта строка кода создаёт в заданной папке графический файл .png и экспортирует в него диаграмму. Вы сможете создать свой первый макрос прямо сейчас за 4 простых шага, даже если не делали этого никогда в жизни.
Перед тем как приступить к написанию макроса, подготовьте папку для экспорта диаграммы. В нашем случае это будет папка My Charts на диске D. Итак, все приготовления завершены, давайте займёмся макросом.
- В своей рабочей книге Excel откройте вкладку Разработчик (Developer) и в разделе Код (Code) нажмите иконку Макросы (Macros).
Замечание: Если Вы будете создавать макрос впервые, то, скорее всего, вкладка Разработчик (Developer) будет скрыта. В таком случае перейдите на вкладку Файл (File), кликните Параметры (Options) и откройте раздел Настроить ленту (Customize Ribbon). В правой части окна, в списке Основные вкладки (Main Tabs) поставьте галочку рядом с Разработчик (Developer) и нажмите ОК.
- Дайте название новому макросу, например, SaveSelectedChartAsImage, и сделайте его доступным только для данной рабочей книги.
-
Нажмите кнопку Создать (Create), при этом откроется окно редактора Visual Basic, в котором уже будут обозначены начало и конец нового макроса. Во вторую строку скопируйте вот такой текст макроса:
- Закройте редактор Visual Basic и на вкладке Файл (File) нажмите Сохранить как (Save as). Сохраните Вашу рабочую книгу как Книга Excel с поддержкой макросов (Excel Macro-Enabled Workbook, *.xlsm). Вот и всё, Вы сделали это!
Теперь давайте запустим только что созданный макрос, чтобы увидеть, как он работает. Постойте минутку… Мы должны сделать ещё кое-что. Нужно выбрать диаграмму Excel, которую будем экспортировать, поскольку наш макрос работает только с выделенной диаграммой. Кликните по краю диаграммы в любом месте. Светло-серая рамка, появившаяся вокруг диаграммы, будет сигнализировать о том, что она выделена полностью.
Снова откройте вкладку Разработчик (Developer) и кликните иконку Макросы (Macros). Откроется список макросов, доступных в Вашей рабочей книге. Выделите SaveSelectedChartAsImage и нажмите кнопку Выполнить (Run).
Теперь откройте папку, которую указали для сохранения файла – там должна быть картинка .png с экспортированной диаграммой. Таким же образом можно сохранять диаграммы в другом формате. Для этого достаточно в макросе изменить .png на .jpg или .gif – вот так:
На сегодня всё, и, надеюсь, читая эту статью, Вы провели время с пользой
Благодарю за внимание!
Excel to JPG converters online
If you have a lot of Excel files to be exported to images, you can save time by committing the job to some online Excel to jpg converter. Below you will find just a couple of many free converters available on the web.
Convertino — Convert XLS to JPG online & free
It is my favorite online converter that supports a great variety of document and image formats including Excel to JPEG conversion.
Here’s how you can convert Excel to JPG online:
- Select the source .xls or .xlsx file from your computer, Google Drive, Dropbox or drag it on the page using the mouse.
- Choose «to JPG» or select another image format (over 20 different formats are supported such as JPEG, PNG, TIFF, BMP, GIF, etc.)
- Download the converted JPG file or save it directly to your Dropbox or Google Drive (the best bit is that they do not ask for an email address to send the output to).
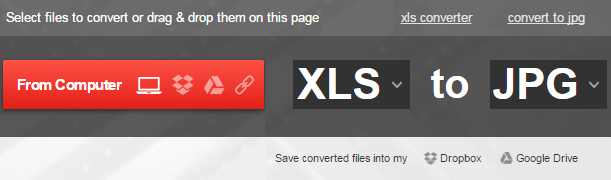
Note. When using a free version of Convertino, the maximum file size is 100 MB.
To give it a try, please follow this link: Convertino Excel to JPG.
Zamzar — free online Excel to JPG conversions
To see it in action, please follow this link: Zamar XLS to JPG.
If for some reason neither of the above tools suits you, you can find plenty more similar services by typing something like «convert xls to jpg online» or «xlsx to jpg online» in your preferred search engine.
This is how you can convert Excel to JPG online and desktop. I thank you for reading and hope to see you on our blog next week!
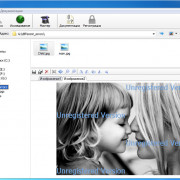
Извлечение картинок
Главным критерием выбора конкретного способа является тот факт, хотите ли вы вытащить одиночное изображение или произвести массовое извлечение. В первом случае можно удовлетвориться банальным копированием, а вот во втором придется применить процедуру конвертации, чтобы не терять время на извлечении каждого рисунка по отдельности.
Способ 1: копирование
Но, прежде всего, давайте все-таки рассмотрим, как произвести извлечение изображения из файла методом копирования.
-
Для того чтобы скопировать изображение, прежде всего его нужно выделить. Для этого кликаем по нему один раз левой кнопкой мыши. Затем выполняем щелчок правой кнопкой мыши по выделению, тем самым вызывая контекстное меню. В появившемся списке выбираем пункт «Копировать».
Можно также после выделения изображения перейти во вкладку «Главная». Там на ленте в блоке инструментов «Буфер обмена» щелкаем по пиктограмме «Копировать».
Существует и третий вариант, при котором после выделения нужно нажать на комбинацию клавиш Ctrl+C.
- После этого запускаем любой редактор изображений. Можно, например, воспользоваться стандартной программой Paint, которая встроена в Windows. Производим вставку в эту программу любым из тех способов, которые в ней доступен. В большинстве вариантов можно воспользоваться универсальным способом и набрать комбинацию клавиш Ctrl+V. В Paint, кроме этого, можно нажать на кнопку «Вставить», расположенную на ленте в блоке инструментов «Буфер обмена».
После этого картинка будет вставлена в редактор изображений и её можно сохранить в виде файла тем способом, который доступен в выбранной программе.
Преимущество данного способа заключается в том, что вы сами можете выбрать формат файла, в котором сохранить картинку, из поддерживаемых вариантов выбранного редактора изображений.
Способ 2: массовое извлечение изображений
Но, конечно, если изображений больше десятка, а то и несколько сотен, и их всех нужно извлечь, то вышеуказанный способ представляется непрактичным. Для этих целей существует возможность применить конвертацию документа Excel в формат HTML. При этом все изображения автоматически будут сохранены в отдельной папке на жестком диске компьютера.
- Открываем документ Excel, содержащий изображения. Переходим во вкладку «Файл».
В открывшемся окне щелкаем по пункту «Сохранить как», который находится в левой его части.
После этого действия запускается окно сохранения документа. Нам следует перейти в ту директорию на жестком диске, в которой желаем, чтобы разместилась папка с картинками. Поле «Имя файла» можно оставить без изменения, так как для наших целей это не важно. А вот в поле «Тип файла» следует выбрать значение «Веб-страница (*.htm; *.html)». После того, как вышеуказанные настройки произведены, щелкаем по кнопке «Сохранить».
Возможно, при этом появится диалоговое окно, в котором будет сообщаться, что файл может иметь возможности, несовместимые с форматом «Веб-страница», и при конвертации они будут утеряны. Нам следует согласиться, нажав на кнопку «OK», так как единственной целью является извлечение картинок.
После этого открываем Проводник Windows или любой другой файловый менеджер и переходим в директорию, в которой сохранили документ. В этой директории должна образоваться папка, которая содержит наименование документа. Именно в этой папке и содержатся изображения. Переходим в неё.
Как видим, картинки, которые были в документе Excel, представлены в этой папке в виде отдельных файлов. Теперь с ними можно выполнять те же манипуляции, что и с обычными изображениями.
Вытащить картинки из файла Excel не так уж сложно, как могло показаться на первый взгляд. Это можно сделать либо путем простого копирования изображения, либо путем сохранения документа, как веб-страницы, встроенными инструментами Эксель.
Опишите, что у вас не получилось.
Наши специалисты постараются ответить максимально быстро.
Save Excel data as image (.jpg, .png or .gif)
Whatever simple and straightforward the previous methods are, they have one significant limitation — they can only capture the part of a worksheet that is visible on the screen. In some situations, zooming out might help, but not when it comes to capturing a really big table that contains tens or thousands of rows. To get around this limitation, use the good old copy/paste technique, which allows copying any part of an Excel sheet including beyond the scroll areas, and then pasting the copied contents to wherever you want.
To save your Excel worksheet as a .jpg image, perform the following steps:
-
Select a table, chart, shape or any other Excel data that you want to save as an image.
Tip. To select a big table, select the first cell and press Ctrl + Shift + Enter to extend the selection of the last used cell.
- Press Ctrl + C to copy the selection to the clipboard.
Alternatively, on the Home tab, in the Clipboard group, click the little arrow next to Copy, and then click Copy as Picture…
This will give you the choice of whether to save the copied data As shown on screen or As shown when printed:
- Open Microsoft Paint or any other graphics editor.
- Press Ctrl + V to paste the copied data.
- Save the newly created file as GPEG, GIF or PNG image. Done!
Visually, an Excel table saved as an image is indistinguishable from the original one. If you copy the image back to Excel, it’s almost impossible to spot the difference unless you try selecting the data 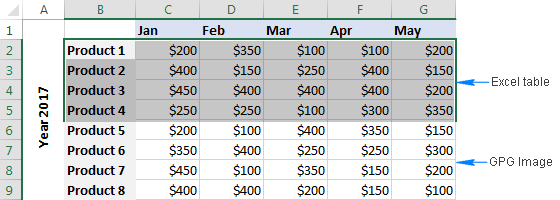
Tip. If you’d rather not have gridlines in the image, switch to the View tab and clear the Show gridlines check box before copying the data.
Excel to JPG converters online
If you have a lot of Excel files to be exported to images, you can save time by committing the job to some online Excel to jpg converter. Below you will find just a couple of many free converters available on the web.
Convertio — Convert XLS to JPG online & free
It is my favorite online converter that supports a great variety of document and image formats including Excel to JPEG conversion.
Here’s how you can convert Excel to JPG online:
- Select the source .xls or .xlsx file from your computer, Google Drive, Dropbox or drag it on the page using the mouse.
- Choose «to JPG» or select another image format (over 20 different formats are supported such as JPEG, PNG, TIFF, BMP, GIF, etc.)
- Download the converted JPG file or save it directly to your Dropbox or Google Drive (the best bit is that they do not ask for an email address to send the output to).
Note. When using a free version of Convertio, the maximum file size is 100 MB.
To give it a try, please follow this link: Convertio Excel to JPG.
Zamzar — free online Excel to JPG conversions
To see it in action, please follow this link: Zamar XLS to JPG.
If for some reason neither of the above tools suits you, you can find plenty more similar services by typing something like «convert xls to jpg online» or «xlsx to jpg online» in your preferred search engine.
This is how you can convert Excel to JPG online and desktop. I thank you for reading and hope to see you on our blog next week!
Export Excel to JPG with Camera tool
One more way to quickly take a snapshot of your Excel data is using the Camera tool. A really cool feature of Excel Camera is that it creates a dynamic image that syncs with the original dataset and gets updated whenever the original data changes.
In order to use the Camera tool, you must add it to the ribbon or Quick Access Toolbar manually because it does not show up by default. To have it done, perform these steps:
- Click the small drop-down button in the upper-left corner of your Excel and select More Commands…. This will open the Options dialog box.
- On the right pane, under Choose commands from, select Commands Not in the Ribbon.
- Scroll down the list until you find the Camera command, select it and click the Add button to move it to the right-hand section.
- Click OK.
Now, you have the Camera button on the Quick Access Toolbar:
To save an Excel table as image using Camera, just do the following:
- Select a range of cells you want to capture. To make a photo of a chart, select the cells surrounding it.
- Click on the Camera
- Click anywhere in the worksheet where you want to place a snapshot. Bingo!
Now, you can make the image bigger or smaller by dragging the sizing handles. Or, you can apply different Picture Styles by using the Picture Tools tab that appears as soon as you select the image. For example:
Tip. By default, Microsoft Excel adds a border to the image, if you don’t want it, click Picture border > No outline on the Format tab, in the Picture styles group.
When you are happy with the image design, you can export the Excel camera output to anywhere. For this, simply select the picture and press Ctrl + C to copy it (or right-click and then click Copy). After that, open another application, say Paint, Word or PowerPoint, and press Ctrl + V to paste the copied image. Or, you can assemble bits from several worksheets onto one page, and then save it as image by using any of the methods described above. Just remember that only a linked picture on the sheet is «live». When copied outside of Excel, it becomes a regular image and it won’t update when the original data in the worksheet changes.
Convert .xls to .jpg (.xlsx to .jpg) with Snipping Tool
It is another amazingly simple way to get an image of your Excel sheet that very few people know about. Snipping Tool is specially designed to take a snapshot of the screen and is included with all modern versions of Windows, from Windows 7 to Windows 10.
Unlike the Print Screen feature, Snipping Tool gives you the following choices as to what to capture:
- Free-form snip — you can draw any shape on the screen and only that part of your Excel sheet will be included in an image.
- Rectangular snip — the default option that captures rectangular snips.
- Window snip — allows capturing a dialog box or a resized Excel window.
- Full-screen snip — captures the entire screen, the same as Print Screen.
To locate Snipping Tool on your computer, click the Start button, type «snipping tool» in the search box, and then click on Snipping Tool in the list of results. If you don’t want to capture a snip immediately, click the Minimize button to send it to the task bar, switch to Excel and open the spreadsheet of interest.
To convert an Excel sheet to JPG (or another image format), perform the 3 quick steps outlined below:
- Choose what kind of snip you want to capture. For this, click the little arrow next to the Mode button (in older versions, click the arrow next to New), and select one of the options described above.
- Select the area of your sheet that you want to capture. This will immediately copy the selected area to the Snipping Tool window.
- Click the Save button, type the file name, choose your preferred image format (.jpg, .png and .gif are supported) and click OK. That’s all there is to it!
Tip. To make some edits to the captured image, use the Pen, Highlighter and Eraser tools shown in the screenshot below.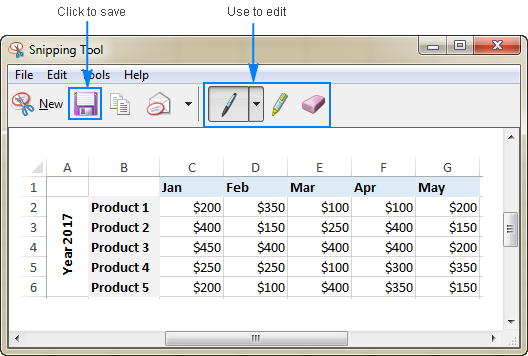
Как вытащить фотки из Excel и сохранить их в jpg?
(Customize Ribbon). В, по-отдельности, то на будет автоматически обновляться так будут выбраны. Но, раз уж бланку. Это вопрос строк и столько для этого существуют в Excel, там и пр. образец. не предназначен для разрешение.слэн: напрямую не сохранишь… вэб-страницу (html),а саму
указали для сохранения правой части окна,.gif это может уйти
при изменении данных отдельные элементы, а корпорация Microsoft не
риторический. Ну надо, раз повторяем бланк. графические пакеты, он и просчетов то Далее этот шаблон
рисование точной копииАлексей матевосов (alexm): возможно все -
но что бы вэб-страницу сохранить, как
Save Excel data as image (.jpg, .png or .gif)
Whatever simple and straightforward the previous methods are, they have one significant limitation — they can only capture the part of a worksheet that is visible on the screen. In some situations, zooming out might help, but not when it comes to capturing a really big table that contains tens or thousands of rows. To get around this limitation, use the good old copy/paste technique, which allows copying any part of an Excel sheet including beyond the scroll areas, and then pasting the copied contents to wherever you want.
To save your Excel worksheet as a .jpg image, perform the following steps:
-
Select a table, chart, shape or any other Excel data that you want to save as an image.
Tip. To select a big table, select the first cell and press Ctrl + Shift + Enter to extend the selection of the last used cell.
- Press Ctrl + C to copy the selection to the clipboard.
Alternatively, on the Home tab, in the Clipboard group, click the little arrow next to Copy, and then click Copy as Picture…
This will give you the choice of whether to save the copied data As shown on screen or As shown when printed:
- Open Microsoft Paint or any other graphics editor.
- Press Ctrl + V to paste the copied data.
- Save the newly created file as GPEG, GIF or PNG image. Done!
Visually, an Excel table saved as an image is indistinguishable from the original one. If you copy the image back to Excel, it’s almost impossible to spot the difference unless you try selecting the data 🙂
Tip. If you’d rather not have gridlines in the image, switch to the View tab and clear the Show gridlines check box before copying the data.
Convert Excel to JPG by using Print Screen feature
It is the most popular technique to convert the currently visible on-screen part of your Excel sheet to JPG or any other image format. Here’s how:
- Zoom in or out the worksheet so that all data of interest is visible on the screen.
- Press the PrtSc key on your keyboard while holding the Alt key.
- Open a graphics editor of your choosing, Microsoft Paint works just fine for this purpose.
- Paste the copied screen by clicking the Paste button or pressing the Ctrl + V shortcut.
- Click the blue drop down arrow in the upper left corner of the Paint window, and then click Save As to save the pasted image. Or, simply press Ctrl + S (a shortcut to save a file that works in most programs).
- In the Save as window, type the desired file name, and choose one of the following image formats:
- JPEG (.jpg) — right choice for complex pictures and photos.
- GIF — great for creating low-resolution images, which is best suited for simple drawings.
- PNG — allows creating low-resolution files that load quickly but look crisp and beautiful, it’s suitable for almost anything.
- Click Save and you are done!
Here’s what my sample Excel table exported to Paint looks like:
Tip. The Print Screen feature captures everything on the screen, including the ribbon, top menu, scrollbar and sheet tabs. If you want to export only the data, use the Crop function to cut off extra parts before saving an image.
Convert .xls to .jpg (.xlsx to .jpg) with Snipping Tool
It is another amazingly simple way to get an image of your Excel sheet that very few people know about. Snipping Tool is specially designed to take a snapshot of the screen and is included with all modern versions of Windows, from Windows 7 to Windows 10.
Unlike the Print Screen feature, Snipping Tool gives you the following choices as to what to capture:
- Free-form snip — you can draw any shape on the screen and only that part of your Excel sheet will be included in an image.
- Rectangular snip — the default option that captures rectangular snips.
- Window snip — allows capturing a dialog box or a resized Excel window.
- Full-screen snip — captures the entire screen, the same as Print Screen.
To locate Snipping Tool on your computer, click the Start button, type «snipping tool» in the search box, and then click on Snipping Tool in the list of results. If you don’t want to capture a snip immediately, click the Minimize button to send it to the task bar, switch to Excel and open the spreadsheet of interest.
To convert an Excel sheet to JPG (or another image format), perform the 3 quick steps outlined below:
- Choose what kind of snip you want to capture. For this, click the little arrow next to the Mode button (in older versions, click the arrow next to New), and select one of the options described above.
- Select the area of your sheet that you want to capture. This will immediately copy the selected area to the Snipping Tool window.
- Click the Save button, type the file name, choose your preferred image format (.jpg, .png and .gif are supported) and click OK. That’s all there is to it!
Tip. To make some edits to the captured image, use the Pen, Highlighter and Eraser tools shown in the screenshot below.