Нам не удалось создать новый или найти существующий раздел
Содержание:
- Форматируем жесткий диск в «Семерке»
- What is diskpart
- Простейший алгоритм использования консольной команды
- More Information
- Как создать загрузочную флешку с помощью командной строки
- About Windows 10 Disk Management
- Solution 3 — Extend volume on Windows 10 with 3 freeware
- Method1: initialize a disk with Diskpart
- Deleting a Hard Drive Partition Or Volume Using Diskpart
- Как удалить или скрыть системные разделы
- Free alternative to Windows 10/11 DiskPart Utility
- Diskpart Create Partition Windows 10
- How to Extend Server C drive using diskpart?
- Diskpart commands
- It’s Very Easy to Create Primary Partition, Extended Partition, and Logical Partition
Форматируем жесткий диск в «Семерке»
Группа способов, которые мы будем рассматривать, реализуются без необходимости установки стороннего программного обеспечения. Первый вариант более простой и менее функциональный, а второй, наоборот, потребует нескольких шагов, однако, способен отформатировать любую флешку или любой жесткий диск даже тот, который содержит ошибки.
Используем функционал операционной системы
Итак, для того чтобы отформатировать жесткий диск делаем следующие шаги:
- Сначала запускаем проводник Windows, сделав двойной клик на иконке компьютера на рабочем столе либо в меню «Пуск».
- После этого находим том, который хотим отформатировать и делаем на нем правый клик мышью. Из появившегося контекстного меню выбираем пункт форматирования (вы видите его на скриншоте ниже).
- Тут можно выбрать один из двух режимов: быстрое или полное форматирование. Второй вариант перезаписывает всю файловую таблицу заново, однако, при больших объемах способен занимать очень много времени. Чаще всего хватает простого быстрого форматирования.
- На следующем этапе выбираем тип файловой системы. По умолчанию следует выбрать NTFS и указать метку будущего тома.
- В результате начнется и сам процесс форматирования, который при установленной галочке отнимет всего несколько секунд.
Вы должны понимать, что операционная система просто не даст форматировать тот диск, на котором она сама установлена. Если нам нужно очистить такой том придется использовать загрузочную флешку и заодно устанавливать саму ОС.
Работаем через командную строку
Иногда какой-либо том жесткого диска Windows 7 попросту не хочет форматироваться. Это может происходить в связи с возникшими ошибками файловой таблицы либо другими причинами. Так или иначе, операционная система позволяет нам реализовать алгоритм, который исправить все ошибки и заново «нарежет» файловую таблицу.
Реализуется это примерно так:
- Запускаем командную строку от имени администратора. Для этого открываем меню «Пуск» и в поиске Windows 7 пишет 3 английские буквы «cmd». Кликаем правой кнопкой мыши по найденному результату и из контекстного меню выбираем нужный пункт.
- В открывшейся командной строки пишем слово diskpart . После этого жмем Enter . Далее выведем список всех имеющихся томов, введя команду list disk .
- Теперь нужно по размеру тома определить, тот ли это диск, который мы хотим форматировать. Совершив ошибку на данном этапе, мы можем запросто удалить все важные данные, например, с диска D. Будьте осторожными, внимательно следите за размером тома. Для того чтобы его выбрать пишем select disk и нужную цифру.
- Ещё раз убеждаемся в том, что выбран правильный диск и очищаем все его содержимое, введя команду clean . После нескольких мгновений ожидания наш диск будет очищен и не просто очищен, а удален.
- Теперь нужно создать раздел и отформатировать его. Для этого снова открываю в меню «Пуск» поисковую строку и пишем в ней «администрирование». Далее выбираем нужный результат из выдачи. В левой половине окна жмем «Управление компьютером», а потом «Управление дисками».
- Делаем правый клик по неразмеченному пространству, в которое превратился наш раздел, и из контекстного меню выбираем пункт «Создать простой том». Следуя подсказкам пошагово мастера, создаем нужный объект. Форматирование произойдет в автоматическом режиме и новенький диск появиться в нашем проводнике.
What is diskpart
The diskpart utility (available in Windows 2000, XP, Vista, 7, 8, 8.1 and 10) can be used to create or delete partitions on your PC.
Command Prompt: list disk
The utility allows you to:
- Partion
- Remove partitions
- Remove formatting
- Assign and remove drive letters and mount points
- Convert disks from basic to dynamic
- Create and extend volumes
Most commands that you can perform in Disk Management (see Boot partitions) are available with diskpart. Because it’s a command line utility, you need to open Command Prompt and type .
On Windows Vista, 7, 8 and 10 systems, you can type at Run, click OK or press Enter and Command Prompt will automatically open with diskpart loaded.
When the utility is loaded, you will notice the version installed on your computer:
Microsoft DiskPart version 6.1.7600
Copyright  1999-2008 Microsoft Corporation.
On Computer: MY_COMPUTER
Commands and parameters
The diskpart tool has the following commands and parameters available:
- can set the focus on a specific target
-
– use this command to set the focus on a specific disk
- – use the select partition command to set the focus on a specific partition
- – use this command to set the focus on a specific volume
- will deliver information about the current disk
- will deliver information about the current partition
- will deliver information about the current volume
- – use list disk to get summary information about the available disks on your computer
- – use this command to get information about each partition available on a specific disk
- – use list volume to get information about each volume available on the computer
- – use the active command to set the focus on the current partition to be active
- – use assign to assign a letter or a mount point to the current active partition
- – use this command to create a new primary partition. The is the size of the partition you want to create, in MB.
- – use this command to create a new extended partition. The is the size of the partition you want to create, in MB.
- – use this command to create a new logical partition. The is the size of the partition you want to create, in MB.
- will delete the current active partition
- will extend the current volume
- will remove a letter or a mount point from the current active partition
- – use this to set the current volume as active
- – use this command to add a mirror to the current active volume
- – use this command to break the mirror added
- – use this to create a stripe set volume on a specified disk
- – use this command to create a Raid-5 volume on a specified disk
- – use this command to delete a missing dynamic disk
- – use this command to delete the current active partition
- – use this command to extend the current volume
- can be used to import disks from a foreigh disk group
- can be used to bring a disk or a volume online that was previously offline
- can be used to remove a letter or a mount point from the current active volume
- is used to prepare a volume to be used as a boot or system volume
- will set the partition style of the current disk to MBR
- will set the partition style to GPT
- will change a basic disk into a dynamic one
- will convert a dynamic disk (empty disk) into a basic disk
- will exit the utility
- will remove the partition or volume formatting from the current disk
- can rescann the I/O buses and can discover new disks added to the computer
- will display the list of all available commands
Error Codes
You can find a list error codes to debug various errors:
- Code means that no errors occurred
- Code means that a fatal exception occurred
- Code means that the parameters you specified for a command are incorrect
- Code means that diskpart is unable to open the specified file
- Code means that diskpart (one of the services used by the utility) returned a failure
- Code means a command syntax error
Простейший алгоритм использования консольной команды
Теперь о практическом использовании этого инструмента. Изначально вызывается командная строка. Если она запускается в работающей системе, обязательно старт производить от имени администратора. Если же речь идет о консоли восстановления при загрузке с внешнего носителя, роли это не играет.

Первым делом стартуют команды diskpart
и list disk
(в некоторых случаях можно использовать дополнение volume
для просмотра литеры выбранного раздела). Первая активирует основной инструмент, вторая предоставляет информацию по всем имеющимся в системе дискам и разделам. Команда выбора раздела в DiskPart имеет такой вид: select disk X
, где X
— номер раздела или диска, указанный при просмотре всех имеющихся.

Строка clean
удаляет все содержимое раздела, затем используется команда создания первичной загрузочной записи create partition primary
, далее водится строка select partition 1
(указание номера созданного раздела), потом раздел активируется строкой active
и, наконец, производится форматирование — format fs=ntfs
, если нужна именно эта файловая система.
Но вышеуказанная команда производит полное форматирование. Если не хочется терять время, можно в конце строки добавить quick, что соответствует быстрому форматированию.
Теперь дело за малым. Созданному разделу нужно присвоить литеру командой assign
, после чего можно выйти из командной консоли либо ее обычным закрытием, либо вводом строки exit
, что способствует корректному завершению ее работы.
More Information
Support Links
-
Easy Recovery Essentials for Windows – our repair and recovery disk.
It’s an easy-to-use and automated diagnostics disk. It’s available for Windows 8, Windows 7 and Windows Vista. It’s also available for Windows XP and Windows Server.Read more at Windows Recovery Disks.
Applicable Systems
This Windows-related knowledgebase article applies to the following operating systems:
- Windows XP (all editions)
- Windows Vista (all editions)
- Windows 7 (all editions)
- Windows 8 (all editions)
- Windows 8.1 (all editions)
- Windows 10 (all editions)
- Windows Server 2003 (all editions)
- Windows Server 2008 (all editions)
- Windows Server 2012 (all editions)
Как создать загрузочную флешку с помощью командной строки
Загрузочная флешка необходима для выполнения различных задач, как административных задач на компьютере, так и восстановления работоспособности и установки операционных систем, удаления вирусов и многих других операций.
Функционал загрузочной флешки определяется составом образа, который планируется на него записать. Это могут быть образы LiveCD, образы операционных систем или специальные сборки и другое.
Существует множество утилит, которые позволяют создавать загрузочные USB накопители, однако не прибегая к стороннему программному обеспечению, для создания загрузочной флешки можно воспользоваться стандартными средствами Windows, а именно командной строкой. Для создания загрузочной флешки на ней необходимо создать загрузочный сектор, так называемый boot-сектор. Для этого откройте командную строку с правами администратора и введите команду DISKPART.
DISKPART – это специальная утилита, позволяющая работать с разделами жестких дисков, производить их очистку и форматирование, и другие операции. Утилита работает, так же, как и консоль Windows, посредством ввода текстовых команд.
Процесс создания загрузочной флешки с помощью утилиты DISKPART следующий:
Скриншот 1. Отображение в окне утилиты DISKPART списока доступных дисков
Необходимо подключить USB накопитель к компьютеру, после чего в окне утилиты DISKPART введите следующую команду (См.скрин. 1):list disk
Данная команда позволяет отобразить на экране список доступных дисков. Это необходимо для того, чтобы для дальнейшей работы с флешкой выбрать именно USB-накопитель, а не раздел жесткого диска.
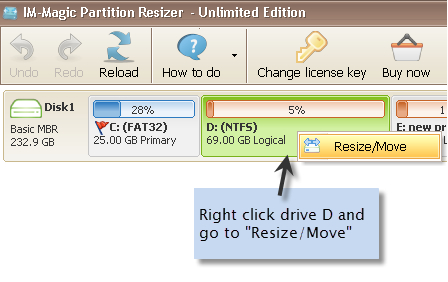
Список дисков достаточно простой, в первом столбце идут номера дисков, во втором отображается их состояние, в третьем – размер и т.д. Ориентируясь на объем накопителя запомните номер диска, в моем случае флешка находится под номером 1 (Диск 1) (См. Скрин. 2).
Скриншот 1. Выбор USB-накопителя
Теперь следует выбрать накопитель, введите команду:select disk 1
В моем случае указан диск под номером 1, который на следующем этапе очистим, введите команду:clean
Диск подготовлен к дальнейшей его модификации. Создайте на флешке основной или главный раздел, введите команду:create partition primary
Работа в интерпретаторе сложна тем, что требуется точно соблюдать последовательность действий. Если вы создали раздел, то чтобы с ним работать его необходимо выбрать:select partition 1
Раздел вы выбрали, теперь сделайте его активным:active
Чтобы задать необходимую файловую систему на флешке необходимо ее отформатировать:format fs=NTFS
Процесс форматирования может длиться несколько минут, в зависимости от объема вашего носителя. При необходимости можно назначить букву дисковому разделу на флешке, введите команду:assign letter Z
Рекомендуем указывать букву с конца латинского алфавита, чтобы не создавать конфликт с другими разделами логических дисков, поэтому флешке назначена буква Z.
Итак, вы создали загрузочную флешку с помощью командной строки, также вы подготовили ее для записи образа, закройте DISKPART, введите команду:exit
Следующим шагом будет запись ISO образа на флешку, для этого его необходимо разархивировать и скопировать все папки и файлы в корень накопителя. Стоит отметить, что после разархивации ISO образа, файлы и папки могут быть помещены в папку с именем образа, необходимо скопировать на флешку не эту папку, а файлы и папки, которые в ней находятся. Для распаковки образа можно воспользоваться программами архиваторами, например, 7-Zip или HaoZip либо любой другой архиватор, который поддерживает работу с форматом файлов . ISO.
Кроме того, в случае если у вас установлена операционная система Windows 8 или Windows 10, так как данные операционные системы включают в себя стандартные средства для работы с ISO образами, для распаковки образа можно не использовать архиваторы, а смонтировать образ, для этого достаточно щелкнуть правой кнопкой мыши на файле ISO образа и в контекстном меню нажать кнопку «Подключить», после чего образ будет смонтирован в виртуальный DVD-привод, а файлы находящиеся в нем можно скопировать на созданную вами загрузочную флешку. Для отключения виртуального привода в проводнике щелкните на нем правой кнопкой мыши и в контекстном меню нажмите кнопку «Извлечь».
После копирования файлов из образа, флешка полностью готова для установки операционных систем или использования для выполнения восстановительных, реанимационных работ с системой и т.д. Не забудьте в настройках BIOS установить в качестве первого устройства загрузки USB-диск, чтобы компьютер загружался с флешки, а не с жесткого диска.
About Windows 10 Disk Management
Windows 10 is the latest Operating System (OS) released by Microsoft. It improves much compared with Windows 8 such as adding the Start Menu seen in Windows 7, a virtual desktop system, a voice assistant named Cortana, Xbox app and streaming, and Edge browser.
Disk Management is a built-in tool in Windows 10 that is widely known by PC users. It is able to help you manage hard disk partitions without rebooting the system and any interruption. It is a convenient tool for Windows 10 users. The features of Windows 10 Disk Management are as follows:
Create, delete and format partitions.
Change drive letter and paths.
Mark partition as active.
Explore partition to view files.
Extend and shrink partition.
Add mirror.
Initialize a brand new disk before you can use it.
Convert empty MBR to GPT disk, and vice versa.
Convert empty dynamic disk to basic disk.
More about partition hard drive Windows 10.
Solution 3 — Extend volume on Windows 10 with 3 freeware
When you fail to expand size of disk volume on Windows 10 by running Diskpart command, you have another choice to perform partition resizing, namely partition software.
#1 Freeware — IM-Magic Partition Resizer Free is a completely free partition tool which enables you to increase size of system partition and data partition on Windows 10. It supports both NTFS file system and FAT32 file system. This partition software also allows you to shrink volume, move volume, format volume, delete volume and so on.
More video tutorials are on https://www.resize-c.com/video/
Download IM-Magic Partition Resizer Free Edition
#2 Freeware — Easeus Partition Master Free
Easeus Partition Master Free provides free disk management for users to resize, move, copy, convert disk partitions with easy to use interface. The free version is for home use.
#3 Freeware — Macrorit Partition Expert Free
Macrorit Partition Expert Free is yet another useful disk management tools that provides easy to use disk partitioning functions not limited to move partition, copy partitions, deleted partitions etc.
Method1: initialize a disk with Diskpart
Diskpart is one of Windows basic utilities with command line. You can use it to manage your disk/partition/volume with a special command line, such as create/delete/format/extend/shrink partitions and initialize/convert disk, etc. It is more powerful than Windows Disk Management. To use a new disk or wipe existing disk, the initialize disk of Diskpart can work it out. Windows snap-in tool Diskpart initialize disk can help you use a new disk and wipe a hard disk clean with its command line. To use it, you can do as following shows.
You need to open a command prompt first. Click Start, type “cmd” in the search bar. Press Enter, it will pop out a command prompt. Or, you can press «WIN+R» and type «cmd» to open the prompt. Then, type diskpart in the prompt and press Enter.
So, here you should type «list disk» first, when it list all the disks, type «select disk, which you want to initialize.
Next, type “attributes cleared successfully” so that it can move to the next step smoothly. Then, type “online disk”, then, the Diskpart successfully onlined the selected disk.
Next, you can type “convert mbr” or “convert gpt” to change the selected disk to MBR format or GPT format according to your requirements.
Once you initialized the disk and convert the disk into MBR format or GPT format, you can create partition on it, which is pragmatic. You can use Diskpart to create partition for you.
Deleting a Hard Drive Partition Or Volume Using Diskpart
A hard drive (disk) is separated into partitions, which are often the same as listed volumes. If your hard drive is separated into several partitions or volumes, and you wish to delete one, you can do that using Diskpart commands.
- Select your hard drive using select disk.
- At the “DISKPART>” prompt, type list partition, then select partition #, replacing # with your partition number.
- Once a partition is selected, type delete partition. Diskpart will confirm whether or not the partition has been deleted afterward.
- You can also delete disk volumes directly if you’d prefer. Type list volume, locate your chosen volume number, then type select volume #, replacing # with your volume number.
Type delete volume to delete the volume completely. Diskpart will confirm if the command was successful or not afterward.
Как удалить или скрыть системные разделы
Перед тем как изменять или удалять системные разделы, учтите такие моменты.
- Этого не следует делать, если ваш компьютер или ноутбук на гарантии.
- Стоит сделать копию раздела на всякий случай. Например, чтобы сохранить лицензию на систему, приобретённую вместе с ноутбуком.
- Имейте при себе загрузочный диск с Windows, чтобы переустановить систему, если что-то сломаете.
Как удалить раздел
Если вы всё-таки хотите удалить системные разделы, чтобы высвободить место или избавиться от предустановленных приложений, которые вам не нужны, это можно сделать несколькими способами.
Во-первых, можно воспользоваться такими программами для управления разделами, как Acronis Disk Director или Paragon Partition Manager. Либо удалить раздел в стандартном «Управлении разделами» Windows.
Во-вторых, можно просто удалить ненужные разделы через командную строку.
Откройте командную строку от имени администратора и введите:
Затем выводим список разделов:
Запомните номер вашего раздела и введите:
select partition номер_раздела
delete partition override
И ненужный раздел удаляется.
Как скрыть раздел
Обычно системные разделы не отображаются в «Проводнике» и не особенно заметны пользователю. Но если один из системных разделов почему-то стал видимым и раздражает вас, его можно легко скрыть.
Вызовите «Управление разделами». Для этого можно нажать Windows + R и ввести diskmgmt.msc. Затем отыщите нужный раздел, щёлкните по нему правой кнопкой мыши и выберите пункт меню «Изменить букву диска или путь к диску». Затем удалите букву диска.
Теперь ненужный раздел перестанет отображаться в «Проводнике».
Как предотвратить создание зарезервированного раздела
Вы можете предотвратить создание зарезервированного раздела при установке Windows, хотя делать этого и не рекомендуется. Но вы можете установить загрузочные файлы прямо в системный раздел.
- Начните устанавливать Windows и нажмите Shift + F10, чтобы вызвать окно командной строки.
- Введите diskpart и нажмите Enter.
- Создайте новый раздел в неразмеченном пространстве. Например, если вы устанавливаете систему на пустой диск, вы можете просто выбрать его целиком. Или создать отдельный раздел для документов и прочих ваших данных, если хотите.
- Продолжите установку. Когда вам предложат создать новый раздел для системы, просто выберите тот, что создали в предыдущем пункте.
Так вы уместите и загрузочные файлы, и систему в один раздел. Правда, вы не сможете пользоваться BitLocker. Зато уменьшите количество разделов, занимаемых системой. Это может быть полезно, если вы устанавливаете Windows второй системой и не хотите, чтобы она плодила разделы.
Free alternative to Windows 10/11 DiskPart Utility
As DiskPart alternative, AOMEI Partition Assistant Standard is a free partition manager software and disk management tool, which provides more features than DiskPart. It not only supports Windows 10, but also supports Windows 11/8.1/8, Windows 7, Vista, and XP. With a user-friendly interface, it is very easy to use.
To perform an operation on a partition, you just need to right-click on it. The operations supported by AOMEI Partition Assistant Standard are as below:
The operations of disk management and step-by-step wizards are as below:
DiskPart in Windows 10/11 can meet the basic requirement of most users. And the free AOMEI Partition Assistant is more advanced than it and provides more amazing features. For example, it can extend/shrink both FAT32 and NTFS partition. For extending a partition, its “Merge partition” allows users to add non-adjacent unallocated space into the target partition. It is able to format large partition (2TB at most) to FAT32 file system. For partition style conversion, it can convert data disk between MBR and GPT without deleting partitions.
You can download this freeware and have a try. To get more advanced features, such as converting dynamic disk into basic without losing data, recovering lost partition, you can upgrade AOMEI Partition Assistant Standard to Professional version.
Download Freeware Win 11/10/8.1/8/7/XP
Secure Download
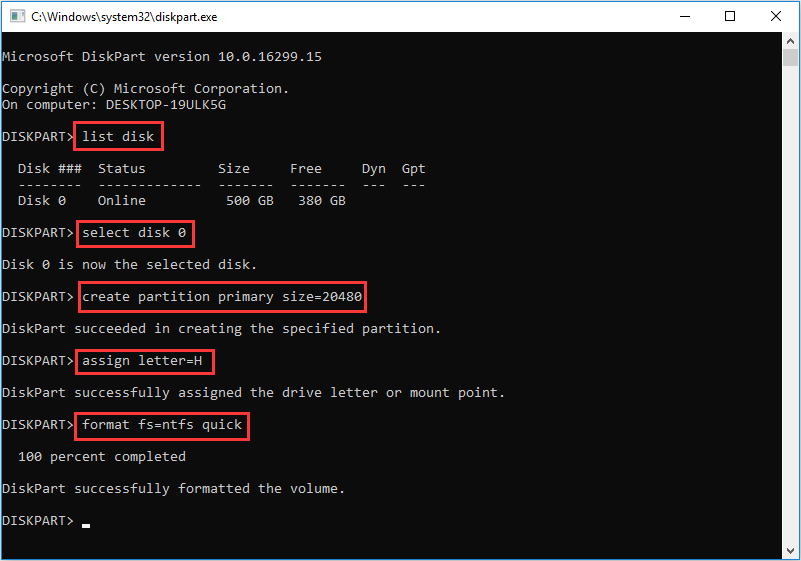
Diskpart Create Partition Windows 10
To create partition using diskpart is very simple. If you are a novice, you can follow the steps and screenshots as below to create partition Windows 10.
Step 1. Press WIN+R key at the same time to open the Run window and then input diskpart to open the diskpart window.
Step 2. At the diskpart window, input list disk. Then all the disks in current system will be listed so that you know the disk number on which you want to create a partition.
Step 3. Input select disk *(* represents the disk number)
Tip: To create a new partition with diskpart, make sure there is unallocated space on the disk you select.
Step 4. After selecting the disk, type one of the following commands according to your requirements.
If you want to create a primary partition, type:
create partition primary size=n (n represents the partition size in MB)
If you want to create a logical partition, you need to create an extended partition at first and then create a logical partition. Type:
create partition extended size=x (x reprents the extended partition size in MB)
create partition logical size=y (y represents the logical partition size in MB)
Step 5. Input assign letter=H to give the new partition a name.
Step 6. Input format fs=ntfs and press Enter. To use the new partition, you must format the partition firstly. This process could be very slow sometimes, so if you want to quicken the process, you can input format fs=ntfs quick and press Enter.
Step 7. Type exit and press Enter.
After seeing the steps above, you may find it is not so difficult to create partition using diskpart. If you still find diskpart create volume is a little complicated, you can try some software with graphic interface to create partition Windows 10.
Actually, most people use diskpart to perform all kinds of disk partition operations, not just diskpart create partition. Here are some common operations that users would like to perform them with diskpart.
Create partition: You can create a primary partition, extended partition, logical partition by using the create partition primary/create partition extended/create partition logical commands respectively. Later I will demonstrate you detailed steps about how diskpart create partition.
Delete partition: You can delete the target partition with diskpart. Just select the target partition on the target disk and then use the delete partition command to delete it.
Format: Format partition with diskpart is very popular for Windows users. You can format any volume using this command. When performing format operation, make sure you select the right partition to format, as all the data on the partition will get lost.
Convert disk to basic/dynamic: You can convert a disk from dynamic to basic or from basic to dynamic with convert basic or covert dynamic command. However, if you want to convert a dynamic disk back to a basic disk with diskpart, you must delete all volumes from the disk, which will cause data loss.
Convert disk to MBR/GPT: You can convert an empty disk with MBR/GPT partition style to GPT/MBR partition style with convert gpt OR convert mbr command on the target disk, but make sure the disk is empty. Otherwise, you might lose all of your data.
Clean: The clean command will remove all partition or volume from the disk. All information on the disk will be cleared once you run clean command. But the data is recoverable as it will only mark the data on the disk as deleted, not secure erase the disk.
When you want to perform an operation on a particular disk/partition, firstly, you need list these disks, and then select a specific disk or partition to give it focus. When the disk or partition has been selected, any following diskpart commands you input will act on that object.
Note: If you open diskpart in Windows 2000, Windows XP and Windows Server 2003 with Recovery Console, there is a diskpart command which is significantly different from the one included in the actual operating system. It only provides functionality for adding and deleting partitions, and it does not support to set a partition active.
After learning what people usually do with diskpart, you may have a deeper understanding of diskpart.
Next, I will show you how to create partition Windows 10 with two diskpart create partition alternatives. Both of them are very easy to use with their graphical interface. Now let’s see how to create partition with the two diskpart create partition alternatives.
How to Extend Server C drive using diskpart?
Diskpart is a Windows Server self-contained utility that deals with disks, partitions or volumes by running a command-line through scripts or direct inputting commands. To enlarge drive c, briefly, you only need to input «list volume», «select volume c» and «extend» into diskpart command interpreter. However, there are still some parts need your attention. Therefore, we list the specific steps in detail:
Step 1. Click Win+R and type «diskpart» in the Run box, then press Enter on the keyboard.
Step 2. Type «list volume» and press Enter on the keyboard to display the existing volumes on the computer.
Step 3. Type «select volume c» and press Enter on the keyboard to focus on volume c.
Step 4. Type «extend » toextend volume c to disk n of size n.
Then, partition C will be extended with the unallocated space successfully.
Notes:
①Contents in the square brackets are unnecessary. That is to say, you can only type «extend» to extend the size of the selected volume.
②»size=n » specifies the space, in megabytes (MB), to add to the current partition. If you do not specify a size, the disk is extended to use all the next contiguous unallocated space.
③In Server 2003, there is no «extend» or «shrink» command to help resize a partition.
Diskpart commands
Familiarize yourself with the main available parameters:
select — a specific choice of target.
select disk — select a specific disk.
select section — select a specific section.
select volume — select a specific volume.
drive list — get a summary of the available drives on your computer.
partition list — get a summary of each partition available on a specific disk.
volume list — get a summary of each volume available on your computer.
active — activate focus on the current section.
assign — assign a letter or mount point to the current active partition.
create partition primary size = SIZE_IN_MB — create a new primary partition. SIZE_IN_MB is the size of the partition you want to create, in MB.
It’s Very Easy to Create Primary Partition, Extended Partition, and Logical Partition
You can do this in Windows Computer/Disk Management tool:
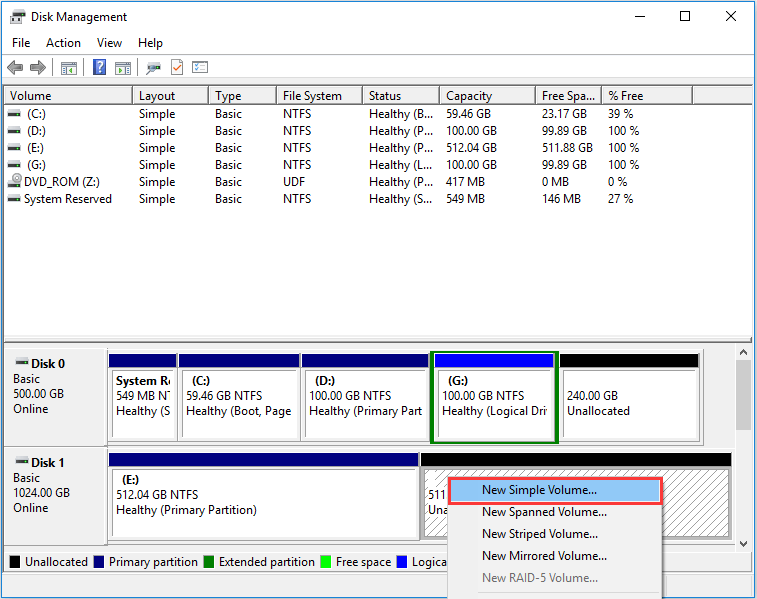
You might be interested in this post How do I open Disk Management on Windows 8.1 Right click unallocated space, choose New Simple Volume, and set partition properties by following instructions.
Nevertheless, in recent Windows operating systems, like Windows 7, Windows 8, and Windows 10, the former 3 partitions will be formatted to primary, and the fourth one formatted to extended by default. If you want to format the second or third partition to logical partition, third party program is required.
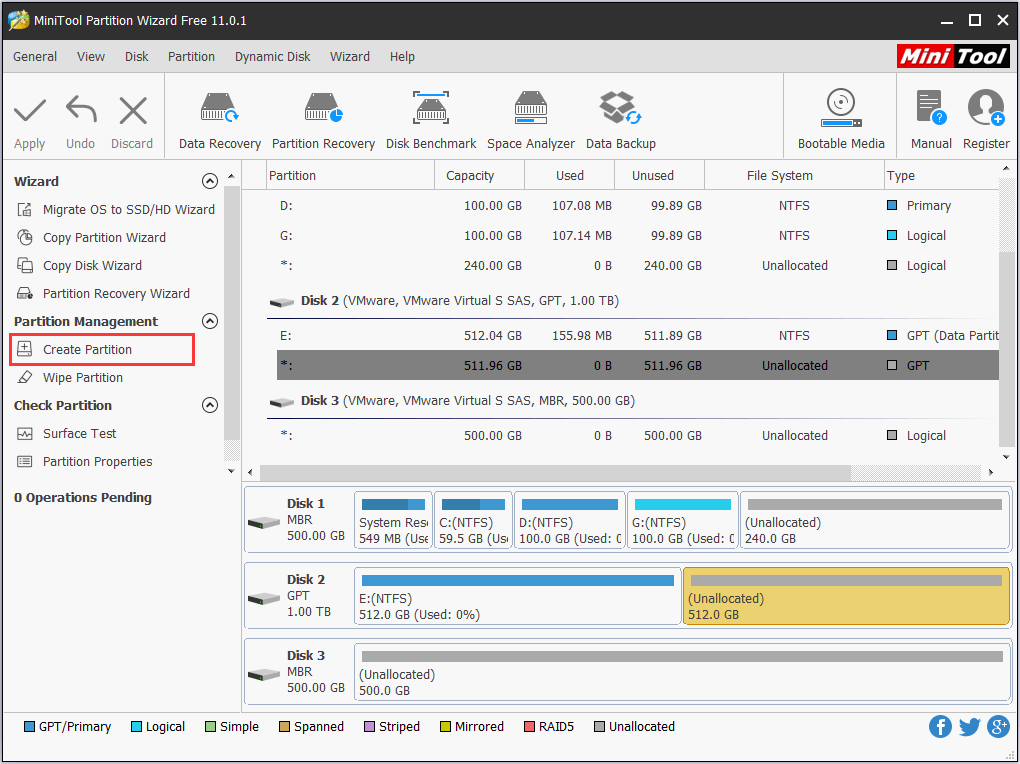
So you can choose to create partitions in MiniTool Partition Wizard: which is a freeware for home users
Step 1. Select the unallocated space and choose «Create Partition» feature from the left action pane.
Step 2. Set properties for this partition, and here we can choose partition type, from the drop-down menu of Create As. either primary or logical, even if we are creating the first partition.
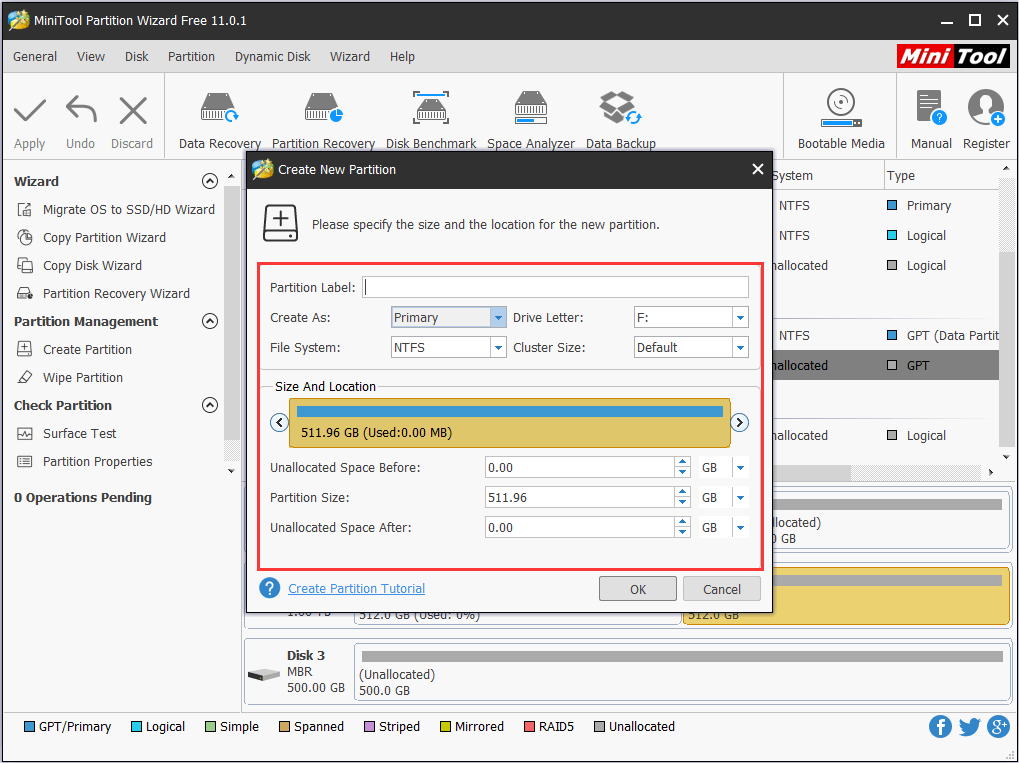
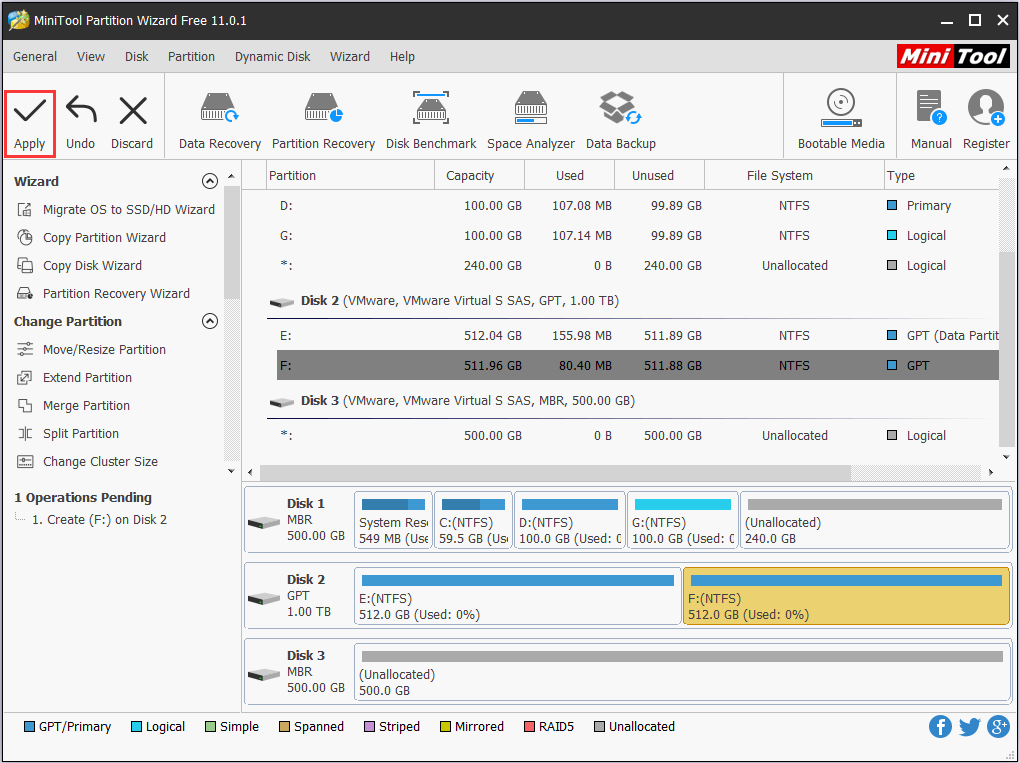
Step 3. Now it seems that we have created a logical partition on Disk 4. To make this change finally performed, please click «Apply» button.
However, sometimes we may need to convert a primary partition to logical or logical to primary. But when and how? Let’s see details.