Css margin
Содержание:
Схлопывание margin у соседних элементов
Схлопывание задумывалось в первую очередь для корректного отображения текста в абзацах. Расстояние между абзацами <p> без схлопывания увеличится в два раза, тогда как верхний margin у первого абзаца и нижний margin у последнего абзаца останутся неизменными. Схлопывание гарантирует, что расстояние в абзацах везде будет одинаковым.
В примере 1 два блока располагаются один под другим, при этом у первого блока отступ снизу равен 20px, а у второго блока отступ сверху равен 10px.
Пример 1. Схлопывание margin
<!DOCTYPE html>
<html>
<head>
<meta charset=»utf-8″>
<title>margin</title>
<style>
.block {
padding: 20px; /* Поля вокруг текста */
border: 1px solid #666; /* Параметры рамки */
}
.block1 {
background: #E2EDC1; /* Цвет фона первого блока */
margin-bottom: 20px; /* Отступ снизу */
}
.block2 {
background: #FCE3EE; /* Цвет фона второго блока */
margin-top: 10px; /* Отступ сверху */
}
</style>
</head>
<body>
<div class=»block block1″>Первый блок</div>
<div class=»block block2″>Второй блок</div>
</body>
</html>
Результат данного примера показан на рис. 1. Расстояние между двумя блоками будет равно не 30 пикселей, как многие ожидают, а 20 пикселей, потому что выбирается большее значение из двух margin.

Рис. 1. Вертикальное расстояние между блоков
Если оба значения margin положительные, то из них выбирается наибольшее значение и оно задаётся как расстояние между блоков.
На рис. 2 приведено схематическое изображение результата схлопывания margin.

Рис. 2. Схлопывание margin
Если один из margin отрицательный, то в этом случае происходит их складывание по правилам математики:
x + (-y) = x – y
Если один из margin отрицательный, тогда margin вычитаются.
На рис. 3 схематично приведено поведение блоков, когда верхний margin у нижнего блока отрицательный.

Рис. 3. Один margin отрицательный
Если полученное значение в результате суммирования окажется отрицательным, то оно будет действовать на нижний блок, соответственно, он сдвинется вверх на указанное значение. При этом возможно наложение одного блока на другой. В примере 2 показан блок с верхним отрицательным margin.
Пример 2. Отрицательный margin
<!DOCTYPE html>
<html>
<head>
<meta charset=»utf-8″>
<title>margin</title>
<style>
.block {
padding: 20px; /* Поля вокруг текста */
border: 1px solid #666; /* Параметры рамки */
}
.block1 {
background: #E2EDC1; /* Цвет фона первого блока */
margin-bottom: 20px; /* Отступ снизу */
}
.block2 {
background: #FCE3EE; /* Цвет фона второго блока */
margin-top: -10px; /* Отрицательный отступ сверху */
}
</style>
</head>
<body>
<div class=»block block1″>Первый блок</div>
<div class=»block block2″>Второй блок</div>
</body>
</html>
Результат данного примера показан на рис. 4. Расстояние между двумя блоками считается как отступ снизу у верхнего блока минус отступ сверху у нижнего блока (20px-10px). В итоге расстояние будет равно 10 пикселей.

Рис. 4. Вертикальное расстояние между блоков
Если оба margin отрицательные, то из двух значений выбирается наибольшее по модулю, оно же и выступает в качестве отрицательного отступа между элементами.
Так, если отступы равны -10px и -20px, то итоговое значение будет -20px. При этом элементы будут частично перекрываться (рис. 5).

Рис. 5. Отрицательные margin
Свойство margin = «0»
Начнем изучение margin, когда margin = «0» или вообще отсутствует!
Для этого нам понадобится какой-то блок на всю ширину нашей страницы, чтобы его увидеть добавим ему бордюр, установим высоту, ну к примеру, 300px.
width: 100%;
height: 200px;
border: 1px solid black;
И во внутрь поместим другой блок с текстом, что это наш блок.
width: 100px;
height: 20px;
border: 1px solid red;
И получим два блока, один внутри другого:
<div style=»width: 100%; height: 200px; border: 1px solid black;»>
<div style=»width: 100px; height: 20px; border: 1px solid red;»>Наш блок.</div>
</div>
Результат:
Наш блок.
Изменения, которые нужно учесть
Во время написания этого поста, уже после глубокого изучения и понимания концепции логических свойств, я заметил несколько упущенных моментов, которые следует поправить в будущем:
- заменить на
- заменить на
Но, похоже, пока не стоит этого ждать, по крайней мере в отношении . Это свойство обновили буквально только что и в его названии по-прежнему присутствует . Пример: .
Но кто знает, может этот пост попадётся на глаза правильным людям из W3C 🙂
Резюмируя
Вот и всё. Я надеюсь, что вам понравилась эта статья и вы узнали что-то новое. Я буду признателен, если вы поаплодируете или поделитесь этим постом 🙂
Definition and Usage
The margin property sets or returns the
margins of an element.
This property can take from one to four values:
- One value, like: div {margin: 50px} — all four margins will be 50px
- Two values, like: div {margin: 50px 10px} — the top and bottom margins will be 50px, left and right margins will be 10px
- Three values, like: div {margin: 50px 10px 20px}- the top margin will be 50px, left and right margin will be 10px, bottom margin will be 20px
- Four values, like: div {margin: 50px 10px 20px 30px} — the top margin will be 50px, right margin will be 10px, bottom margin will be 20px, left margin will be 30px
Both the margin property and the padding property insert space around an
element. However, the difference is that margin inserts the space around the
border, while padding inserts the space within the border of an element.
What Is Margin?
In finance, the margin is the collateral that an investor has to deposit with their broker or an exchange to cover the credit risk the holder poses for the broker or the exchange. An investor can create credit risk if they borrow cash from the broker to buy financial instruments, borrow financial instruments to sell them short, or enter into a derivative contract.
Buying on margin occurs when an investor buys an asset by borrowing the balance from a broker. Buying on margin refers to the initial payment made to the broker for the asset; the investor uses the marginable securities in their brokerage account as collateral.
In a general business context, the margin is the difference between a product or service’s selling price and the cost of production, or the ratio of profit to revenue. Margin can also refer to the portion of the interest rate on an adjustable-rate mortgage (ARM) added to the adjustment-index rate.
Key Takeaways
- Margin is the money borrowed from a broker to purchase an investment and is the difference between the total value of an investment and the loan amount.
- Margin trading refers to the practice of using borrowed funds from a broker to trade a financial asset, which forms the collateral for the loan from the broker.
- A margin account is a standard brokerage account in which an investor is allowed to use the current cash or securities in their account as collateral for a loan.
- Leverage conferred by margin will tend to amplify both gains and losses. In the event of a loss, a margin call may require your broker to liquidate securities without prior consent.
1:40
CSS Reference
CSS ReferenceCSS Browser SupportCSS SelectorsCSS FunctionsCSS Reference AuralCSS Web Safe FontsCSS Fallback FontsCSS AnimatableCSS UnitsCSS PX-EM ConverterCSS ColorsCSS Color ValuesCSS Default ValuesCSS Entities
CSS Properties
align-content
align-items
align-self
all
animation
animation-delay
animation-direction
animation-duration
animation-fill-mode
animation-iteration-count
animation-name
animation-play-state
animation-timing-function
backface-visibility
background
background-attachment
background-blend-mode
background-clip
background-color
background-image
background-origin
background-position
background-repeat
background-size
border
border-bottom
border-bottom-color
border-bottom-left-radius
border-bottom-right-radius
border-bottom-style
border-bottom-width
border-collapse
border-color
border-image
border-image-outset
border-image-repeat
border-image-slice
border-image-source
border-image-width
border-left
border-left-color
border-left-style
border-left-width
border-radius
border-right
border-right-color
border-right-style
border-right-width
border-spacing
border-style
border-top
border-top-color
border-top-left-radius
border-top-right-radius
border-top-style
border-top-width
border-width
bottom
box-decoration-break
box-shadow
box-sizing
break-after
break-before
break-inside
caption-side
caret-color
@charset
clear
clip
clip-path
color
column-count
column-fill
column-gap
column-rule
column-rule-color
column-rule-style
column-rule-width
column-span
column-width
columns
content
counter-increment
counter-reset
cursor
direction
display
empty-cells
filter
flex
flex-basis
flex-direction
flex-flow
flex-grow
flex-shrink
flex-wrap
float
font
@font-face
font-family
font-feature-settings
font-kerning
font-size
font-size-adjust
font-stretch
font-style
font-variant
font-variant-caps
font-weight
gap
grid
grid-area
grid-auto-columns
grid-auto-flow
grid-auto-rows
grid-column
grid-column-end
grid-column-gap
grid-column-start
grid-gap
grid-row
grid-row-end
grid-row-gap
grid-row-start
grid-template
grid-template-areas
grid-template-columns
grid-template-rows
hanging-punctuation
height
hyphens
image-rendering
@import
isolation
justify-content
@keyframes
left
letter-spacing
line-height
list-style
list-style-image
list-style-position
list-style-type
margin
margin-bottom
margin-left
margin-right
margin-top
mask-image
mask-origin
mask-position
mask-repeat
mask-size
max-height
max-width
@media
min-height
min-width
mix-blend-mode
object-fit
object-position
opacity
order
orphans
outline
outline-color
outline-offset
outline-style
outline-width
overflow
overflow-wrap
overflow-x
overflow-y
padding
padding-bottom
padding-left
padding-right
padding-top
page-break-after
page-break-before
page-break-inside
perspective
perspective-origin
pointer-events
position
quotes
resize
right
row-gap
scroll-behavior
tab-size
table-layout
text-align
text-align-last
text-decoration
text-decoration-color
text-decoration-line
text-decoration-style
text-indent
text-justify
text-overflow
text-shadow
text-transform
top
transform
transform-origin
transform-style
transition
transition-delay
transition-duration
transition-property
transition-timing-function
unicode-bidi
user-select
vertical-align
visibility
white-space
widows
width
word-break
word-spacing
word-wrap
writing-mode
z-index
CSS Свойства
align-contentalign-itemsalign-selfallanimationanimation-delayanimation-directionanimation-durationanimation-fill-modeanimation-iteration-countanimation-nameanimation-play-stateanimation-timing-functionbackface-visibilitybackgroundbackground-attachmentbackground-blend-modebackground-clipbackground-colorbackground-imagebackground-originbackground-positionbackground-repeatbackground-sizeborderborder-bottomborder-bottom-colorborder-bottom-left-radiusborder-bottom-right-radiusborder-bottom-styleborder-bottom-widthborder-collapseborder-colorborder-imageborder-image-outsetborder-image-repeatborder-image-sliceborder-image-sourceborder-image-widthborder-leftborder-left-colorborder-left-styleborder-left-widthborder-radiusborder-rightborder-right-colorborder-right-styleborder-right-widthborder-spacingborder-styleborder-topborder-top-colorborder-top-left-radiusborder-top-right-radiusborder-top-styleborder-top-widthborder-widthbottombox-decoration-breakbox-shadowbox-sizingcaption-sidecaret-color@charsetclearclipcolorcolumn-countcolumn-fillcolumn-gapcolumn-rulecolumn-rule-colorcolumn-rule-stylecolumn-rule-widthcolumn-spancolumn-widthcolumnscontentcounter-incrementcounter-resetcursordirectiondisplayempty-cellsfilterflexflex-basisflex-directionflex-flowflex-growflex-shrinkflex-wrapfloatfont@font-facefont-familyfont-kerningfont-sizefont-size-adjustfont-stretchfont-stylefont-variantfont-weightgridgrid-areagrid-auto-columnsgrid-auto-flowgrid-auto-rowsgrid-columngrid-column-endgrid-column-gapgrid-column-startgrid-gapgrid-rowgrid-row-endgrid-row-gapgrid-row-startgrid-templategrid-template-areasgrid-template-columnsgrid-template-rowshanging-punctuationheighthyphens@importisolationjustify-content@keyframesleftletter-spacingline-heightlist-stylelist-style-imagelist-style-positionlist-style-typemarginmargin-bottommargin-leftmargin-rightmargin-topmax-heightmax-width@mediamin-heightmin-widthmix-blend-modeobject-fitobject-positionopacityorderoutlineoutline-coloroutline-offsetoutline-styleoutline-widthoverflowoverflow-xoverflow-ypaddingpadding-bottompadding-leftpadding-rightpadding-toppage-break-afterpage-break-beforepage-break-insideperspectiveperspective-originpointer-eventspositionquotesresizerighttab-sizetable-layouttext-aligntext-align-lasttext-decorationtext-decoration-colortext-decoration-linetext-decoration-styletext-indenttext-justifytext-overflowtext-shadowtext-transformtoptransformtransform-origintransform-styletransitiontransition-delaytransition-durationtransition-propertytransition-timing-functionunicode-bidiuser-selectvertical-alignvisibilitywhite-spacewidthword-breakword-spacingword-wrapwriting-modez-index
Значения margin
В качестве значений margin используются любые допустимые единицы длины, к примеру, пиксели, проценты, em, rem и др. В отличие от padding свойство margin может быть отрицательным (например: -10px), а также принимать значение auto. В остальном margin похоже на padding, у него также может быть от одного до четырёх значений.
Одно значение — определяет отступы для всех сторон блока.
Два значения — первое определяет отступы сверху и снизу для элемента, второе слева и справа для элемента.
Три значения — первое задаёт отступ сверху для элемента, второе одновременно слева и справа, а третье снизу.
Четыре значения — первое определяет отступ сверху, второе справа, третье снизу, четвёртое слева. Для запоминания последовательности можно представить часы — значения идут по часовой стрелке, начиная с 12 часов.
Значение auto
Свойство margin позволяет выравнивать элемент по центру горизонтали, если использовать значение auto и задать ширину элемента через width (пример 1).
Пример 2. Значение auto
<!DOCTYPE html>
<html>
<head>
<meta charset=»utf-8″>
<title>margin</title>
<style>
.dialog {
width: 80%; /* Ширина блока */
background: #D4E3A5; /* Цвет фона */
border: 2px solid #7D9B3D; /* Параметры рамки */
padding: 1rem; /* Поля */
margin: auto; /* Выравниваем по центру */
}
</style>
</head>
<body>
<div class=»dialog»>
Полинезийцы называют Млечный путь Манго-Роа-И-Ата,
что в переводе с маори означает «Длинная акула на рассвете».
</div>
</body>
</html>
Результат данного примера показан на рис. 3.

Рис. 3. Выравнивание блока по центру
Вместо margin: auto можно использовать комбинацию margin-left: auto и margin-right: auto.
Выравнивание блока по центру через значение auto работает только в сочетании с width.
Аналогично можно выровнять по центру горизонтали изображение, для этого даже не надо указывать ширину картинки, поскольку браузер получает её автоматически. Следует только превратить изображение в блочный элемент через свойство display, как показано в примере 3.
Пример 3. Значение auto
<!DOCTYPE html>
<html>
<head>
<meta charset=»utf-8″>
<title>margin</title>
<style>
.center {
display: block; /* Блочный элемент */
margin: auto; /* Выравниваем по центру */
}
</style>
</head>
<body>
<img src=»image/html-128.png» alt=»HTML5″ class=»center»>
</body>
</html>
Результат данного примера показан на рис. 4.

Рис. 4. Выравнивание картинки по центру
Проценты
В качестве значения margin можно использовать процентную запись, с которой связаны следующие особенности.
- По горизонтали проценты считаются от ширины всего блока.
- По вертикали проценты считаются от ширины всего блока.
Таким образом, margin в процентах берётся от ширины всего блока, даже для margin-top и margin-botom.
Отрицательный margin
margin может быть задан с отрицательным значением, тем самым элемент сдвигается в противоположном направлении. К примеру, margin-top:-10px поднимает блок вверх на 10 пикселей, а margin-left:-10px сдвигает блок влево.
В примере 4 показан сдвиг блока с классом stat вверх, если он располагается сразу после элемента <p>.
Пример 4. Использование отрицательного значения
<!DOCTYPE html>
<html>
<head>
<meta charset=»utf-8″>
<title>margin</title>
<style>
p + .stat {
margin-top: -1rem; /* Поднимаем текст вверх */
}
.stat {
font-size: 3rem; /* Размер текста */
}
</style>
</head>
<body>
<p>Продано ёлок</p>
<p class=»stat»>64</p>
</body>
</html>
Результат данного примера показан на рис. 5. Без отрицательного margin строки располагаются далеко друг от друга.

Рис. 5. Поднимаем блок вверх через margin-top
Описание
CSS свойство margin определяет расстояние по вертикали и/или горизонтали (его также называют «внешний отступ» или «поле») от внешнего края рамки текущего элемента до внутренней границы родительского элемента или до внешнего края элемента, который расположен рядом с текущим элементом.
Свойство margin обеспечивает краткий метод установки значений сразу нескольких свойств внешнего отступа в одном объявлении. Оно может содержать от одного до четырех значений, разделяемых между собой пробелами. Если указывается более одного значения, внешний отступ устанавливается начиная с верхней позиции:
Визуальный эффект будет зависеть от количества заданных значений:
-
margin:10px 5px 15px 20px;
- Верхнее поле — 10px
- Правое поле — 5px
- Нижнее поле — 15px
- Левое поле — 20px
-
margin:10px 5px 15px;
- Верхнее поле — 10px
- Правое и левое поле — 5px
- Нижнее поле — 15px
-
margin:10px 5px;
- Верхнее и нижнее поле — 10px
- Правое и левое поле — 5px
-
margin:10px;
Все 4 поля по 10px
Внешний отступ по горизонтали может быть установлен и для блочных и для строчных элементов, а по вертикали только для блочных элементов.
Объединение вертикальных полей
- Поля сестринских элементов расположенных друг под другом и находящихся в потоке документа объединяются в одно общее. Высота полученного поля равняется высоте большего из двух полей, например: поле верхнего элемента (margin-bottom) составляет 10px, а нижнего элемента (margin-top) — 20px, единое поле в этом случае будет высотой 20px.
- Объединение полей родительского и дочернего элемента находящихся в потоке документа происходит, если родительский элемент не имеет ничего из того, что могло бы отделять его внешний отступ от внешнего отступа дочернего элемента (рамки, внутреннего отступа или строчного содержимого). Также объединение полей не будет происходить, если родительскому элементу установить свойство overflow со значением hidden или auto. Плюс от этого способа заключается в том, что размер родительского элемента не увеличивается.
Для установки внешних отступов отдельно для каждой стороны элемента, используются следующие свойства: margin-top, margin-bottom, margin-left, margin-right.
Примечание: допускаются отрицательные значения полей.
| Значение по умолчанию: | |
|---|---|
| Применяется: | ко всем элементам, за исключением тех элементов, которые относятся к типу display: table-*, кроме table-caption, table и inline-table. Дополнительно: значения относящиеся к margin-top и margin-bottom не применяются к строчным элементам. |
| Анимируется: | да |
| Наследуется: | нет |
| Версия: | CSS1 |
| Синтаксис JavaScript: | object.style.margin=»10px 5px» |
Свойства margin и padding на примере сайта
Рассмотрим свойства на примерах с элементами. Мы начнем с абзаца (тега <p>), затем добавим к нему цвет фона и добавим отступ 30px с каждой стороны.
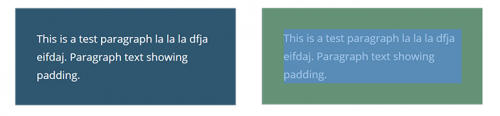
Ниже слева видно, что это абзац с padding 30px вокруг него. На изображении справа я использовал инструменты Google Chrome, чтобы показать, где padding HTML начинается /заканчивается для этого элемента. Зеленый цвет на изображении ниже – это padding, который расположен вокруг контейнера. Темно-синий цвет фона заполняет внутреннюю область:
Теперь добавим margin абзацу. Я добавлю отступ сверху и снизу 30px, а также 20px слева и справа. Ниже на изображении слева показано, как этот абзац изменился с margin. Фактическая ширина изображения стала меньше, потому что margin отталкивает от границ другой HTML элемент. Справа видно, что оранжевый цвет – это margin вокруг элемента. margin всегда находится за пределами padding и темно-синий фон не распространяется на область margin:

Если вы до сих пор путаетесь, как использовать margin и padding, то пришло время экспериментировать! Чем больше вы будете использовать свойства CSS, и изменять их значения, тем лучше поймете, как они работают.
Пожалуйста, оставляйте ваши мнения по текущей теме материала. Мы очень благодарим вас за ваши комментарии, лайки, дизлайки, отклики, подписки!
ВЛВиктория Лебедеваавтор-переводчик статьи «CSS PADDING VS. MARGIN AND HOW TO USE THEM»
Syntax
The CSS margin property can be expressed with one, two, three or four values provided. And each value can be expressed as either a fixed value or as a percentage.
One Value
The syntax for the CSS margin property (with 1 value) is:
When one single value is provided, the margin value will apply to all four sides of the element (ie: top, right, bottom, left).
Two Values
The syntax for the CSS margin property (with 2 values) is:
When two values are provided, the first value will apply to the top and bottom of the element. The second value will apply to the left and right sides of the element.
Three Values
The syntax for the CSS margin property (with 3 values) is:
When three values are provided, the first value will apply to the top of the element. The second value will apply to the right and left sides of the element. The third value will apply to the bottom of the element.
Four Values
The syntax for the CSS margin property (with 4 values) is:
When four values are provided, the first value will apply to the top of the element. The second value will apply to the right side of the element. The third value will apply to the bottom of the element. The fourth value will apply to the left side of the element.
The top, right, bottom, and left margin values can be one of the following:
Buying on Margin
Buying on margin is borrowing money from a broker in order to purchase stock. You can think of it as a loan from your brokerage. Margin trading allows you to buy more stock than you’d be able to normally. To trade on margin, you need a margin account. This is different from a regular cash account, in which you trade using the money in the account.
By law, your broker is required to obtain your consent to open a margin account. The margin account may be part of your standard account opening agreement or may be a completely separate agreement. An initial investment of at least $2,000 is required for a margin account, though some brokerages require more. This deposit is known as the minimum margin.
Once the account is opened and operational, you can borrow up to 50% of the purchase price of a stock. This portion of the purchase price that you deposit is known as the initial margin. It’s essential to know that you don’t have to margin all the way up to 50%. You can borrow less, say 10% or 25%. Be aware that some brokerages require you to deposit more than 50% of the purchase price. (Related: Buying on Margin Explainer Video.)
You can keep your loan as long as you want, provided you fulfill your obligations such as paying interest on time on the borrowed funds. When you sell the stock in a margin account, the proceeds go to your broker against the repayment of the loan until it is fully paid.
There is also a restriction called the maintenance margin, which is the minimum account balance you must maintain before your broker will force you to deposit more funds or sell stock to pay down your loan. When this happens, it’s known as a margin call. A margin call is effectively a demand from your brokerage for you to add money to your account or close out positions to bring your account back to the required level. If you do not meet the margin call, your brokerage firm can close out any open positions in order to bring the account back up to the minimum value. Your brokerage firm can do this without your approval and can choose which position(s) to liquidate.
In addition, your brokerage firm can charge you a commission for the transaction(s). You are responsible for any losses sustained during this process, and your brokerage firm may liquidate enough shares or contracts to exceed the initial margin requirement.