Как установить и использовать гостевые дополнения virtualbox в ubuntu
Содержание:
- Download Virtualbox Guest Additions
- Using VirtualBox Guest Addition features
- Почему вы должны использовать гостевые дополнения VirtualBox?
- How to Install VirtualBox’s Guest Additions
- The VirtualBox Guest Device
- Установка платформы Oracle VM VirtualBox
- Установите гостевые дополнения VirtualBox в Windows
- Auto-resize Guest Display
- Оглавление
- Issues[edit]
- Установка гостевых дополнений из репозиториев
- Download Virtualbox Guest Additions
- Download VirtualBox
Download Virtualbox Guest Additions
We have never realized how difficult it is to find the VirtualBox Guest additions download page. It is not accessible from the wiki. But, at this time… After some time spent on Google, we collect some vBoxGuestAdditions installation file with many version. This link will directly download the offline installer .iso from the official website. So, it’s secure and free from malware. Here is the answer:
| File Name | Version | Last Update | File Size |
| (Open the link to download) | |||
| VBoxGuestAdditions_6.0.4.iso | 6.0 | 28-Jan-2019 | 82 MB |
| VBoxGuestAdditions_5.2.26.iso | 5.2 | 28-Jan-2019 | 56 MB |
| VBoxGuestAdditions_5.1.38.iso | 5.1 | 09-May-2018 | 57 MB |
| VBoxGuestAdditions_5.0.40.iso | 5.0 | 28-Apr-2017 | 56 MB |
| VBoxGuestAdditions_4.3.40.iso | 4.3 | 22-Aug-2016 | 55 MB |
| VBoxGuestAdditions_4.2.38.iso | 4.2 | 14-Sep-2016 | 59 MB |
| VBoxGuestAdditions_4.1.44.iso | 4.1 | 11-Nov-2015 | 52 MB |
| VBoxGuestAdditions_4.0.36.iso | 4.0 | 11-Nov-2015 | 46 MB |
Using VirtualBox Guest Addition features
Here are some screenshots for enabling/using helpful features of VirtualBox Guest Additions in use:
Configure Drag And Drop (any files)
You can enable drag and drop from the top menu -> Devices ->Drag and Drop -> Bidirectional.
With Bidirectional, you can drag and drop from guest to host and from host to guest, both.
Drag and Drop
Configure Shared Clipboard (for copy-pasting)
Similarly, you can enable shared clipboard from the top menu -> Devices -> Shared Clipboard -> Bidirectional.
Shared Clipboard
Uninstalling VirtualBox Guest Additions (if you don’t want to use it anymore)
Navigate to the CD image and open it in terminal (Right Click inside directory > Open in Terminal):
Open in Terminal
Now enter:
However, in some cases you might have to do some more cleanup. Use the command:
Note: Replace VBoxGuestAdditions-version with the right version (you can hit tab to autocomplete; in my case it is VBoxGuestAdditions-6.0.4).
Почему вы должны использовать гостевые дополнения VirtualBox?
С включенными гостевыми дополнениями VirtualBox использование виртуальной машины становится намного удобнее. Не веришь мне? Вот важные функции, которые предлагает гостевые дополнения:
- Интеграция указателя мыши: вам больше не нужно нажимать какие-либо клавиши, чтобы «освободить» курсор от гостевой ОС.
- Общий буфер обмена: с установленными гостевыми дополнениями вы можете копировать и вставлять данные между гостевой и хост-операционной системами.
- Перетаскивание: вы также можете перетаскивать файлы между хостом и гостевой ОС.
- Общие папки: Моя любимая функция; эта функция позволяет обмениваться файлами между хостом и гостем. Вы можете указать VirtualBox обрабатывать определенный каталог хоста как общую папку, и программа сделает его доступным для гостевой операционной системы как сетевой ресурс, независимо от того, есть ли у гостевой системы сеть.
- Улучшенная поддержка видео: пользовательские драйверы видео, которые устанавливаются с гостевыми дополнениями, предоставляют вам сверхвысокие и нестандартные режимы видео, а также повышенную производительность видео. Это также позволяет изменить размер окна виртуальной машины. Разрешение видео в гостевой системе будет настроено автоматически, как если бы вы вручную вводили произвольное разрешение в настройках дисплея гостевой системы.
- Бесшовные окна: отдельные окна, которые отображаются на рабочем столе виртуальной машины, могут быть сопоставлены на рабочем столе хоста, как если бы основное приложение фактически выполнялось на хосте.
- Общие каналы связи хоста/гостя: гостевые дополнения позволяют вам контролировать и мониторить действия гостевой системы. «Свойства гостя» предоставляют общий механизм на основе строк для обмена битами данных между гостем и хостом, некоторые из которых имеют особые значения для управления и контроля гостевой системы. Приложения могут быть запущены на гостевой машине с хоста.
- Синхронизация времени: благодаря гостевые системы будут регулярно синхронизировать время с хост-машиной. Параметры механизма синхронизации времени могут быть настроены.
- Автоматические входы в систему: это может быть полезной функцией.
Под впечатлением от функций, которые предоставляет гостевое дополнение? Давайте посмотрим, как вы можете установить VirtualBox Guest Additions в Ubuntu Linux.
How to Install VirtualBox’s Guest Additions
It’s easy to install the Guest Additions on your VirtualBox system. In fact, every time VirtualBox receives an update, it includes a new version of the Guest Additions too. You don’t necessarily need to update the Guest Additions every time you update VirtualBox, but Oracle recommends it for best performance.
Keep in mind that the Guest Additions are available for Windows and Linux, but not macOS. You’ll need other workarounds if you’re running macOS in a virtual machine.
Install Guest Additions on Windows VMs
To install the Guest Additions for VirtualBox in a Windows VM, boot into your guest OS as normal. On the toolbar at the top, select Devices > Insert Guest Additions CD Image. This mounts a virtual disc to the VM.
When you do this, Windows will respond as if you’ve just inserted a physical disc. If it doesn’t prompt you to run it, open a File Explorer window and go to This PC. You should see a device in the CD Drive named something like VBox_GAs_x.
Double-click this to open the disc’s contents. Inside, run the VBxWindowsAdditions file (or VBxWindowsAdditions-x86 on a 32-bit VM).
From there, simply walk through the steps to install the Guest Additions like you would any other software. After it completes, you’ll be prompted to reboot the VM, which you should do as soon as possible.
Once you’re done, you can go to Devices > Optical Drives > Remove disk from virtual drive to «eject» the virtual Guest Additions disc.
Install Guest Additions on Linux VMs
The process to install VirtualBox’s Guest Additions into a Linux VM is quite similar. Once you’ve booted up, select Devices > Insert Guest Additions CD Image from VirtualBox’s menu bar. Depending on your flavor of Linux, you may see a message to automatically run the CD’s contents.
You can accept this, but if you don’t, you’ll find the CD available on the taskbar in many Linux distros. If it doesn’t appear there, open the file browser and look for VBox_GAs_x on the left sidebar.
On Ubuntu, a Run Software button appears at the top-right of the window. Click this to start the install process, then provide your admin password to continue. A Terminal window will open to keep you updated with its progress.
Once it’s done, reboot the VM and you’re all set. You can then eject the disk using the Devices > Optical Drives > Remove disk from virtual drive option, or by right-clicking it in your OS and choosing Eject.
The VirtualBox Guest Device
The Guest Additions package operates through a PCI/mmio device provided by the VM. A combination of memory-mapped packets, MMIO port writes, and IRQs allow the guest to communicate its feature support to the VM and for the VM to communicate events such as display changes and mouse movement. The PCI device has the vendor ID 0x80EE, same as the VirtualBox implementation of the Bochs display adapter, and a device ID of 0xCAFE. BAR0 is the MMIO port and BAR1 is a memory region that contains some shared state for the device, such as a bit mask for what events the guest wishes to receive. The format for the latter is unimportant for the features described on this page — you need only know that the region can be interpreted as an array of 32-bit unsigned integers and offset 3 contains the IRQ mask.
Communication between the guest and the host happens through packets in memory. These can be anywhere in physical memory, and are relatively short. The MMIO operations that read or populate packets are synchronous, so setting up one page to pass back and forth is feasible. The basic process for sending a message to the VM is to prepare a packet and then write its (physical) address to the MMIO port. Receiving works the same way, as you must prepare a packet with a request type and provide its physical address; after the MMIO port write finishes, the packet will be populated with the appropriate values if the request was successful. Communication from the VM is primarily initiated by an IRQ on the PCI device’s interrupt line, which should then be followed up by appropriate packet requests, one of which should be of a special «Acknowledge Events» type.
This page contains some struct definitions which could alternatively be obtained from headers provided by VirtualBox, but those headers are rather heavy and assume they are being used alongside a robust set of system headers, so instead we will define these structs ourselves.
Pseudo-code examples in the following sections will assume the availability of these functions; adjust them to match your environment:
// Allocate one page of memory, providing its physical address as an output and virtual address as a return value.
void * allocate_physical_page(uint32_t * physical);
// Map a physical page into the virtual memory space.
void * map_physical_page(uint32_t physical);
// Install an interrupt request handler function.
void install_interrupt_handler(irq, int (*irq_function)(void));
// Write a 32-bit value to an MMIO port.
void outportl(port, value);
// Write a 16-bit value to an MMIO port.
void outports(port, value);
// Return an object describing the requested PCI device, if found.
pci_device_t pci_find(vendor,device);
// Read a field from the given PCI device
uint32_t pci_read_field(pci_device_t device, field, size);
Установка платформы Oracle VM VirtualBox
В рамках данной статьи мы с Вами будем рассматривать работу с платформой VirualBox версии 3.2.8 r64453 (скачать), последней на момент написания статьи.
После того как установочный пакет оказался у Вас на жестком диске можно приступить к установке программы. В рамках данной статьи рассматривается установка и настройка платформы VirtualBox в среде операционной системы Windows Vista Home Premium SP2.
После запуска инсталлятора Вы увидите приветственное окно. Нажмите кнопку «Next» и в новом окне согласитесь с условиями лицензионного соглашения, поставив флажок «I accept the terms in the License Agreement». В следующем окне (рис.1) Вам будет предложено выбрать компоненты для установки и задать расположение исполняемых файлов. По умолчанию все компоненты устанавливаются на жесткий диск (а нам нужны все), а сама программа устанавливается в папку «Program Files» на системном диске. Если же вы хотите задать другое расположение, нажмите кнопку Browse и выберите новую папку для установки приложения.
Рис.1: Ход установки
Далее процесс установки не потребует от Вас никаких вмешательств, кроме разрешения на создания ярлыков на рабочем столе и в меню «Пуск». По окончанию установки программа запуститься автоматически.
Примечание. При установке приложения на операционную систему Windows XP возможно появление сообщения о том, что платформа не тестировалась на совместимость с данной ОС. Предупреждением можно пренебречь и продолжить установку – никаких проблем при работе у Вас не возникнет. При установке приложения на операционную систему Windows Vista/Seven по завершении инсталляции стоит включить режим совместимости. Для этого следует перейти в папку с установленной программой, найти файл VirtualBox.exe, посредством правой кнопки мыши вызвать контекстное меню, выбрать «Свойства» и на вкладке «Совместимость» поставить флажок в пункте «Запустить программу в режиме совместимости с», в качестве операционной системы выбрав «Windows XP (пакет обновления 2)».
Установите гостевые дополнения VirtualBox в Windows
Следует иметь в виду, что гостевые дополнения, как следует из названия, являются дополнениями гостевой ОС, а не хост-ОС. Следовательно, в этом случае гостевой ОС, работающей на виртуальной машине, является Windows (7, 8.X и 10). Операционная система, на которой установлен VirtualBox, может быть любой. Это идеальный вариант, когда вашей хост-системой является Linux, и вы хотели бы получить доступ к Windows для решения некоторых задач.
Настройка Windows VirtualBox Guest Additions чрезвычайно проста. Вам не нужно загружать компакт-диск Oracle VirtualBox Guest Additions. Все, что вам нужно сделать, это, когда виртуальное устройство Windows работает, перейти к ->, как показано на рисунке ниже. Это смонтирует компакт-диск VBox Guest Additions в качестве привода для установки.

Вставьте компакт-диск гостевых дополнений VBox
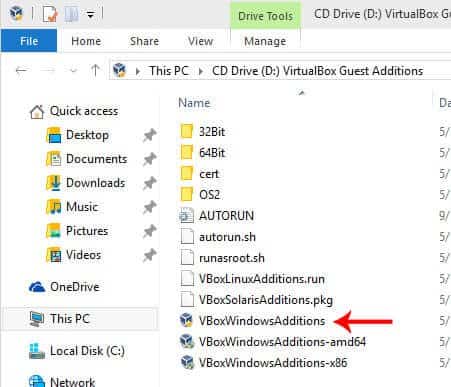
Теперь откройте или и откройте компакт-диск Guest Additions. На рисунке ниже показан VBox Windows 10 с открытым CD Guest Additions. Найдите исполняемый файл и дважды щелкните по нему, чтобы запустить его. Кроме того, вы также можете щелкнуть исполняемый файл для вашей архитектуры (amd64 или x86), чтобы установить VirtualBox Guest Additions в Windows.
Запустите VBox Guest Additions Installer для Windows
Оставьте параметры по умолчанию как есть и щелкните по шагам, чтобы начать установку гостевых дополнений. Вот и все, просто сидеть и смотреть. Установщик автоматически подготовит и установит гостевые дополнения VBox в Windows.

Установите гостевые дополнения VirtualBox в Windows
После завершения установки перезагрузите гостевую ОС, и все готово. Теперь вы сможете запускать гостевую ОС в полноэкранном режиме, перетаскивать объекты между гостевой и хост-ОС, делиться буфером обмена и делать многое другое. На мой взгляд, если вы используете VirtualBox, то гостевые дополнения обязательно. VirtualBox также предлагает так называемый , который добавляет некоторые расширенные функции. Но большинству пользователей не нужен пакет расширений. Идите вперед, установите VirtualBox Guest Additions на гостевую ОС Windows и наслаждайтесь повышенной производительностью и возможностями.
Источник записи: https://www.smarthomebeginner.com
Auto-resize Guest Display
The first feature of the Guest Additions we’ll look at is «Auto-resize Guest Display», which will allow your OS to be informed of the best resolution to use on the display adapter. The VirtualBox display adapter is itself based on the Bochs/Qemu display adapter, though it uses a different PCI vendor and device ID. It allows for any resolution to be set (in older versions, it required widths to be multiples of 4). With this capability enabled, we can receive interrupts when the host window size changes, and querying the guest device will tell us what resolution we should set the display to.
We’ll need to define some new packets, install an interrupt handler, and also set some bits in the VMMDevMem space.
#define VBOX_REQUEST_ACK_EVENTS 41
#define VBOX_REQUEST_GET_DISPLAY_CHANGE 51
#define VBOX_REQUEST_SET_GUEST_CAPS 55

/* VBox Guest Capabilities packet */
struct vbox_guest_caps {
        struct vbox_header header;
        uint32_t caps;
};

/* VBox Acknowledge Events packet */
struct vbox_ack_events {
        struct vbox_header header;
        uint32_t events;
};

/* VBox GetDisplayChange packet */
struct vbox_display_change {
        struct vbox_header header;
        uint32_t xres;
        uint32_t yres;
        uint32_t bpp;
        uint32_t eventack;
};

/* We'll use separate pages for our packets for simplicity. */
static uint32_t vbox_display_phys;
static uint32_t vbox_ack_phys;
static vbox_display_change * vbox_display;
static vbox_ack_events * vbox_ack;

/* Adjust as necessary for your interrupt handling. */
static int vbox_irq_handler(struct regs * r) {
    if (!vbox_vmmdev2) return ; /* Nothing to process? Maybe this interrupt was from something sharing the line. */

    vbox_ack->events = vbox_vmmdev2;
    outportl(vbox_port, vbox_ack_phys); /* Acknowledge events */

    outportl(vbox_port, vbox_display_phys); /* Request display change information. */

    /* vbox_display now has information on our display size. If it changed we can tell our display driver to update. */
    set_new_graphics_mode_maybe(vbox_display->xres, vbox_display->yres, vbox_display->bpp);

    /* You probably want to make sure you have a way of informing your userspace that the
       display resolution is changing, so your window manager or whatever updates. */

    /* Don't forget to acknowledge the interrupt itself if you need to. */
    return 1;
}

static void vbox_guest_init(void) {
    ...

    /* Install an interrupt handler. */
    int irq = pci_read_field(vbox_pci, PCI_INTERRUPT_LINE, 1);
    install_interrupt_handler(irq, vbox_irq_handler);

    ...

    /* We need to tell the VM that we support this capability. The Guest Capabilities request tells the VM about our ability to support seamless and auto-resize modes. */
    uint32_t guest_caps_phys;
    struct vbox_guest_caps * guest_caps = allocate_physical_page(&guest_caps_phys);

    guest_caps->header.size = sizeof(struct vbox_guest_caps);
    guest_caps->header.version = VBOX_REQUEST_HEADER_VERSION;
    guest_caps->header.requestType = VBOX_REQUEST_SET_GUEST_CAPS;
    guest_caps->header.rc = ;
    guest_caps->header.reserved1 = ;
    guest_caps->header.reserved2 = ;
    guest_caps->caps = 1 << 2; /* set bit 2, which indicates we support "graphics" (auto-resize guest display). */
    outportl(vbox_port, guest_caps_phys);

    /* We'll also set up the packets we'll use later for AcknowledgeEvents and GetDisplayChange */
    vbox_ack = allocate_physical_page(&vbox_ack_phys);
    vbox_ack->header.size = sizeof(struct vbox_ack_events);
    vbox_ack->header.version = VBOX_REQUEST_HEADER_VERSION;
    vbox_ack->header.requestType = VBOX_REQUEST_ACK_EVENTS;
    vbox_ack->header.rc = ;
    vbox_ack->header.reserved1 = ;
    vbox_ack->header.reserved2 = ;
    vbox_ack->events = ;

    vbox_display = allocate_physical_page(&vbox_display_phys);
    vbox_display->header.size = sizeof(struct vbox_display_change);
    vbox_display->header.version = VBOX_REQUEST_HEADER_VERSION;
    vbox_display->header.requestType = VBOX_REQUEST_GET_DISPLAY_CHANGE;
    vbox_display->header.rc = ;
    vbox_display->header.reserved1 = ;
    vbox_display->header.reserved2 = ;
    vbox_display->xres = ;
    vbox_display->yres = ;
    vbox_display->bpp = ;
    vbox_display->eventack = 1;

    /* Finally, we need to enable interrupts for the capabilities we've advertised. We're just going to enable all of them. */
    vbox_vmmdev3 = 0xFFFFFFFF;
}
Оглавление
VirtualBox это интуитивно понятная в использовании программа. Если вам не интересна теория и вы хотите сразу приступить к практике, то обратитесь к инструкциям по использованию VirtualBox для установки и запуска операционных систем в виртуальном компьютере:
- Установка Linux на виртуальный компьютер (на примере Linux Mint)
- Установка Kali Linux в VirtualBox
В данной цикле статей подробно рассмотрены возможности VirtualBox, а также дано детальное описание её опций. Этот материал рекомендуется вам если вы хотите досконально понимать VirtualBox, а также если у вас возникли какие-либо проблемы или вопросы, которые вы не можете решить самостоятельно.
Issues[edit]
To document any problems, utilize the following short link to this wiki page: https://www.whonix.org/wiki/ga
Kernel Upgradesedit
The following issue is happening during kernel upgrades.
/etc/kernel/postinst.d/vboxadd:
VirtualBox Guest Additions: Building the modules for kernel 5.6.0-0.bpo.2-amd64.
Failed to rename process, ignoring: Operation not permitted
update-initramfs terminated by signal TERM.
Workaround in short: two reboots required.
Workaround details: This results in guest additions being non-functional after the next reboot. During the next reboot VirtualBox guest additions will automatically detect the missing kernel modules for the upgraded kernel and build them. Therefore when rebooting yet another time the issue should be resolved until the next kernel upgrade.
Please contribute to generic bug reproduction:
- Conceptually:
- Specifically: and .
See also Whonix specific technical information, .
One long term solution might be replacing initramfs-tools with dracut but that needs further research and development work. (develpoment discussion , issue )
Forum discussion:Guest additions fail to start after upgrade
Установка гостевых дополнений из репозиториев
Если мы установили версию OSE Virtual Box из репозиториев, мы можем добавить гостевые дополнения из репозиториев в гостевой системе. Это установит гостевые дополнения, соответствующие версии Virtual Box, полученные из репозиториев. Не рекомендуется устанавливать их в более новые выпуски Virtual Box, полученные из репозитория Oracle (см. Ниже).
В качестве альтернативы мы можем установить пакет virtualbox-guest-extension-iso в хосте Ubuntu.
Файл.iso с образом OSE выпуска компакт-диска с гостевыми дополнениями будет установлен в каталог хоста. , Смонтируйте этот файл.iso как компакт-диск в настройках вашей виртуальной машины. После этого у вас будет доступ к компакт-диску с установщиком.
Download Virtualbox Guest Additions
We have never realized how difficult it is to find the VirtualBox Guest additions download page. It is not accessible from the wiki. But, at this time… After some time spent on Google, we collect some vBoxGuestAdditions installation file with many version. This link will directly download the offline installer .iso from the official website. So, it’s secure and free from malware. Here is the answer:
| File Name | Version | Last Update | File Size |
| (Open the link to download) | |||
| VBoxGuestAdditions_6.0.4.iso | 6.0 | 28-Jan-2019 | 82 MB |
| VBoxGuestAdditions_5.2.26.iso | 5.2 | 28-Jan-2019 | 56 MB |
| VBoxGuestAdditions_5.1.38.iso | 5.1 | 09-May-2018 | 57 MB |
| VBoxGuestAdditions_5.0.40.iso | 5.0 | 28-Apr-2017 | 56 MB |
| VBoxGuestAdditions_4.3.40.iso | 4.3 | 22-Aug-2016 | 55 MB |
| VBoxGuestAdditions_4.2.38.iso | 4.2 | 14-Sep-2016 | 59 MB |
| VBoxGuestAdditions_4.1.44.iso | 4.1 | 11-Nov-2015 | 52 MB |
| VBoxGuestAdditions_4.0.36.iso | 4.0 | 11-Nov-2015 | 46 MB |
Download VirtualBox
Before we providing you an installer files of virtualbox guest additions, please download the master of virtualbox installation file on below if you don’t have it. On this page you will find the last version of virtualbox for windows/mac/linux, and the old version of virtualbox.
VirtualBox for Windows
On below you will find the installation file of VirtualBox for Windows 10 64 bit and 32 bit. This executable file is also compatible for windows 7 and windows 8 version.
| File Name | Version | Last Update | File Size |
| (Open the link to download) | |||
| VirtualBox-6.0.4-128413-Win.exe | 6.0 | 28-Jan-2019 | 23 MB |
| VirtualBox-5.2.26-128414-Win.exe | 5.2 | 28-Jan-2019 | 110 MB |
| VirtualBox-5.1.38-122592-Win.exe | 5.1 | 09-May-2018 | 119 MB |
| VirtualBox-5.0.40-115130-Win.exe | 5.0 | 28-Apr-2017 | 109 MB |
| VirtualBox-4.3.40-110317-Win.exe | 4.3 | 22-Aug-2016 | 99 MB |
| VirtualBox-4.2.38-110681-Win.exe | 4.2 | 14-Sep-2016 | 102 MB |
| VirtualBox-4.1.44-104071-Win.exe | 4.1 | 11-Nov-2015 | 98 MB |
| VirtualBox-4.0.36-104075-Win.exe | 4.0 | 11-Nov-2015 | 88 MB |
VirtualBox for MAC
| File Name | Version | Last Update | File Size |
| (Open the link to download) | |||
| VirtualBox-6.0.4-128413-OSX.dmg | 6.0 | 28-Jan-2019 | 158 MB |
| VirtualBox-5.2.26-128414-OSX.dmg | 5.2 | 28-Jan-2019 | 92 MB |
| VirtualBox-5.1.38-122592-OSX.dmg | 5.1 | 09-May-2018 | 91 MB |
| VirtualBox-5.0.40-115130-OSX.dmg | 5.0 | 28-Apr-2017 | 87 MB |
| VirtualBox-4.3.40-110317-OSX.dmg | 4.3 | 22-Aug-2016 | 104 MB |
| VirtualBox-4.2.38-110681-OSX.dmg | 4.2 | 14-Sep-2016 | 108 MB |
| VirtualBox-4.1.44-104071-OSX.dmg | 4.1 | 11-Nov-2015 | 99 MB |
| VirtualBox-4.0.36-104075-OSX.dmg | 4.0 | 11-Nov-2015 | 87 MB |
VirtualBox for Linux
Please choose the installation file that fit with your Linux OS
| File Name | Version | OS | File Size |
| (Open the link to download) | |||
| virtualbox-6.0_6.0.4-128413~Ubuntu~bionic_amd64.deb | 6.0 | Ubuntu | 124 MB |
| virtualbox-6.0_6.0.4-128413~Debian~jessie_amd64.deb | 6.0 | Debian | 130 MB |
| VirtualBox-6.0-6.0.4_128413_openSUSE132-1.x86_64.rpm | 6.0 | Open Suse | 130 MB |
| VirtualBox-6.0.4-128413-Linux_amd64.run | 6.0 | Linux | 148 MB |
| VirtualBox-6.0-6.0.4_128413_fedora26-1.x86_64.rpm | 6.0 | Fedora | 130 MB |
| VirtualBox-6.0.4-128413-SunOS.tar.gz | 6.0 | SunOS | 159 MB |