Plex media server
Содержание:
- Frequently Asked Questions
- How to activate Plex.tv/link on your Android TV?
- Способ создать сервер Плекс без телевизора
- Подписка PLEX Pass
- Tautulli
- Player Apps and Platforms
- Customizing Collections
- Как установить плагин Plex
- Setting up a Plex Media Server on the Raspberry Pi
- Предпосылки
- Установите Plex Media Server
- Настроить Plex Media Server
- Обновление Plex Media Server
- Вывод
- Установите клиент Plex Android: что вам нужно
- What are the Plex requirements?
- Удаление сервера Plex
- Collection Inline library display options
- Remote access and library sharing
Frequently Asked Questions
Where did all these extra collections come from? I didn’t add them.
There are three ways “automatic” collections can be made.
- You may have enabled the Use collection info from The Movie Database metadata agent setting (for legacy agents). When enabled (it is disabled by default), that will try to gather collection information from The Movie Database. This may cause many unwanted collections to be automatically created, particularly collections where you only have one item. You can disable that preference in the server metadata agent settings for the “Plex Movie (Legacy)” and “The Movie Database” metadata agents. This will only prevent collections from getting automatically added to items added to your library in the future. It will not remove collections from existing library items.
- When using the current “Plex Movie” scanner/agent combo, you’ve set the Minimum automatic collection size preference for a library. You can set it to Disabled if you do not want it to automatically create collections. Again, the change only applies to future added items or metadata refreshes.
- If you have MP4s with an embedded “Album” tag, the Local Media Assets agent may pick it up as a collection. Note that the Local Media agent also picks up external subtitles, extras, and other embedded metadata in MP4s (and other files), so be aware of this if you choose to disable the agent source.
Related Page: Related Page:
Why are there collections with zero items?
You will find after removing all the collection tags from items, the collapsed collection itself remains, but with zero items in it. These are kept because you might have made customizations to the collection (artwork, a description, etc.). We don’t want automatically remove the collection, in case you were only temporarily emptying it before you add other items to it.
If you want to get rid of an empty collection, delete the collection as described above.
Can I make a photo or music collection?
Collection tags cannot be added to photos.
You can add music artists or albums to a collection. You’ll be able to filter by the collection as normal, but there are no “collection details page” screens in music libraries, nor will they appear “collapsed” inline when browsing the music library.
If you add an artist or album to a collection with the same name as a collection in a movie or TV library, the artist or album collection can appear as a related item in that movie or TV library collection preplay, as described earlier.
Last modified on: July 26, 2021
How to activate Plex.tv/link on your Android TV?
You need to get an activation code to activate Plex on Android TV. So to broadcast Plex on your Android TV’s big screen, you need to connect your TV to your Plex TV account. So follow the three easy steps given below.
- First, you’ll see a “Login” option on your screen, so click on the option, and you’ll be able to see a “four-digit” code to activate the plex device. The same code will help you in the login process.
- Now go to https://plex.tv/link on your device. Fill in the Plex account details on the same page to log in.
- Once logged in, enter the activation code and click on the send button. Now you will be connected to your account in a few seconds.
How to activate Plex.tv/link on your Firestick?
To install your Plex TV app on your Fire Stick, you’ll need to sign up for an account by visiting www.plex.tv/link and adding your compatible plan. Then follow the steps below to install the Plex on Firestick.
- Firstly, look for the “Firestick Search” option on the home screen in the middle.
- Now, enter Plex and click on it in the search results.
- Finally, download and install the Plex application when you find the Plex application icon in the Applications & Games section.
Once installed, open the Plex application to work with it.
And follow the procedure mentioned above to activate Plex of Android TV.
How do I activate Plex.tv/link on Apple TV?
The user-friendly aspect of the entire Plex experience really shines during the installation phase. Not only is the Apple TV Plex app polished, but the Plex team has made the process of connecting the app to your Plex system completely painless.
- Firstly, launch your Apple TV and go to the App Store by selecting it on the main screen, as shown below.
- Secondly, select the Search option in the App Store and search for “Plex”. Remember to choose a simple old “Plex” and not one from sound applications like “Simple X – for Plex”.
- In the expanded view, as shown below, select the “Install” button.
- Also, once the installation is complete, the “Install” button will be “Open”. Click it again to launch the Plex application.
- Following the Plex home screen, you will be prompted to log in to your Plex account. The app will then give you a security code.
- To get this four-character alphanumeric code, go to Plex.tv/link and enter the code to link the Apple TV Plex app to your Plex account. “Thanks to using Plex” – you will receive an almost simultaneous confirmation on both the website and the Apple TV application.
- After the confirmation screen, you will see all the Plex Media servers associated with your account. Subsequently, select Media Access Server on it.
- Finally, select the server you want to connect to.
We hope that the article has helped you easily activate Plex on your device. If you want to read more activation guides, you can visit our activation guide blog.
Способ создать сервер Плекс без телевизора
Для создания медиасервера на вашем ПК без использования телевизора будет необходимо сделать следующее:
- Перейдите на plex.tv;
- Нажмите внизу на «Скачать»;
- Установите «Plex Media Server» на ваш ПК;
- После завершения процедуры инсталляции нажмите на «Запуск» (Launch);
- В панели задач справа внизу появится значок в виде правой стрелки. Наведите на него курсор, щёлкните правой клавишей мыши, и выберите «Open Plex»;
- Вы будете перенаправлены на веб-страницу в браузере. Вам необходимо будет войти в свою учетную запись Плекс, если вы этого ранее не сделали;
- На следующем экране будет отображён краткий обзор функционала сервиса. Нажмите на «Понятно» (Got It!);
- Далее вас попросят дать имя вашему серверу. Дайте ему какое-либо близкое и узнаваемое названием. Затем нажмите на «Далее» (Next);
- Если вы хотите получить доступ к мультимедиа на сервере (на вашем компьютере) с внешних клиентов, тогда убедитесь, что установлен флажок «Разрешить мне доступ к мультимедиа за пределами моего дома». Для этого на данном этапе даже не понадобится ввод кода;
- В процессе установки вы можете добавить вашу медиатеку, нажав «Добавить библиотеку». Это позволит добавить на сервер данные о фильмах, шоу, видео, музыке, изображениях с вашего ПК, а затем и получить к этим медиа доступ с внешних устройств. Нажмите на «Далее» для продолжения;
- Останется нажать на «Готово» для завершения настройки сервера.
Подписка PLEX Pass
Подписка PLEX Pass создана для поддержки развития проекта, разблокировки некоторых дополнительных возможностей. Для большинства сценариев использования можно ограничиться бесплатной версией.
Вот что дает PLEX Pass:
- Доступ к загрузке новых версий PLEX Media Server. На страничке проекта в разделе «Release Notes and Previous Versions» можно посмотреть историю версий, раздачу только PLEX-Pass пользователям или публичный релиз.
- Загрузка приложений для SMART-ТВ и прочих устройств. Для меня не актуально.
- Трейлеры и дополнительный контент. Трейлеры к фильмам мне не нужны, а вот дополнительный контент — классная функция, когда ты открываешь прослушать альбом и доступны видеоклипы группы.
- Синхронизация с мобильными клиентами. Любой контент можно загрузить на телефон или планшет. Если пробросить сервер в «сеть», можно обойтись бесплатным стримингом.
- Выгрузка фотографий и видео с мобильного устройства на сервер. Функция удобная, но мне не нравится, как работает просмотр фотографий.
- Синхронизация с облаком. Можно выгрузить фильм на Google Drive.
- PLEX Home — предоставление доступа к медиатеке другим членам семьи с разделением доступа.
- PLEX Cloud — не нужно держать домашний сервер, можно выгрузить весь контент на Amazon Clud Drive, Google Drive, Dropbox, OndeDrive и PLEX сможет самостоятельно выступать сервером.
Полный список доступен на сайте проекта, я ограничился самыми интересными.
Tautulli
(https://tautulli.com/)
Плагин Tautulli Plex является важным дополнением для всех, кто использует свой сервер Plex совместно с несколькими людьми. Он показывает, какой контент смотрели, а также кто, где и когда смотрел. Это позволяет вам отслеживать каждого пользователя в вашей сети.
Если вы размещаете большой сервер Plex для нескольких человек, вы можете отправлять уведомления при добавлении нового контента. Вы также можете настроить его так, чтобы вы получали предупреждения, если ваша сеть выходит из строя, и контролировать доступ пользователей в зависимости от местоположения. Список вариантов огромен.
Player Apps and Platforms
-
- Getting Started with Alexa Voice Control
- Alexa Voice Commands
-
- Navigating the Mobile Apps
- Customizing the Mobile Apps
- Settings: Plex for Android (mobile)
- Unlocking or Activating Plex for Android
- What are the features and limitations without unlocking the app?
- Android, Android TV, Fire TV, Portal Logs
- Purchasing a Plex Pass Subscription Through Google Play
- Android Auto
- I have Plex Pass, so how do I use Plex for Android for free?
- Purchasing a Plex Pass Subscription Through Amazon
- Opening a Local Video File (mobile)
-
- Navigating the Big Screen Apps
- Customizing the Big Screen Apps
- Settings: Android TV
- Android, Android TV, Fire TV, Portal Logs
- Purchasing a Plex Pass Subscription Through Google Play
- Purchasing a Plex Pass Subscription Through Amazon
- How do I use the old TV Layout with pre-4.4 Android devices?
-
- Navigating the Big Screen Apps
- Customizing the Big Screen Apps
- Settings: Plex for Apple TV
- How do I get Plex content to show up in the Top Shelf?
- How do I delete content using the Apple TV app?
- Do I need a Plex account to use the Apple TV app?
- Apple TV Logs
-
- Casting Support
- Cast from Browser or Desktop
- Cast from Android
- Cast from iOS
- Does content stream directly to the Chromecast or through the casting device?
- Why does the Chromecast show my BT router page?
- Why can’t I see Chromecast on my Amazon-based Android device?
- Why can’t I see Chromecast on my iOS 5 device?
-
- Navigating the Mobile Apps
- Customizing the Mobile Apps
- Settings: Plex for iOS
- Unlocking or Activating Plex for iOS
- Purchasing a Plex Pass Subscription Through iTunes
- iOS Media Playback
- Using Mobile Sync
- iOS Logs
- Do I need a Plex account to stream locally?
- What are the features and limitations without unlocking the app?
- Can I use the in-app purchase with Family Sharing?
- Can I AirPlay if I require secure connections and have DNS Rebinding protection?
- Will Plex work on my older iOS devices?
- Downloads for iOS
- iOS App System Permissions
-
- NAS Compatibility List
- NAS Devices and Limitations
- Is Plex Media Server on a NAS Right for Me?
- Mounting Network Resources
- Installing Plex Media Server on FreeNAS
- Install Plex Media Server on a TerraMaster NAS
- Western Digital My Cloud Home
-
- Setting Up and Managing Plex Media Server on NVIDIA SHIELD
- Media Storage Options for NVIDIA SHIELD
- Accessing SHIELD Storage
- Limitations When Running Plex Media Server on NVIDIA SHIELD
- Moving server data storage location on NVIDIA SHIELD
-
- Navigating the Big Screen Apps
- Customizing the Big Screen Apps
- Settings: PlayStation
- What media formats are supported?
- Why can’t it find my local server?
- Where is Plex for PlayStation available?
- Logging for PlayStation
- Is it for the PlayStation 3 or PlayStation 4?
- Is it available for the PlayStation TV and PlayStation Vita?
- Is a PlayStation Plus subscription required?
-
- Getting Started
- Navigating the Big Screen Apps
- Customizing the Big Screen Apps
- Settings: Plex Media Player
- Controlling the App
- Audio Configuration Guide – Plex Media Player
- Create your own inputmap
- Plex Media Player Logs
- Advanced Configuration
- Uninstalling Plex Media Player
- How do I set up WiFi on an embedded Plex Media Player?
- Is Plex Media Player based on Kodi/XBMC?
- How do I create the disk image for my SD Card or USB Stick?
-
- HTPC – Getting Started
- HTPC – Settings
- Plex HTPC Logs
- Plex HTPC Input Maps
-
- Customizing Plex Web
- Overview
- Opening Plex Web App
- Cinema Trailers & Extras – Plex Web App
- Why are there old or duplicate Server entries in the Dashboard sidebar?
- Interface Overview
- Using the Library View
- Viewing Item Details
- Plex Web App Player
- Plex Web App Settings
- Search
- Devices
- Server Status and Dashboard
- Plex Account
- Updating Plex Web App
- Plex Web App Logs
-
- Navigating the Big Screen Apps
- Customizing the Big Screen Apps
- What models are supported for the Plex for Roku channel?
- Purchasing a Plex Pass Subscription Through the Roku App
- Settings: Plex for Roku
- Roku Logs
- Is 4K content supported on the Roku?
- Do I need a Plex account to use the Roku channel?
- Is Plex for Roku open source?
-
- Plex VR for Gear VR & Oculus Go
- Plex VR for Daydream
-
- Navigating the Big Screen Apps
- Customizing the Big Screen Apps
- Which Smart TV models are supported?
- Why can’t it find my local server?
- What media formats are supported?
- How do streaming quality selections work?
- Logging for Smart TV App
-
- Requirements for using Plex for Sonos
- Control Sonos Playback With a Plex App
- Installing the Plex for Sonos Service
- Navigating Plex for Sonos
- Sonos Playback
-
- Introduction and Installation
- Configuration and Usage Options
- Download for Offline Access – Windows & MacOS
- Windows/Mac app logs
- Audio Configuration
-
Xbox
- Settings: Xbox
- Xbox One Logs
- Xbox One Controller Mapping
- What media formats are supported?
- Why can’t the Xbox One app find my local server?
- What information is sent to Microsoft?
- Is Xbox Live Gold required?
Customizing Collections
After creating a collection you will notice the collapsed collection has a poster with up to 4 images from items in that collection. You can edit the collection’s own metadata to add a custom poster, a summary, a background image (fanart), and (for manual collections) choose the sort order for the collection.
- Open the web app
- If you do not have collections displayed inline then switch to view by collections
- Select the edit icon on when hovering on a collection poster or on its preplay screen
- Make edits as you see fit
Custom Collection Order
The content of regular “dumb” collections can be reordered in any arbitrary way the server admin chooses.
This requires Plex Web App v4.61.2 or newer.
When on the collection details page, the posters of items in the collection will have a drag handle on the top center when hovering over them. Simply drag-and-drop the items to the desired order. This is not available for “smart” collections, which are always ordered by the sort chosen when creating or editing the filter for the smart collection.

Как установить плагин Plex
Установить плагин Plex просто. Сначала загрузите плагин. Скорее всего, это будет заархивированный файл, поэтому разархивируйте его и найдите файл .bundle. Если после «.bundle» есть текст, удалите его, чтобы избежать ошибок.
Скопируйте или переместите файл .bundle в папку плагинов в Plex. Как только вы это сделаете, все, что вам нужно сделать, это перезапустить Plex, чтобы убедиться, что плагин загружен.
Если вы не можете найти папку с плагином, она обычно находится в следующих местах:
- Windows:% LOCALAPPDATA% Plex Media Server Plug-ins
- macOS: ~ / Библиотека / Поддержка приложений / Plex Media Server / Плагины
- Linux: $ PLEX_HOME / Библиотека / Поддержка приложений / Plex Media Server / Плагины
Setting up a Plex Media Server on the Raspberry Pi
Setting up a Plex Media Server on the Raspberry Pi
Raspberry Pi можно использовать в самых разных проектах. Один из самых популярных вариантов использования Raspberry Pi — превратить Raspberry Pi в домашний медиацентр.
Plex — это популярный сервер потокового мультимедиа, который позволяет упорядочивать коллекции видео, музыки и фотографий и передавать их на все ваши устройства в любое время и из любого места.
В этом уроке мы покажем вам, как установить Plex Media Server на Raspberry Pi.
Предпосылки
Мы предполагаем, что на вашем Raspberry Pi установлен Raspbian. Plex Media Server не нужен графический интерфейс, поэтому мы рекомендуем использовать образ Raspbian Stretch Lite и включить SSH. Таким образом, ваш Raspberry Pi будет иметь гораздо больше доступной вычислительной мощности и памяти для запуска медиа-сервера Plex.
Также рекомендуется использовать внешнее хранилище для хранения ваших медиа-файлов. Запасной SSD или USB-накопитель выполнит эту работу.
Установите Plex Media Server
Самый простой способ установить и управлять Plex Media Server на Raspberry Pi — использовать официальный репозиторий Plex. Он не требует технических знаний и не должен занимать у вас более 20 минут для установки и настройки медиасервера.
Войдите в Raspberry Pi через SSH и выполните следующие шаги для установки Plex Media Server:
-
Начните с обновления индекса пакетов и установите зависимости, необходимые для включения нового репозитория через HTTPS:
Затем импортируйте ключ GPG хранилища и добавьте хранилище APT в список хранилищ программного обеспечения вашей системы, выполнив следующие команды:
После включения репозитория Plex обновите список пакетов и установите последнюю версию Plex Media Server с помощью:
Установка может занять несколько минут.
Чтобы убедиться, что служба Plex работает, введите:
Вывод должен выглядеть примерно так:
Настроить Plex Media Server
Перед запуском мастера установки Plex создадим каталоги, в которых будут храниться медиа-файлы Plex:
Сервер мультимедиа Plex работает как пользовательское который должен иметь права на чтение и выполнение файлов мультимедиа и каталогов. Чтобы установить правильное владение, выполните следующую команду.
Вы можете выбрать любое место для хранения мультимедийных файлов, просто убедитесь, что вы установили правильные разрешения.
Теперь мы можем приступить к настройке сервера. Откройте браузер, введите и вы увидите следующий экран:
Теперь, когда вы завершили работу с мастером установки, вы можете приступить к изучению параметров Plex и всего, что он может сделать.
Обновление Plex Media Server
После выпуска новой версии вы можете обновить пакет Plex Media Server с помощью стандартного средства обновления программного обеспечения настольного компьютера или запустив в своем терминале следующие команды:
Вывод
вы узнали, как установить Plex Media Server на Raspberry Pi и как создать медиа-библиотеку.
Теперь вы можете установить приложение Plex на свой Android, iPhone, Smart TV, Xbox, Roku или любое другое поддерживаемое устройство. Вы можете найти список поддерживаемых приложений и устройств на странице загрузок Plex или просто установить приложение из магазина приложений устройства.
Для получения дополнительной информации посетите официальное руководство Plex Quick-Start и страницу документации Plex.
Plex Media Server Raspberry Pi
Plex — это сервер потокового мультимедиа, который позволяет вам организовывать ваши коллекции видео, музыки и фотографий и передавать их на все ваши устройства в любое время и из любого места. Из этого туториала Вы узнаете, как установить Plex Media Server в Debian 9.
В этом уроке мы познакомим вас с установкой Plex Media Server в Ubuntu 18.04. Plex — это сервер потокового мультимедиа, который позволяет вам организовывать ваши коллекции видео, музыки и фотографий и передавать их на все ваши устройства в любое время и из любого места.
Plex — это сервер потокового мультимедиа, который объединяет все ваши коллекции видео, музыки и фотографий и передает их на ваши устройства в любое время и из любого места. В этом руководстве мы покажем вам, как установить и настроить Plex Media Server в CentOS 7.
Установите клиент Plex Android: что вам нужно
Давайте на минутку предположим, что ваш сервер уже настроен со всеми вашими медиа, ожидающими потоковой передачи. В этом случае все, что вам нужно сделать, это убедиться, что ваш сервер Plex работает, и перейти на ваше устройство Android. Для этого урока я использовал планшет, но, конечно, вы также можете использовать медиа-проигрыватель Android, такой как телевизор NVIDIA SHIELD или SkyStreamX 4. Если вы не знаете, как установить медиа-сервер Plex, вы можете установить Plex на Windows 10, если вы следуете нашему руководству по этой теме.
Захватите свое устройство Android и отправляйтесь в Play Store, чтобы скачать Plex из Google Play. Чтобы иметь возможность установить клиент Plex Android, введите в поле поиска. Вы увидите следующий экран:
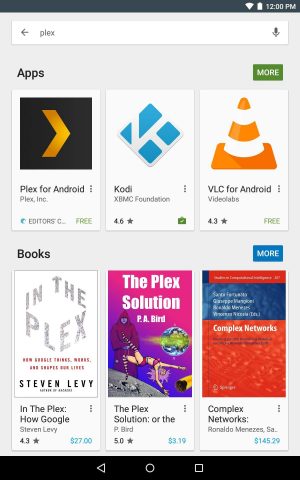
Найдите Plex и коснитесь его значка, чтобы начать установку клиентского приложения Plex Android.
Нажмите, и вы попадете на экран приложения, где вы можете установить клиент Plex Android на потоковое устройство, просто нажав кнопку.
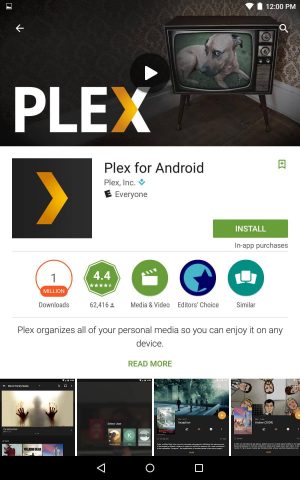
Нажатие на кнопку установки запустит автоматический процесс и позволит вам быстро запустить Plex на вашем Android-устройстве.
Подождите немного, и вы увидите, что кнопка меняется с на . Это указывает на то, что клиент медиа-центра Plex был успешно установлен. Просто нажмите, чтобы запустить медиа-клиент Plex. После того, как вы успешно установите Plex Android клиент на свое устройство и откроете его, вы увидите экран уведомлений, где вам нужно нажать .
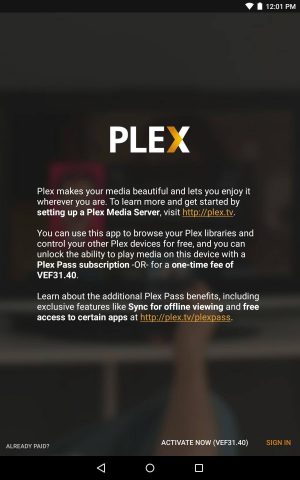
Plex сообщит вам, что есть платная версия; конечно, в вашей местной валюте.
Предполагая, что вы создали учетную запись Plex при настройке сервера, подключиться к серверу Plex будет так же просто, как войти в клиентское приложение. После того, как вы запишите свое имя пользователя и пароль, нажав на оранжевую кнопку, вы войдете на свой сервер. Теперь вы можете просматривать любой контент, который вы могли сохранить и настроить в приложении сервера Plex.
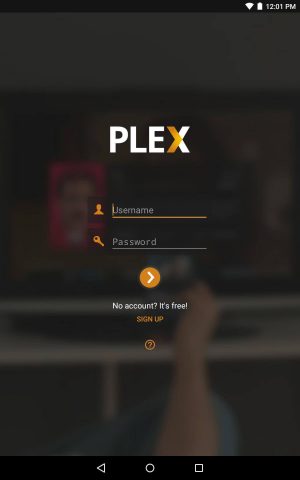
Просто введите имя пользователя и пароль и нажмите эту оранжевую кнопку. Позже вы можете решить, получить ли платную версию или нет.
И это в значительной степени это! Имейте в виду, что вы сможете просматривать свои медиафайлы даже из-за пределов своей домашней сети, если вы создали имя пользователя и пароль, поэтому я бы сказал, что это правильный путь. Также будьте осторожны с сопутствующими расходами на использование Plex, поскольку версия, которую вы устанавливаете с помощью этих шагов, является ознакомительной версией; Вы можете просматривать свою библиотеку и мультимедиа, но только смотреть до одной минуты воспроизведения, и изображения будут иметь водяные знаки. Вы также можете установить неофициальные каналы Plex, чтобы еще больше расширить возможности, предлагаемые вашим медиацентром Plex. Установите Android-клиент Plex сегодня, в конце концов, попробовать его бесплатно!
Источник записи: https://www.smarthomebeginner.com
What are the Plex requirements?
Plex Media Server
For the Plex Media Server, you will need to pick a device on which to install and run it. Your options are:
- A PC, Mac, Linux, or FreeBSD computer
- Nvidia Shield TV Pro (2019) or Shield TV (2017/2015)
- Netgear Nighthawk X10 router
- Or, one of the (NAS)
Whichever one you choose, a wired network connection for both your server machine and your client device is recommended. A sufficiently fast Wi-Fi network (routers and devices that support 802.11 AC are best) can work too, but you’ll need excellent signal strength to support streaming in 4K/HDR.
Since the Plex Media Server does the lion’s share of the work involved in organizing and playing back your media, a sufficiently powerful device is important for the best experience. Here’s Plex’s support page that discusses the minimum requirements; it’s a good place to start.
If you only plan to watch one video at a time and you’re not planning to share your Plex library with other users, an inexpensive NAS or a Shield TV might do the trick. However the moment your needs become more demanding, you’re probably going to want to run your server on a desktop or laptop machine.
If you’re unsure what you should use, the Plex user forums are a great place to ask questions and get advice.
Plex Client (Player)
You can run the Plex client app on just about any device that’s out there, so the odds are good that you already own a compatible one. But if you’re thinking of buying a new streaming device anyway, we recommend the Roku Streaming Stick+, Apple TV 4K, or Nvidia Shield TV, for the best Plex experience.
Those with Dolby Atmos home theater systems may want to read our How To Know If You’re Getting Dolby Atmos Sound guide as it contains some considerations for Plex users who want to ensure they get Dolby Atmos support.
Удаление сервера Plex
Если ваш сервер Plex работает странно, вы можете удалить его и создать новый. Вы потеряете весь доступ к библиотекам на сервере, но файлы мультимедиа на вашем компьютере не будут удалены.
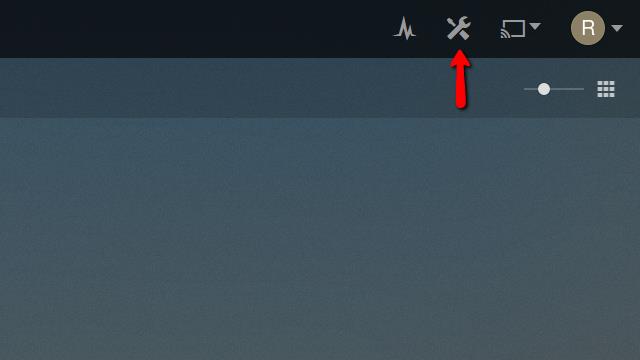 Для начала откройте веб-клиент и нажмите настройки значок в правом верхнем углу.
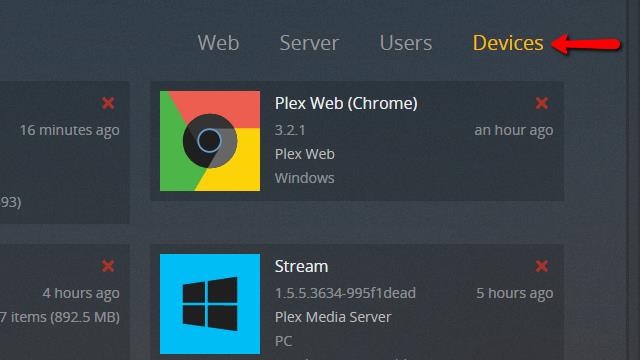 После открытия страницы настроек нажмите приборы пункт меню в правом верхнем углу экрана. Откроется список всех утвержденных устройств, подключенных к вашему серверу Plex, а также самого сервера..
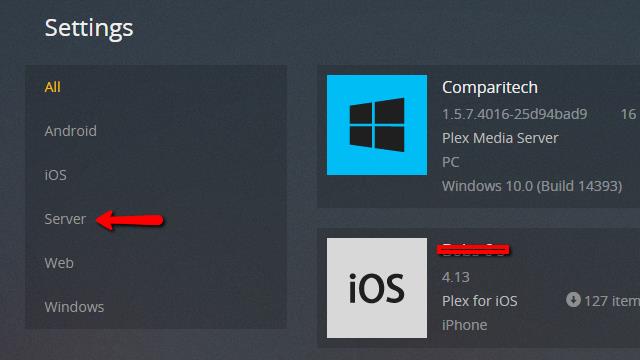 Затем нажмите сервер пункт меню в левой части экрана, чтобы отфильтровать список устройств для отображения только серверов Plex.
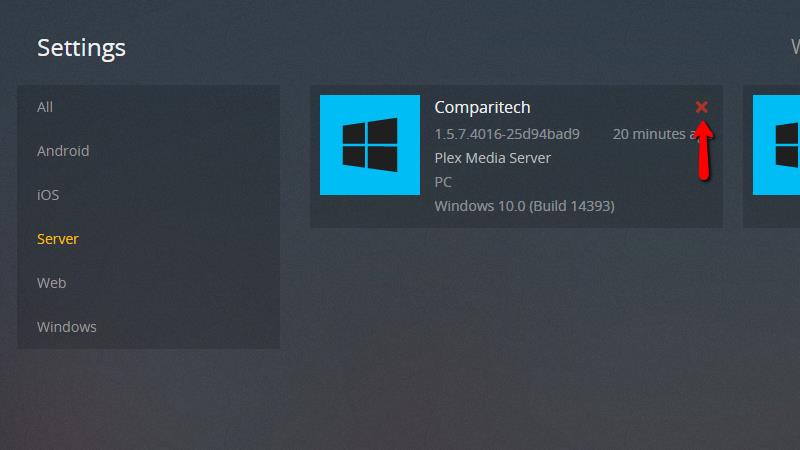 Найдите сервер, который вы хотите удалить, и нажмите Красный х как показано выше.
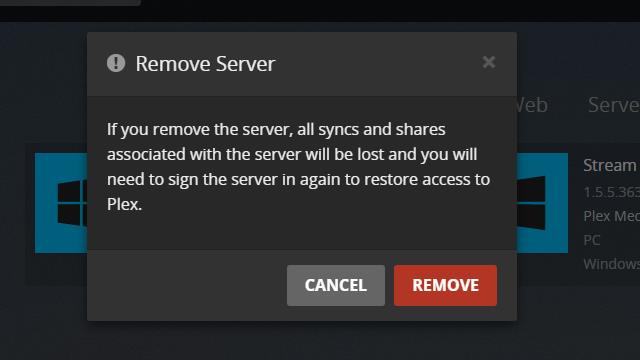 Наконец, появится предупреждение. Если вы уверены, что хотите удалить сервер Plex, щелкните удалять кнопка.
Как и при удалении библиотеки, кнопка «Удалить» изменится на счетчик хода выполнения. Когда он будет завершен, ваш сервер Plex будет удален. Вам может потребоваться обновить веб-клиент, прежде чем будут отображены изменения.
Collection Inline library display options
It’s possible to “collapse” collections for TV and movie (including “Other Videos”) libraries so that an entry for the collection appears inline with other items when browsing your library. This can be set or changed on the Advanced tab when creating or editing the corresponding library.
Setting options:
- Disabled: Don’t display collections inline at all, show items. Regardless of individual collections settings, they will only be shown in the libraries collection tab.
- Hide items which are in collections: If an item belongs to a collection, do not show the item in the main library when browsing. Entries for collections are shown inline.
- Show collections and their items: Entries for collections are shown inline and items belonging to a collection also still appear in the main library when browsing.
When enabled, these “inline collections” will only appear when the library is sorted by Title/Name. For TV libraries, it applies only when viewing the library by shows (sorted by title) and not episodes or seasons.
Related Page:
Remote access and library sharing
One of the most powerful features of Plex is the ability to configure the Plex server for remote access. It takes a bit of fiddling to get this set up correctly because you’ll need to adjust your router’s firewall settings, but once it’s configured, you’ll be able to use the Plex client on your phone or tablet to stream your personal media library from anywhere in the world — including live TV and recorded shows if you have that enabled.
Plex has a detailed set of remote access instructions so we won’t repeat them here, but it boils down to two or three steps:
- Configure your modem to send remote access requests to your router if they are not the same device
- Configure your router to send remote access requests to the machine on your network that hosts your Plex Media Server
- Configure your Plex Media Server to respond to those remote access requests
If you want to share your Plex library with friends and family (who don’t live with you), you’ll need to configure remote access first.
Inside the settings for your Plex Media Server, you’ll find a section called Users and Sharing. Within that screen, you can add additional users for the people who live with you, as well as giving access to friends via the Shared Libraries option.
For each Plex user you invite, you can choose which server (if you have more than one) and which libraries (movies, TV, etc) they can access. If you have a Plex Pass subscription, you can also let these users download and sync your content to their devices, and upload their photos to your server.
You can see what these users are watching in real-time as well as being able to see a history of what they’ve watched, within the Activity dashboard for your server.