Выполнение основных задач в графическом редакторе gimp
Содержание:
- Releases
- Multi-layer selection
- Чем Gimp хорош?
- Introduction to GIMP
- Работа с программой
- darktable as Raw Processing Plug-in
- Intention
- babl minimum requirement in GEGL and GIMP
- Downloading GIMP 2.10.24
- What’s next
- User Interface
- Miscellaneous
- Source for version 2.99 (Development)
- Курсы и книги по работе с GIMP
- How To Submit Your Changes
- Changing the Size (Filesize) of a JPEG
- Как пользоваться инструментами редактирования GIMP
- Step 5
- Paint Select tool
- Как пользоваться редактором GIMP
- Pros and cons of various images formats from a GIMP perspective
Releases
When do you release the next version of GIMP?
We release both updates to the current stable version and development versions.
We cut new updates of the stable version in two cases: 1) some newly introduced
bug is knowingly affecting a lot of users; 2) the amount of improvements and
bug fixes is large enough to justify an update — typically, a few
dozens of each, but there is no rule.
Currently, we are working on GIMP 3.0 that will be using the GTK+3 user
interface toolkit and feature a lot of under-the-hood work. We also backport as
many changes as possible to the 2.10.x branch so that you would get them as part
of bugfix releases. We make 2.10.x releases on a regular basis, usually once
in one or two months.
Why can’t you announce dates of future releases?
We are a team of volunteers with day jobs, families, and personal interests
beyond development of software. Given that, we try to avoid the situation when
we cannot deliver a release, because something else at work/in family came up.
Instead we provide a feature-based roadmap
that roughly outlines, in what order we will be implementing various popular
requests made by users.
Aren’t you interested in doing paid development of GIMP via crowdfunding?
We already have jobs we love. However we actively encourage personal
fundraisers by trusted contributors. There are two such campaigns running at
the moment. You can learn more about them on the
Donate page.
If you are willing to launch a campaign and develop some features for GIMP,
talk to us about changes you are about to propose. We’ll help you to flesh
out your idea and promote it to a larger community.
Will you release GIMP for Android or iOS devices?
Apps for mobile devices imply a different approach to designing interfaces.
Since most of GIMP’s source code is related to the user interface one way or
another, it means that we would have to design and then develop a whole new
application. Given the current manpower, we’d rather focus on delivering a
great image manipulation program for desktop users.
However, we are interested to consult 3rd party developers willing to make a
free/libre GIMP-branded image manipulation program for Android. As for iOS,
please note that GIMP is licensed under GNU GPL v3+ which conflicts with
Apple’s Terms of Service. For a full story, please read
this article
by Richard Gaywood.
Multi-layer selection
Multi-item selection in the dockable comes with common key
interactions for multiple selection such as: for range
selection or for selection modification. These interactions clashed with some features we had on layer and mask thumbnails.
For instance one could end up changing the selected layers while in the
same time create or remove layer masks by mistake.
Since the multiple layers feature is just too important and these
generic interactions are so well established across software (hence their
removal or replacement not even being a question), we made the following
design choices:
- No special click features in the dockable should be based
only on , or modifiers, but it could
include these if any additional modifier (e.g. ) comes to play. - We moved all existing features that didn’t follow such rule to the
combination. - For cases where all modifier combinations were taken, we removed
click features based mostly on seniority (e.g. Alpha to Selection
has been around pretty much since inception of GIMP while mask creation
utilities were only added a few years ago). - Actions are now based on exact modifier combinations to avoid feature
clashes (e.g. should not trigger both the
and simple actions). - Actions done when clicking a thumbnail with modifiers do not change
the selection and will now operate on the clicked layer or mask, not
on selected layers/masks. This makes these actions more useful as they
are not redundant anymore.
The concrete consequential changes are as follows:
-
on a mask thumbnail to enable/disable the layer mask has
been changed to . The other mask action,
for showing the mask, stays the same. -
and actions on a layer thumbnail to
respectively add (with last used values) or remove a layer mask have
been removed. Indeed all combinations are already taken on
layer thumbnails (for “Alpha to Selection“, “Add Alpha to
Selection“, “Subtract Alpha from Selection” and “Intersect Alpha
with Selection“, respectively on , ,
and ; we also took the
opportunity to improve the Undo labels for these actions, improving
discoverability on random clicks) and these “Add/Remove mask”
actions were much newer (2.10.0) anyway. - Thumbnail popups on long click do not happen anymore when any modifier
is being held, hence removing a distraction when this was obviously
not what the click was for.
Чем Gimp хорош?
Итак, почему Gimp лично мне удобен?
- Gimp, несмотря на свою бесплатность является программой для профессиональной обработки цифровой фотографии. Статьи профессиональных фотографов, использующих эту программу, я читала в журнале LinuxFormat. На официальном сайте этого журнала можно почитать бесплатно старые номера в электронном виде. Итак, профессиональные фотографы используют Gimp в своей работе. Этот графический редактор поддерживает достаточно большое количество форматов изображений (более 30), имеет возможности работы со слоями, кистями, масками, фильтрами. По крайней мере, на мой взгляд, все, что нужно для обработки фотографии, там имеется. Даже больше.
- Gimp имеет интуитивно понятный интерфейс, гибкую систему настроек «под себя». Можно, например, самостоятельно настраивать горячие клавиши, задавать параметры сохранения изображения и другое. Все это достаточно просто осуществляется по мере необходимости.
- Gimp вполне корректно распознает и обрабатывает формат .psd (поддерживающий слои), который по умолчанию использует фотошоп. Таким образом, работа с готовыми бесплатными рамками, шаблонами и т.п. полностью доступна и в Gimp.
- Gimp имеет полноценную русскоязычную документацию. По большому счету, каждый из вас, уважаемые читатели, может полностью самостоятельно освоить эту программу по документации. Однако, если вы вообще никогда не работали с растровой графикой, то по документации работать достаточно сложно. Тут нужен самоучитель.
- Наконец, решающим для меня фактором была именно бесплатность Gimp. Платить за AdobePhotoshop мне не по карману, а использовать взломанную версию совесть не позволяет. Вот как-то резко изменилась моя совесть. Одновременно с повсеместным введением бесплатных программ на работе. Институт тоже посчитал, что платить за фотошоп не имеет смысла. Как я теперь понимаю, правильно посчитал. Для нашей работы за глаза хватает Gimp.
Introduction to GIMP
GIMP is an acronym for GNU Image Manipulation Program. It is a freely distributed program for such tasks as photo retouching, image composition and image authoring.
It has many capabilities. It can be used as a simple paint program, an expert quality photo retouching program, an online batch processing system, a mass production image renderer, an image format converter, etc.
GIMP is expandable and extensible. It is designed to be augmented with plug-ins and extensions to do just about anything. The advanced scripting interface allows everything from the simplest task to the most complex image manipulation procedures to be easily scripted.
GIMP is written and developed under X11 on UNIX platforms. But basically the same code also runs on Windows and macOS.
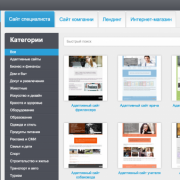
Работа с программой
Интерфейс программы несколько непривычен и может быть сложным для новичков. По умолчанию он состоит из трёх отдельных окон: главного окна с рабочей зоной, в которой вы можете обрабатывать изображение или создавать новые рисунки, а также двух окон, в которых можно выбирать необходимые для работы инструменты.
Именно такое расположение и вызывает больше всего дискомфорта. Чтобы переключаться в более привычный однооконный режим, особенно если раньше вы хоть немного работали в Photoshop, в главном окне программы перейдите в меню «Окна», после чего активируйте функцию «Однооконный режим».
После этого два окна инструментами, которые располагались по бокам экрана, примкнут к основному окну и станут его элементами.
Теперь давайте посмотрим, какую структуру имеет рабочий экран редактора Gimp.
- В самом верху окна располагается главное меню с такими вкладками: Файл, Правка, Выделение, Вид, Изображение, Слой, Цвет, Инструменты, Фильтры, Окна и Справка. В каждой из этих вкладок располагаются другие функции, которые можно использовать для работы.
- В левой стороне экрана, в его верхней части, располагается панель инструментов, в которой можно выбрать все необходимые для обработки графического файла инструменты: перемещение, поворот, вырезание, дублирование, карандаш, кисть, ластик, заливка, штамп, текст, а также многие другие.
- Ниже панели инструментов располагается панель настройки инструмента. Она предоставляет возможность настройки отдельного инструмента и активируется при его выборе в панели выше. Здесь же можно создать несколько профилей настройки каждого инструмента.
- В правой части экрана вверху располагается панель управления слоями, контурами, каналами и историей ваших изменений.
- Чуть ниже можно выбирать различные кисти, градиенты, а также текстуры.
- В самом низу предоставлены инструменты управления профилями кисти. Можно также создать несколько профилей с настройками для различной ситуации.
Чтобы отредактировать готовое изображение, нажмите «Файл» — «Открыть».
Для создания нового нажмите Ctrl + N либо же «Файл» — «Создать».
После окончания изменений сохраните файл в желаемом формате.
darktable as Raw Processing Plug-in
On Linux, GIMP is now capable of using darktable for pre-processing raw images from DSLRs (Canon CR2, Nikon NEF etc.). darktable is an amazing project whose developers stick around at our IRC channel and even contribute to GIMP (most recently, they added reading various metadata from EXR files).
Note that the plug-in is activated only when darktable is built with Lua support. Make sure your build of darktable for Linux is feature-complete.
It is still possible to use other raw development plug-ins like . For cases when multiple plug-ins are installed in your system, we intend to add a preference option.
Intention
On this page, the first section of our ever growing (?) collection of tutorials, I will demonstrate the basic operation you will need to perform over and over again in your life as a computer artist: Generate isolated parts of a picture and combine them with a random background. What we want to achieve in this example is to generate a 3-dimensional text logo flying (and movable) over the background (a simple uni-color layer in our case, but you will easily see that you could use any other (stack of) layers/images instead. Start with a plain white picture, black as the foreground color and open the layer dialog!
babl minimum requirement in GEGL and GIMP
Meanwhile babl minimum requirement in GEGL has been downgraded to 0.1.78
(same as in GIMP) because newer versions require too recent
build tool, which is unfortunately still not available on some
distributions. In order not to prevent people from benefiting from a
newer version of GEGL and GIMP, we refrain on purpose to bump the
minimum requirement for a bit even though we highly encourage every
packager to use the last version of babl when possible. Many fixes and
improvements were also made available in recent versions.
Downloading GIMP 2.10.24
As usual GIMP 2.10.24 is available on GIMP official website
(gimp.org):
The Linux flatpak has already been published so that anyone who
installed it previously should have an update proposed by their
software manager (or from terminal: flatpak update org.gimp.GIMP).
Note: our flatpak now supports only and (i.e. the
64-bit variants of the x86 and ARM architectures). In particular
(32-bit x86) had been dropped quite some time ago by the Freedesktop
runtime we depend on. This is now the (32-bit) support which has
been dropped (even though 32-bit hardware is still being released or
often 64-bit board computers are sold with a 32-bit OS). We tried to
hold back a bit, for more than 6 months even, but now that the older
runtime we used is unsupported, updating is the only sane choice.
For the record, our i386 flatpak is therefore stuck at GIMP 2.10.14
and our ARM flatpak is stuck at GIMP 2.10.22 with a few thousands
downloads for this last version of GIMP i386 and a bit more than 400
for the last version of GIMP ARM.
-
The Windows installer is already available. Most mirrors have picked
it up, but some still haven’t. So if the download fails, just try to
click the button again. -
The macOS DMG package will be published in the next few days once our
packager can make the time.
What’s next
The development continues very strong on the development branch and we
can clearly see the shift towards more work on GIMP 3 as 2.10.x release
become more about robustness and less about new features (though we
still continue to backport features when it can be done without too much
additional work).
We will give more details on this side of development when we will
release the upcoming 2.99.6 development version.
Finally, please don’t forget you can donate to the project and personally
fund several GIMP developers, as a way to
give back and accelerate the development of GIMP.
User Interface
Toolbox Menubar Removed
![]()
The toolbox menubar has been removed and merged with the image window menubar. To be able to do this a window called the empty image window has been introduced. It hosts the menubar and keeps the application instance alive when no images are opened. It also acts as a drag and drop target. When opening the first image the empty image window is transformed into a normal image window, and when closing the last image, that window becomes the empty image window.
Toolbox and Docks are Utility windows
With the empty image window acting as a natural main window, the default window hints for the Toolbox and Docks have been changed to Utility window. This enables window managers to do a much better job of managing the GIMP windows, including omitting the Toolbox and Docks from the taskbar and ensuring that the Toolbox and Docks always are above image windows.
Ability to Pan Beyond Image Border

It is now possible to pan beyond the image border, making image window navigation much less constrained. It is no longer a problem to use the edge of a brush on the edge of an image while being zoomed in, and one can adapt the canvas to any utility windows covering parts of the image window.
Minor Changes
- Renamed Dialogs menu to Windows.
- Keep a list of recently closed Docks and allow reopening them.
- Make opening images in already running GIMP instances work better on Windows.
- You can now enter the image zoom ratio directly in the status bar.
- Added support for using online help instead of a locally installed GIMP Help package.
- Make it possible to lock tabs in docks to prevent accidental moving.
Miscellaneous
Plug-in Development
GIMP 2.8 also further enhances its scripting abilities. For example, API changes to support layer groups have been made. Here is a list of new symbols in GIMP 2.8.
GEGL
The projection code which composes a single image from layers has been ported to GEGL. This includes the layer modes, as well as support for layer groups. Also, preparations have been made for better and more intuitive handling of the floating selection.
Developers: Michael Natterer, Martin Nordholts
Roadmap
The GIMP developers now maintain a roadmap for GIMP development found here: https://wiki.gimp.org/index.php/Roadmap
Source for version 2.99 (Development)
GIMP releases available from gimp.org and its mirrors contain the source code and have to be compiled in order to be installed on your system.
For instructions, how to build GIMP from source code, please see this page.
GIMP 2.99.8 is now available at https://download.gimp.org/mirror/pub/gimp/v2.99/.
To allow you to check the integrity of the tarballs, here are the sums of the latest releases:
-
gimp-2.99.8.tar.bz2
(sha256): - dd916bd3474ef2efc652a0510280977ab8ea95e3d95d918394b0662261c32aae
-
gimp-2.99.6.tar.bz2
(sha256): - 8d264b28445a3df2b940f30ee0b89b469255e975e8563b889fd57fb2f58f66a0
-
gimp-2.99.4.tar.bz2
(sha256): - df25c149c78f265181809d7685a9470a62c3c2f08c05e8498a4d5c86a048a5b2
-
gimp-2.99.2.tar.bz2
(sha256): - 39dc99a1581bbaafa9d6686bf246f7be12b0788ebfc37d185dea5bdae9c3ae73
GIMP help files are available at https://download.gimp.org/mirror/pub/gimp/help/.
Please consider using one of the mirrors listed below.
Курсы и книги по работе с GIMP
В сети существует множество других учебников, но их недостаток в том, что они не всегда успевают за обновлениями программы.
Есть множество курсов, например, целый сайт uroki-gimp.ru, посвящен этой утилите и работе с ней.
Программа от Академии ALT Linux на площадке Интуит. Он содержит 15 уроков GIMP, несколько тестов, дополнительные материалы, также есть самоучитель, на котором основан курс. Программа курса подойдет новичкам, пользователь познакомится с разными графическими форматами, способами обработки картинок, созданием изображений.
На площадке gimpart.org собрано множество уроков, позволяющих познакомится с основными понятиями и инструментами, используемыми при работе с GIMP. Этих бесплатных курсов достаточно чтобы научится простой обработке фотографий, настройке программы.
Программа на mooc.ru рассчитана на детей старше 10 лет. Ученики познакомятся с GIMP, научаться обрабатывать фотографии, рисовать в нем. Курс включает практические занятия и домашние задания, которые помогут разобраться с программой. Начальные сведения из области веб-дизайна сделают GIMP уроки максимально интересными для подростков, они смогут оформить группу в соцсети или создать макет сайта. Курс проходит полностью онлайн.
Для людей владеющих английским доступно более 30 курсов на площадках Udemy, Coursera. Они посвящены различным направлениям дизайна: работе фотографиями, подготовке сайтов и обложек для книг, созданию собственных картин и прочим вещам. Есть разные уровни сложности, от самых простых, понятных даже детям, до рассчитанных на профессионалов, которым нужно расширить свои знания и навыки.
How To Submit Your Changes
When you’re ready, we suggest to create a fork of the repository , make your edits to the fork and submit a . Make sure you select the item of
“Allow commits from members who can merge to the target branch.”, this will allow the developers to do additional changes or to give
feedback in a simpler way.
The GIMP community is a friendly one, but it probably is still worth saying this: Try not to take critiques personally. We all just want GIMP to be the best that it can be. Once approved, your edits will be merged into the code base, making you an official GIMP contributor. And if you keep up the good work, not only will this process get easier with practice, your administrative privileges in GIMP development will also increase too.
Changing the Size (Filesize) of a JPEG
You can also modify the filesize of an image when exporting it to a format like JPEG. JPEG is a lossy compression algorithm, meaning that when saving images to the JPEG format, you will sacrifice some image quality to gain a smaller filesize.
Using the same Horsehead Nebula image from above, I have resized it to 200px wide (see above), and exported it using different levels of JPEG compression:
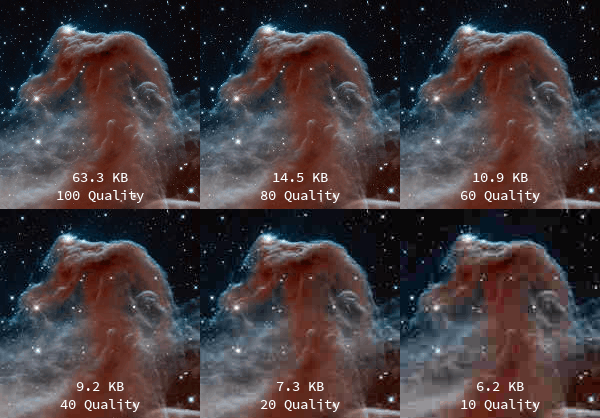
Comparison of different JPEG compression levels.
As you can see, even at a quality setting of 80, the image is significantly smaller in filesize (77% size reduction), while the image quality is still quite reasonable.
When you’ve finished any image modifications you are doing, and are ready to export, simply invoke the export dialog with:
File → Export…
This will invoke the Export Image dialog:
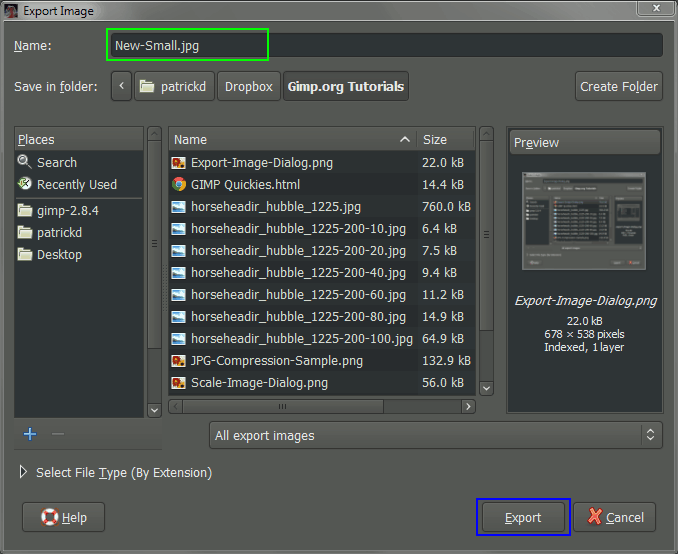
You can now enter a new name for your file here. If you include the filetype extension (in this case, .jpg), GIMP will automatically try to export in that file format for you. Here I am exporting the image as a JPEG file.
You can also navigate to a new location on your computer through the Places pane, if you need to export the file to a different location. When you are ready to export the image, just hit the Export button.
This will then bring up the Export Image as JPEG dialog, where you can change the quality of the export:
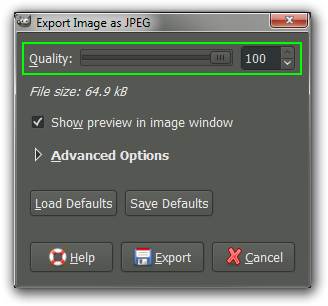
From this dialog you can now change the quality of the export. If you also have the “Show preview in image window” option checked, the image on the canvas will update to reflect the quality value you input. This will also enable the “File size:” information to tell you what the resulting file size will be. (You may need to move some windows around to view the preview on the canvas in the background).
When you are happy with the results, hit the Export button to export.
To see more details about exporting different image formats, see Getting Images out of GIMP in the manual.
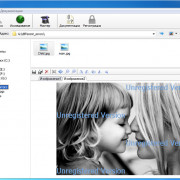
Как пользоваться инструментами редактирования GIMP
Рассматриваемый графический редактор характеризуется набором полезных инструментов для профессионального редактирования и обработки фотографий и картинок.
1. В главном меню доступно управлением изображением на глобальном уровне. Здесь переключаются окна, слои, цветовая гамма, фильтры – стандартные для работы инструменты.
2. С помощью следующего меню мастер переходит между фотографиями, который открыты в программе, для вставки или слияния.
3. Панель инструментов содержит полезный набор функций, чтобы выделить область, повернуть и увеличить изображение или текст, изменить цвет, закрасить отдельные элементы и так далее. Чтобы воспользоваться всплывающей подсказкой, наводим указатель мыши (курсор) на инструмент и ждем 1-2 секунды – программа отобразит наименование функции.
4. После выбора инструмента открывается соответствующее меню для настройки параметров выбранной функции. Для кисти – толщина, цвет, варианты закраски, для текста – шрифт, размер и так далее.
5. В правом верхнем меню также содержатся кисти, текстуры и шрифты.
6. Следующий раздел обрабатывает слои, цветовые каналы и выделенные контуры.
Step 5
All we need to do now is to save the animation. You can choose to go for the GIF format as I did with the image above, but the filesize is too huge to be widely accepted on the web anyway, so you can consider using a regular animation format like avi (needs special version of the xanim player from Loki) or mpeg1 / 2.
To save the animation as gif, first apply the video/frames to image function. This will create a single multi-layered image with the specified delay. Now apply the animation optimize filter (not that useful in this case) and finaly index the image to 16 color without using any color dithering. The file will still be about 170kB, so it’s huge. You can consider trying some specialised optimisation software like GIFsicle. Maybe MNG with its sprite based animation will make it more suitable for the web. Rendering will happen on the browser side and I’m very excited about the idea.
Last thing I can’t help myslef not to mention is to thank Wolfgang Hofer for making such a great plugin that takes GIMP functionality to a new level. With GIMP 2 rendering engine we’ll probably see more “applications” like that using GIMP’s features to provide us with another area of application. I’d also like to thank the GIMP developer community to work hard every day to give us the best web gfx tool there is. If you just started to experience GIMP, don’t hesitate and drop by up at #gimp on irc.gimp.org:6669.
Text and images Copyright (C) 2002 Jakub Steiner and may not be used without permission of the author.
Paint Select tool
The tool is still listed as experimental as it is not yet deemed
finished by its contributor, Thomas Manni. Nevertheless it has already
improved quite a bit and starts getting really interesting.
Several bugs were fixed and selection is now viewport-based which allows
it to be much faster already depending on the zoom. Yet this is not even
the expected optimization which is planned to make the tool work really
fast. Expect more to come!
This work has been happening both on GIMP code base and on our graphics
engine library’s code base, GEGL.
Copy-pasting Wilber in a few seconds with the Paint Select tool (realtime GIF, faster as zoomed-in) — GIMP 2.99.6
As a side note, the Paint Select tool now has its own icons, original
design by Yash Arya, with collaborative work and design finalisation by Aryeom.
New Paint Select tool icon by Yash Arya and Aryeom — GIMP 2.99.6
Как пользоваться редактором GIMP
У начинающих пользователей возникает вопрос: как пользоваться GIMP?
Основная часть окна редактора отведена под область редактирования: там можно увидеть любые отображаемые изменения. По обе стороны от окна редактирования можно отыскать удобные панели инструментов. Там же можно зайти в панель настроек, посмотреть историю действий, выбрать параметры конкретного инструмента. Прямо как в фотошопе!
Рабочее поле или так называемый холст
Пример работы в GIMP
Посмотрите один из примеров работы в редакторе. Думаю вам понравится.
Как работать в GIMP 2.10?
Watch this video on YouTube
А если хотите подробнее научится работать в gimp, то у меня есть бесплатный видеокурс для начинающих
и электронная книга
Работа с фотографиями в GIMP
Основными задачами, почему стоит обратиться к программе GIMP, являются кадрирование и редактирование изображений. Посредством актуальных инструментов можно легко устранить недочеты заваленного горизонта, эффект красных глаз, неправильную экспозицию. Также редактор позволяет создавать из фотографий художественные композиции или дизайнерские коллажи различной сложности. Можно сделать даже превью для видео на ютуб.
Как сделать превью для видео YouTube с помощью GIMP
Watch this video on YouTube
Чтобы привести свои фото в безупречный вид, улучшить их качество, нам стоит воспользоваться базовым набором манипуляций. Это кадрирование, исправление уровня яркости, коррекция четкости. Все эти инструменты можно настроить, исходя из своих целей и комфорта.
Если есть потребность применить более продвинутые варианты работы с изображениями, помогут в этом инструменты выделения, при помощи которых легко удалить фрагменты фото.
Также можно изменить размеры, повернуть или отзеркалить изображение. Работая с кривыми, мы настроим баланс цветопередачи, показатели яркости и контрастности. Подробные уроки про кривые:
Есть в программе и фильтры, чтобы добавить фотографии художественный эффект.
Если фото вышли засвеченными из-за съемки в яркий солнечный день, можно поработать с инструментом Тон/Насыщенность. Посредством ползунков можно изменить тон снимка, степень освещенность и насыщенности.
При размытом изображении рационально использовать технику повышения резкости.
Сделав фото в условиях недостаточного света или с короткой выдержкой, мы получим кадр с повышенной зернистостью. Исправить ситуацию поможет инструмент Выборочное Гауссово размывание либо использования фильтра Удаление пятен.
Избавиться от эффекта красных глаз можно при помощи одноименного фильтра.
При проблемах с выдержкой лучше применить регулировки яркости и контраста. Также исправить недочеты выдержки можно при помощи инструментов Уровни или Кривые. Последний подразумевает перемещение управляющих точек кривой, которые создают оптимальную яркость.
Как пользоваться программой, если надо убрать нежелательный объект из изображения? Благодаря специальному фильтру Resynthesizer можно избавить кадр от лишних предметов.
Рисование в программе GIMP
Помимо работы с изображениями бесплатный графический редактор позволяет создавать свои изображения. Открыв новое изображение, можно при помощи инструментов Кисть и Карандаш. Также стоит попробовать инструмент «Аэрограф», воспользоваться градиентом, каллиграфическим пером, заливкой, убирая лишнее ластиком. Данная тема мало представлена на моем блоге, так как мы в основном редактируем готовые изображения.
При необходимости, в программу гимп для рисования можно установить любой удобный нам набор кистей. Кисти для графической программы можно скачать из сети или в этом разделе.
Таким образом, расширение возможностей программы зависит только от фантазии и мастерства пользователя.
Гимп отлично подойдет как для любительского рисования, так и для проработки векторных иллюстраций. Легко настроить инструменты графического редактора и под выполнение серьезных профессиональных заданий, создавая логотипы, интерфейсные элементы для интернет-страниц любой сложности.
Pros and cons of various images formats from a GIMP perspective
XCF
The Native GIMP image format. Everything is saved: layers, selections, channels, paths and more.
Cons
- Not a “display” format, even if you can find codecs to display thumbnails of XCF image in file explorers.
- Bulky.
- Color channels are coded in 8 bits (in GIMP 2.8).
Recommended uses
Saving all GIMP work.
JPG
- Compresses the files quite efficiently.
- Universally supported for display.
Cons
- Compression is “lossy” and it slightly alters the image data. In case of global changes (color, contrast…) repeated file editing will slowly degrade the image quality.
- At good quality levels, compression is invisible in photography, but can be seen (so called “artifacts”) in computer-generated graphics and text.
- Doesn’t support transparency.
- Color channels are coded on 8 bits.
Recommended uses
- Display of photography
- Storage of photography
PNG
- Lossless format, all pixels are kept.
- Supports partial transparency.
- Produces small files with most computer graphics.
- Supported by all browsers.
Cons
- Complex images (photos) are bulky.
- Color channels are coded in 8 bits.
Recommended uses
- Web page widgets: banners, buttons, frames, etc…
- Computer graphics.
- Screenshots (unless this screenshot contain mostly a photo).
GIF
Universally supported for animation.
Cons
- Only 256 colors per image, leads to blocky look.
(a modern variant supports 256 colors per frame, but GIMP doesn’t use it). - Supports transparency but only as fully transparent/fully opaque.
Recommended uses
Small animated images.
(in all other still-image uses PNG is a better alternative, and for bigger animation modern HTML supports video)
TIFF
- Lossless format, all pixels are kept.
- Color channels can be coded in 16 bits.
- Can store several images (layers).
- Supported by all image processing software.
Cons
Can be bulky on complex images.
Recommended uses
Storage and exchange of high quality images.
Cons
- Proprietary (except DNG).
- Content format can change without notice (new camera models), this can impact support by your favorite software.
- Bulky.
- Not suitable for display.
Recommended uses
Storage of camera output, but a secondary copy in some universal format could be a good idea.
There are of course many other image formats, but the formats above cover most uses.
Use them unless you know better, they can usually be converted easily to any other format should the need arise.
GIMP Tutorial — Image Formats Overview by Ofnuts is licensed under a Creative Commons Attribution-ShareAlike 3.0 Unported License.